4 Steps To Make Your Blog Profitable (Without Increasing Traffic)

You’ve tried every blog promotion tactic in the book – but still – traffic never seems to translate into revenue.
Sound familiar?
Here’s the deal:
Your blog can be profitable but you’re going to need to hit the brakes on traffic generation (temporarily!)
The truth is that most bloggers have the equation for profitable blogging backwards.
In this post, I’ll show you a 4 step process that will make your blog profitable without increasing traffic.
Once you’ve implemented the advice in this post, your conversion woes will be over and you can finally begin to see meaningful growth from traffic that translates into revenue.
Step 1: Build your blog sales funnel
If you want your blog to be profitable, you’re going to need a blog sales funnel.
Here’s what it looks like:
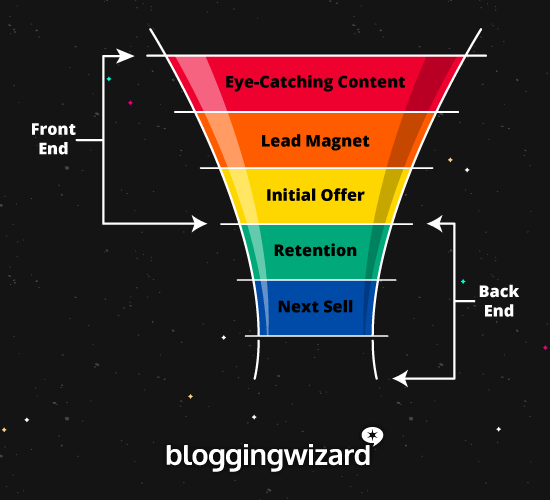
Let’s break it down:
- Eye-catching content – You’re a blogger and you publish great content. This is what you’re already doing. The important thing is that your content strategy supports the rest of your funnel.
- Lead magnet – This could be a chapter from a book, a checklist, swipe file, or something similar. Use it to build your email list.
- Initial offer – This is typically a lower priced product to get people in the door. It’s got to be value packed and at least generate enough revenue to cover expenses/acquisition costs. This could be an ebook or a course.
- Retention/Follow-up – This is where you’ll follow up on the sale with more helpful content, and relevant offers. Nurture your new customers to turn them into future customers.
- Next sell – This is your core offering. Your high ticket offer. With the higher price ticket, you’ll need to offer more value. Intensive courses, membership sites, workshops, and conferences are solid options here.
Note: Need more help? Don’t worry, we’ve got an entire article dedicated to the blog sales funnel.
Once you have your blog sales funnel in place, you’ll be able to scale your traffic and every action you take will be more worthwhile.
Here’s an example:
Daniel Ndukwu wrote a free guest post for Blogging Wizard. He linked to a landing page where people could download his lead magnet within his author bio.
Despite writing the article for free, Daniel still got paid because he had a sales funnel in place. In fact, he earned around $1800 in sales because of that guest post.
How to approach your blog sales funnel
Let’s go through what you’ll need.
First of all, you need to map out your sales funnel. And the best way to do this is to start with your high ticket offer. This could be your flagship course, an intensive workshop, coaching, a “done for you service” or a digital conference (the possibilities are endless).
Each stage of the funnel should lead people to the next logical step. For example, your initial offer needs to make sense for people to purchase after downloading your lead magnet.
Here’s an example of how this could look if I was creating an intensive course on blogger outreach:
- Eye-catching content – This could include blog posts such as “Why Your Outreach Strategy Is Failing And How To Fix It”, “10 Copywriting Tips To Level Up Your Blogger Outreach Strategy” (the list goes on!)
- Lead magnet – A swipe file of our highest converting outreach templates, categorised by type (guest blogging/infographic promotion/PR, etc.)
- Initial offer – This could be an easy to digest course featuring everything students need to know. From researching sites, deciding on tactics, writing outreach emails that convert, and managing outreach campaigns.
- Retention/follow-up – I’d have a series of emails queued up with helpful nuggets of information that’s sent to those who purchased the course. Each email would lead into the “next sell.”
- Next sell – I could offer ongoing coaching, or a “done-for-you” service where I work with brands and audit their outreach process, train their team, create custom resources for them. This would specifically be useful for agencies and in-house marketing teams who need help overhauling their outreach process.
Your blog sales funnel could be a lot simpler and be more passive. For example, with an initial offer that’s an ebook, and a next sell that’s an intensive course (rather than a service.)
Note: You could simplify this process even further by not having your own product at all. For example, your lead magnet could be a free course that promotes another product as an affiliate. This is only usually profitable if you can find a great product with decent commission. Your next sell could simply be a service related to that product. It’s critical that your next sell be the logical next step for people to take.
You’re going to need some other tools and pieces of content to make this funnel fit together, so I recommend using a free diagram tool like Draw.io to map everything out.
This will help you understand what pages you need to create (opt-in pages, sales pages, etc), and any supporting content that will be required for blog posts, or emails, etc.
You’ll also need the following tools:
- Email marketing provider – ConvertKit is one of the simplest to use but there are plenty of others. Check out my roundup of email marketing services to learn more.
- Landing page builder – There are a bunch of WordPress plugins you can use. OptimizePress 3.0 is a great option because they have a funnel builder and checkout builder included. Leadpages is a great option too, but it’s more pricey.
- Payment gateway & product delivery – Depending on what you’re selling, you could choose a simple platform like Gumroad. Or, you could choose a single platform to sell courses, products, and membership offerings such as Podia (they don’t charge transaction fees, hurray!).
Step 2: Remove unnecessary distractions
Your blog will be one of the main ways people will enter your blog sales funnel.
As such, your blog needs to be free of clutter and here’s why:
When there is too much clutter, everything has less impact and the clutter can lead users to confusion over which action to take (this brings us back to the paradox of choice.)
Everything on your blog needs a purpose.
If it doesn’t, then should it be there? Nope. Less is more.
Each element should either improve user experience or help you reach your goals (fill your blog sales funnel).
What should you consider removing?
- Ads that aren’t performing – Google Adsense and similar ads are common place, but is it really worth sending a visitor away from your site for a few cents in return?
- Social media streams – Social networks should be used to generate traffic, not send traffic away when they might not return.
- Search boxes – Check your analytics and see if anyone is using your search box, if they aren’t consider removing it or moving it to your blog’s footer.
- Blog rolls – Linking to other blogs from your sidebar is a nice thought but when you consider that 75% of your visitors may never return, you should probably remove it.
- Badges that don’t mean a thing – Badges are typically used to build trust but the only badges worth using are ones that are fairly exclusive. This ties in to social proof, which I’ll cover in a moment.
- Your sidebar – In some situations, when it’s imperative that 100% focus is on your content, removing your sidebar can do a good job at minimizing distractions. Play this one by ear.
This isn’t a complete list by any means but it’s enough to get you started.
Here’s the bottom line:
If an element on your blog doesn’t offer any benefit, or hinders user experience – consider getting rid of it.
Step 3: Leverage the power of social proof to win trust
In a world where people form first impressions of a website within 50 milliseconds, it’s critical to make that first impression a positive one.
Social proof is a great way to do this. Not just on your landing pages or sales pages but on the rest of your blog too – it all helps.
And you’ve probably seen a million examples of social proof already. Things like testimonials, trust logos, share counts, etc.
So, what is social proof?
It’s a concept based on human psychology. Specifically, how we look to others when deciding on an action to take.
When we see that other people view someone as an authority, we often come to the conclusion that they are an authority.
Now, how can you use social proof on your own blog?
Here are a few examples:
Add trust logos where relevant
Have you been featured on a significant website? Let the world know about it.
I do this a lot on conversion-focused landing pages and homepages. You can see this in action on Blogging Wizard’s homepage, or on my personal blog.

If you haven’t been featured on any noteworthy sites, don’t worry.
There are two easy ways to fix that:
- Start guest blogging – The easiest way to get featured on other websites is to write content for them. Check out my guest blogging strategy article for some pointers.
- Use HARO (HelpAReporterOut) – Journalists that need sources for their stories will post requests using this service. You can sign up for free and become a source.
And remember – noteworthy doesn’t mean you need to be featured on Forbes or another site of that caliber. There will be smaller sites in your niche that will have meaning for your readers – they’re worth contributing as well.
Display share counts on your blog posts
When people can see evidence that your content is getting shared by a lot of people, they’re more likely to share it. And see you as an authority.
I do this on Blogging Wizard with a plugin called Social Snap:
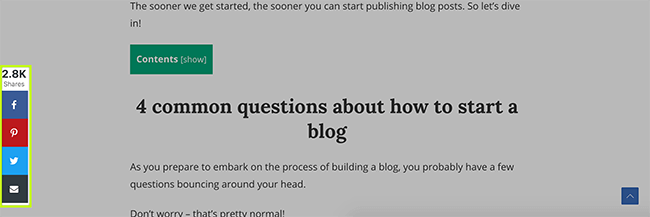
It can be done with other social sharing plugins but Social Snap is my favorite due to its awesome feature set.
Another factor with share counts is that low share counts can cause negative social proof. It comes across like this: “If nobody is sharing this, why should I?” – Sure, there will always be exceptions to this but it’s worth avoiding whenever possible.
Leverage testimonials on important pages, forms, and more
One of the most popular types of social proof (or trust indicators) is testimonials.
Here’s an example from an earlier iteration of the Blogging Wizard homepage:

If you use WordPress, you can easily add testimonials if you’re using a page builder to build your website. Alternatively, there are plugins that make it easy to display testimonials.
And don’t forget, there are plenty of other pages you can add testimonials to – landing pages, checkout pages, pricing pages, opt-in forms, and more.
Boost important metrics with quizzes and contests
Impressive metrics are typically one of the most common types of social proof. Remember, this is about making a positive first impression.
Common metrics to display include:
- Email subscribers
- Blog traffic
- Social media followers
- Social shares
But what if you don’t have much in the way of any of these?
Here’s the good news:
There are two particular content types that can help you increase each of these metrics quicker than other content types.
I’m talking about these:
- Social media contests – Given that there is an incentive to share, follower, and sometimes subscribe, contests are effective. You don’t need to spend much time on content creation, but you will need a great prize (or multiple prizes). Try partnering with a brand and you can often secure prizes for free. These social media contest tools will help you manage most of the process.
- Viral quizzes – You’ve probably taken part in a few of these types of quizzes by sites like Buzzfeed. People love to share them and they don’t take long to create. Follow this tutorial by Colin Newcomer on how to create your own quiz with WordPress.
When using contests and quizzes, try to make them as relevant to your lead magnet and initial offer as possible. That way, you’ll be more likely to attract your ideal customer to your blog.
Note: Need more help with social proof? Check out my article on how to leverage social proof on your blog.
Step 4: Optimize your blog for conversions
At this point, you’ll have your blog sales funnel in place but you need to ensure the rest of your blog is optimized so it can fill your funnel (it’s your best marketing asset.)
Now, it’s time to optimize your blog for conversions – specifically by adding CTA’s (call-to-actions) to key areas of your blog.
What you need to know about CTA’s
If you don’t encourage your readers to take action – they won’t.
So, it’s critical that you add CTA’s to key parts of your blog. They can take the form of buttons, widgets, forms, and more.
Your CTA needs to draw people’s eyes to it, so it’s important to ensure that you use a color that stands out – ideally it shouldn’t be used elsewhere in your blog’s design. If your CTA blends in with everything else, it’s not going to convert.
At a basic level, there will be three core components of a CTA:
- Headline – This is what will grab people’s attention and it needs to be compelling.
- Description/tagline – Clearly convey the value your audience will get from the offer.
- Button – This can be a button that links to a landing page, or part of an optin form.
It’ll take a bit of experimenting to get your CTA optimized. And there are a lot of ways to approach this from a copywriting standpoint. This is why I recommend using a WordPress plugin like Thrive Leads – this will allow you to A/B test your CTA’s.
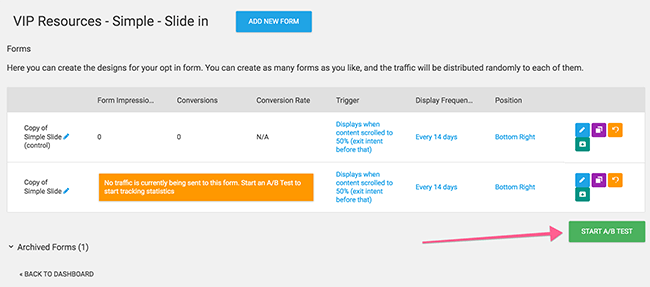
Best practice can only take you so far – A/B testing will show you exactly what works for your audience.
Primary areas of your blog to optimize
Your blog is one of your biggest marketing assets. As such, there are numerous ways you can optimize it to fill your funnel.
Given that the next stage in your funnel will be to offer a lead magnet to build your email list, you will primarily be optimizing your blog to promote that lead magnet.
Let’s look at how you can start optimizing:
Add a CTA to your homepage
Your homepage is the first page a lot of people will see. Instead of just directing people to your latest posts, you can encourage them to download your lead magnet as well.
Similar to what we do on the Blogging Wizard homepage. Here’s an example from an earlier iteration of the homepage:

Add CTA’s within your content
Chances are that most people visiting your blog will first find their way to one of your blog posts via social media or search engines.
So, it’s important to optimize your content as much as possible.
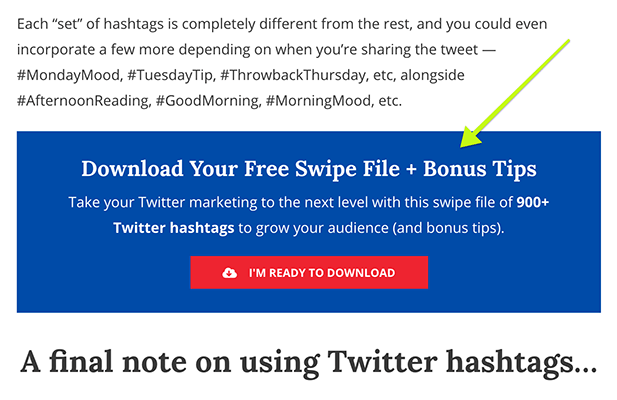
For example, this CTA promotes our Twitter hashtags swipe file:
Add a CTA after your content
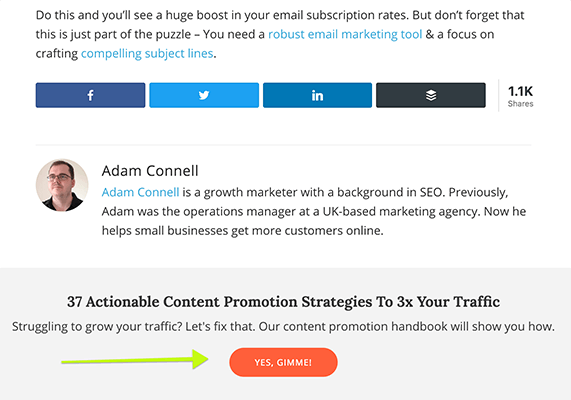
Those who make it to the end of your articles will typically be the most engaged. So, it makes sense to add a CTA to the end of your content.
Here’s an example from my other website; Funnel Overload:
Use exit intent popovers on your blog
Popovers are annoying but in general they’ll convert 5-10x better than an opt-in form in your sidebar.
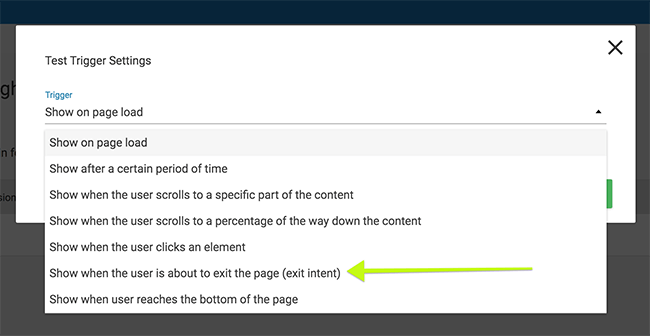
The key is to minimize their disruption on your readers. That’s why I prefer to display popovers when someone is abound to leave.
For example, in Thrive Leads, you can easily change the type of trigger for popovers in a few clicks:
Make better use of your blog’s navigation menu
Your navigation menu needs to be simple, clear, and focused around your most important pages.
Here’s a great example from Natalie Bacon’s blog:

You may have other important content or pages that you want people to be able to find. This may include legal pages, pillar content, etc.
For these sorts of pages, the footer is a good place to put them. It makes them available without cluttering the main navigation.
Wrapping it up
We’ve covered a lot of ground in this article and while going through these steps will take time and effort – the end result will be well worth it.
To recap:
- Plan and build your blog sales funnel.
- Remove distractions and unnecessary clutter from your blog.
- Leverage the power of social proof to improve your clarity.
- Optimize your blog for conversions with the strategic placement of compelling CTA’s.
While there are plenty of other things you can do to improve each step in this process, stay focused on working through what we’ve discussed first.
Once that’s in place, you can optimize each step in the funnel further and start ramping up your traffic generation efforts.
What are you waiting for?
Disclosure: Our content is reader-supported. If you click on certain links we may make a commission.

