ConvertKit Review 2024: Pros And Cons You Need To Know

Welcome to our ConvertKit review.
ConvertKit is one of our favorite email marketing tools, especially for content creators—but it isn’t perfect.
In this in-depth review, we’ll be sharing our take on all of ConvertKit’s pros and cons.
Plus, we’ll also explain the platform’s features and pricing plans, and walk you through what it’s like to use ConvertKit so you can see for yourself how everything works.
What is ConvertKit?
ConvertKit is marketed as a ‘creator marketing platform’, but what it really is is an all-in-one email marketing software solution with some extra bells and whistles.
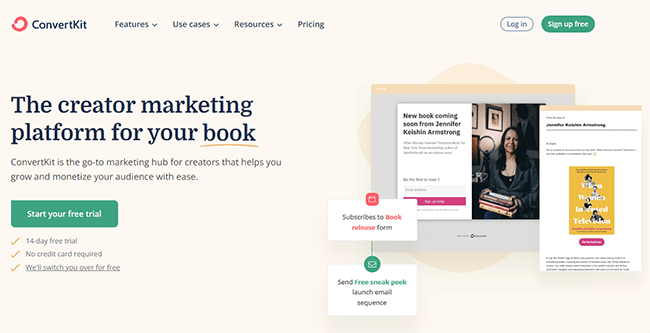
Over 600,000 creators use it to send over 2.5 billion emails every month.
By creators, we’re talking about people like bloggers, YouTubers, podcasters, coaches, musicians… anyone who creates content online.
These are the target users ConvertKit was built for. It was designed to solve the pain points creators often face with other email providers. And as such, it’s super straightforward and easy to use.
As an all-in-one solution, ConvertKit doesn’t just give you the tools you need to design and send emails.
It also comes with a bunch of tools to help you grow your audience, like landing pages, forms, and the awesome new Creator Network (more on this later).
Its built-in commerce tools mean you can even use it to sell digital products and subscriptions, plus earn more money through the built-in sponsor network.
What features does ConvertKit offer?
ConvertKit offers a lot of features. Some of the main ones you need to know about are:
- Landing pages & forms
- Drag and drop builder
- Templates
- Email broadcasts & sequences
- Segmentation
- Marketing automation
- RSS feeds
- Creator Profile & Creator Network
- Commerce features (sell digital products & subscriptions)
- Sponsor Network
- Integrations
Next, I’m going to try out ConvertKit and show you how everything works. As we explore the platform together, we’ll look at most of the features listed above. Let’s jump into it…
Getting started
When you log in to ConvertKit for the first time, you’ll be greeted by a signup survey that asks you some questions about how you plan on using the software.
If you’re moving over from another email marketing tool, ConvertKit will give you custom import instructions for the platform you’re migrating from to help you transfer everything over seamlessly.
Eventually, you’ll be brought to the dashboard, which looks like this:
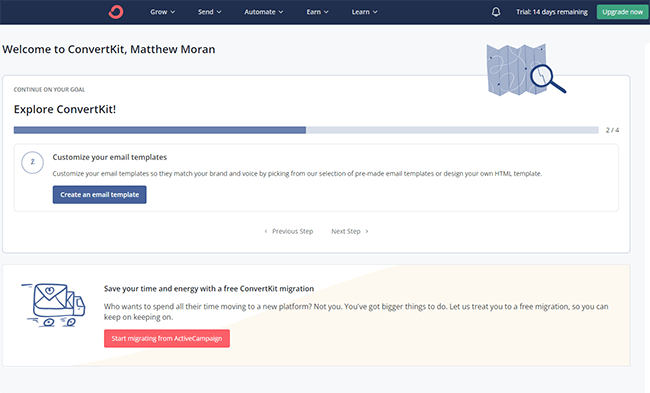
Reports will show up here at some point. But at first, there should be a quick-start guide to help you get everything set up.
You can access all of the different tools and features that ConvertKit comes with from the navigation bar at the top.
These tools are separated into different menus: Grow, Send, Automate, Earn, and Learn.
Let’s start with the Grow tools…
Landing pages
Under Grow > Landing Pages & Forms, you can build hosted landing pages and opt-in forms to help you grow your list. Let’s test it out.
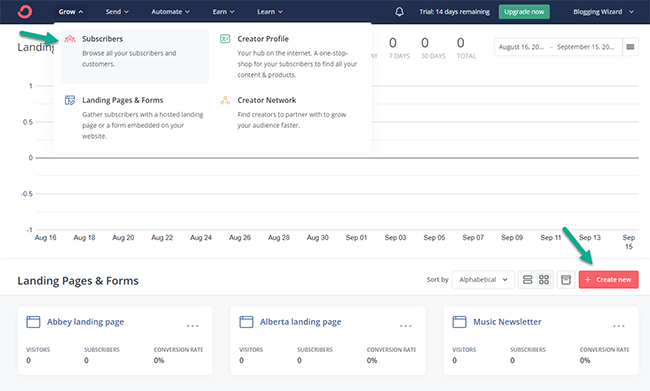
First, we’ll click Create a landing page to bring up the template library. Here, we can choose from dozens of pre-built landing page templates for all sorts of use cases.
For example, there are templates for pages where you can collect event or webinar registrations:
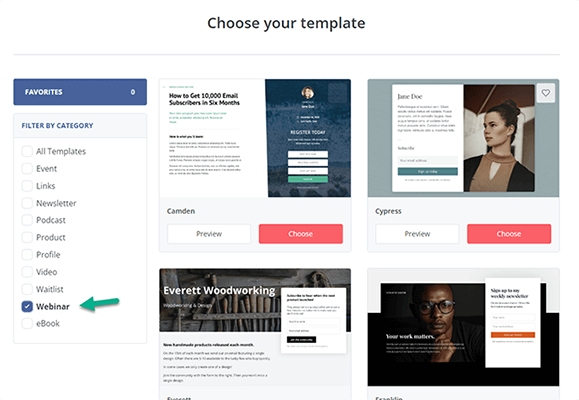
There are also templates for pages that promote a podcast, ebook, or other digital products. And there are even ‘Links’ page templates that you can use as link-in-bio pages for Instagram and TikTok:
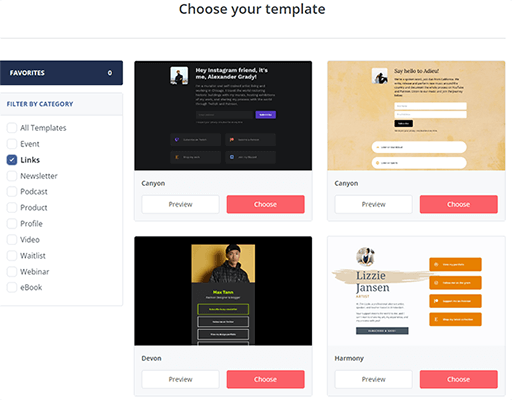
But seeing as we’re using ConvertKit for email marketing, let’s choose one of the newsletter templates that encourage users to sign up for your email list.
Selecting a template will open it up in the drag-and-drop landing page builder, where you can change the content and design as needed.
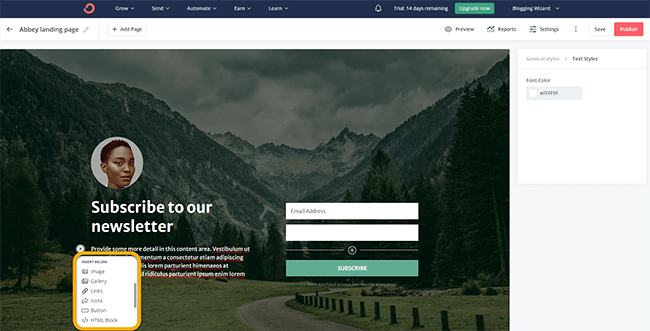
You can click the + icon in the preview window to add blocks/elements to the page. These can be things like headings, lists, images, buttons, countdown timers, videos, or even products.
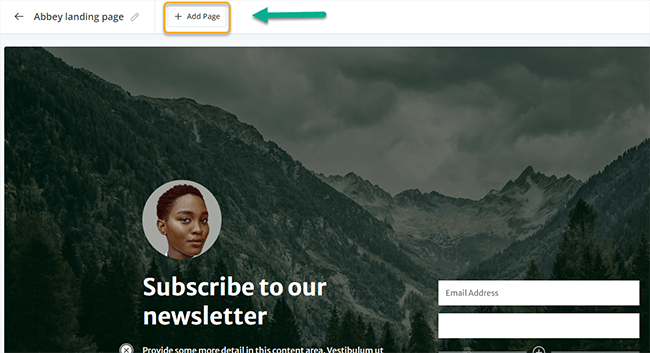
At the top of the editor, click Add Page to add a thank you page that’ll automatically show up to users after they’ve subscribed.
Once you’re finished making your page, click Publish and it’ll be ready to share.
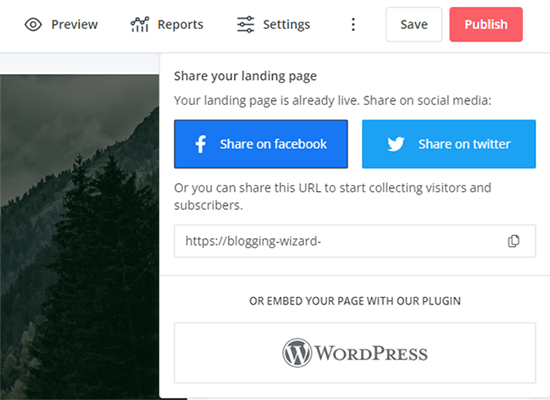
You can copy the URL to your clipboard and share it on your socials to start collecting subscribers. Or alternatively, embed the page on your WordPress website via the ConvertKit plugin.
Forms
You can create opt-in forms on ConvertKit the same way you’d create a landing page.
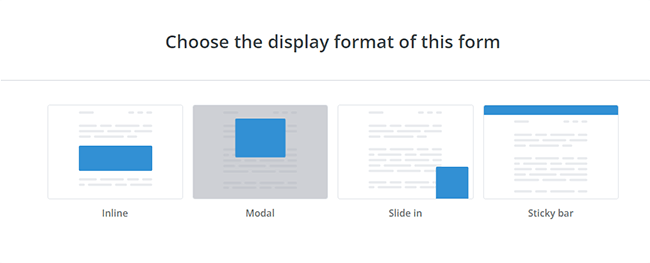
Just click Grow > Landing Pages & Forms > Create a form. Then, choose your preferred display format.
After that, choose a template from the library to open it up in the drag-and-drop editor.
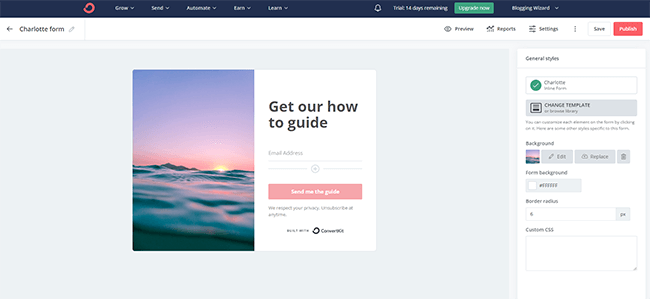
In the editor, you can add, remove, and reorder form fields, and change the style/design of the form.
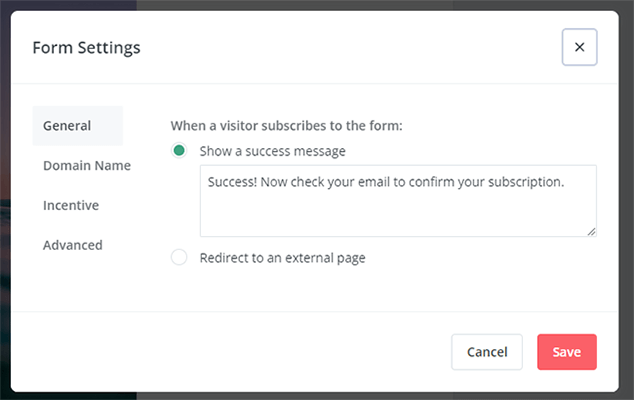
To change what happens after the user submits the form, hit Settings. Here, you can do things like add a custom success message or redirect new subscribers to an external page.
You can also click the Incentive tab to set up your lead magnet.
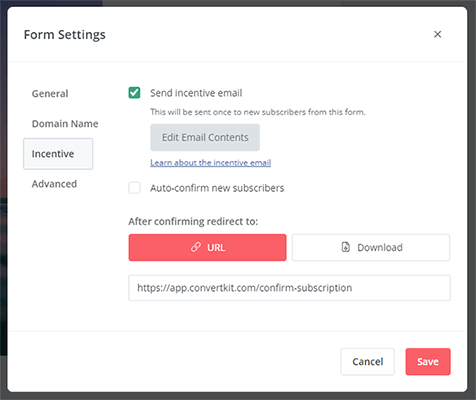
It’s possible to automatically send out an ‘incentive’ email that contains your free lead magnet when users fill out the form. Alternatively, you can redirect them to a download page.
Once you’re finished getting everything set up, hit Publish to embed the form on your site or grab the link to the hosted version.
Creator Profile
Creator Profile is a game-changing new feature that was only recently added to ConvertKit.
It lets you create a page (actually, it’s more of a mini-site) to serve as your public newsletter feed. Your Creator Profile page contains a bio of who you are alongside a collection of your newsletter posts, products, and links.
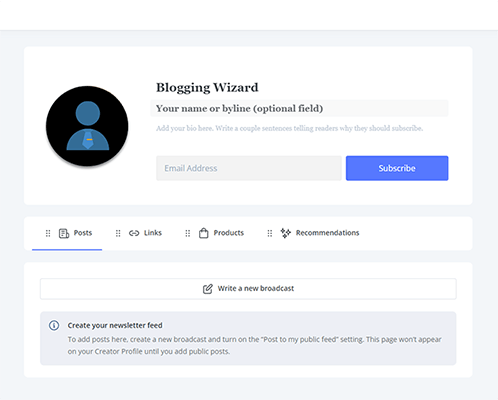
You can choose which content you want to appear on your Creator Profile. And once you’ve set it up once, it stays up to date automatically.
Whenever you send a new newsletter out using the Broadcast tool (we’ll explore this shortly), you can choose whether or not you want it to be added to your Creator Profile.
Creator Network
This is another game-changing new feature that we really like. It makes it easy for creators to team up and work together to grow their email lists even faster.
The Creator Network works hand-in-hand with your Creator Profile. Once you’ve set up your profile, you can join the network. Then, you can search through it to find other creators with similar audiences to you.
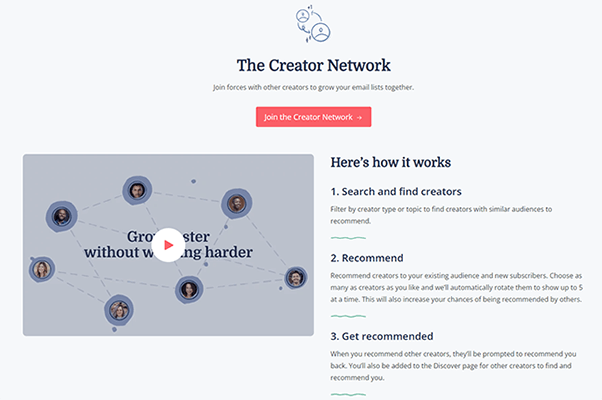
And when you do, you can add them to your recommend list. ConvertKit will automatically start recommending them to your existing audience and new subscribers (it can show up to 5 creators at a time).
Why would you want to do this? Well, when you recommend others, they’re prompted to recommend you back, which helps you to reach a ton of new readers.
Plus, when you recommend others, you’ll also be added to ConvertKit’s Discover page, so other creators will be able to find and recommend you!
This kind of cross-promotion is a win-win for everyone. Your newsletter gets a whole new audience, and you bring in new readers to another creator. Everyone benefits.
Broadcasts
Now we’ve covered the Grow menu, let’s look at the Send menu.
Under Send > Broadcasts, you can design, send out, and schedule one-time emails.

To get started, click + New broadcast. Then, choose a template.
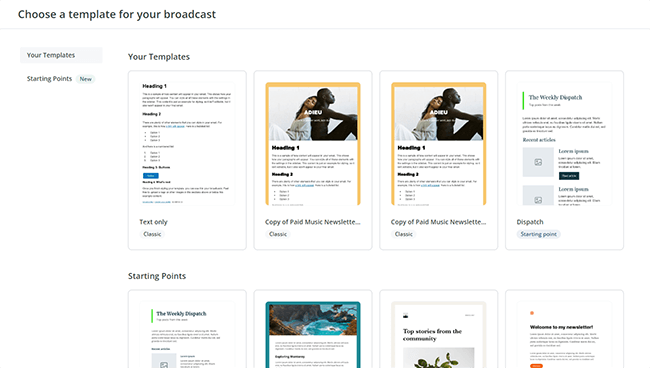
You can build and save your own email templates or alternatively, choose one of the pre-made Starting Points templates in ConvertKit’s catalog.
Selecting a template will open it up in the email creator, which is super easy to use.
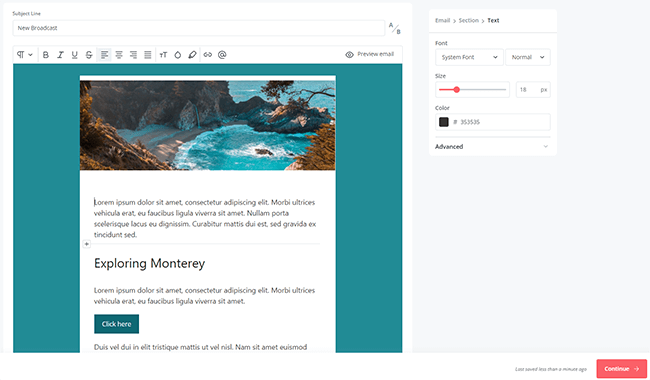
You can click the + icon in the main text box to add blocks. You have most of the same options you have in the landing page editor, plus a couple of extra ones.
The Product block is neat as it lets you embed products in your newsletters to create shoppable emails.
I also really like the Personalization block. It lets you personalize your email content using liquid snippets. For example, you can add personalized greetings, include the subscriber’s first name, and deliver conditional content to subscribers who have specific tags on their account
Another block worth mentioning is the Snippet block. Snippets are reusable blocks of content that you can create and save yourself. It’s a great way to save time if there are some common elements that you tend to use again and again in a lot of your emails.
You’ll enter the subject line at the top of the page. If you want to experiment with two different variations, click the A/B test icon next to the text box. Then, enter a second subject line and ConvertKit will run an experiment to see which one performs best.

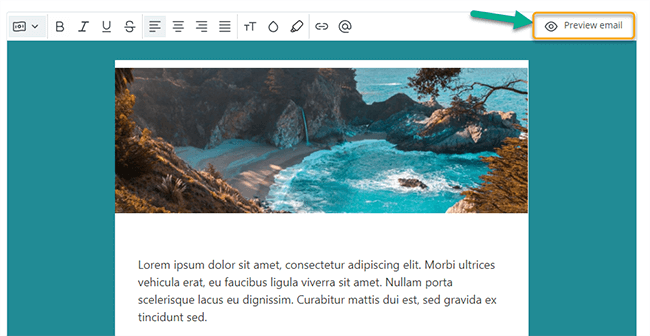
Once you’re finished, you can Preview your email to see how it’ll look when it goes out. Then, continue to choose your delivery options.
ConvertKit lets you segment your campaigns, so you can either send out your broadcasts to everyone or use filters to send them out to a subset of your subscribers based on segments, demographics, tags, etc.
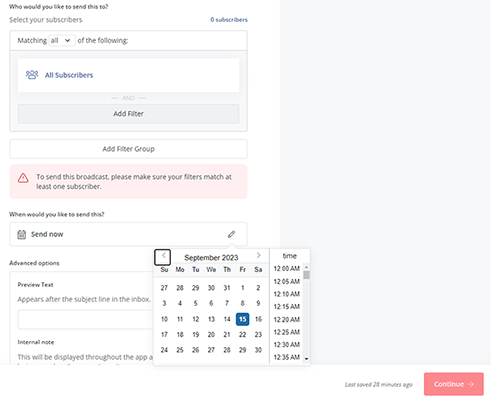
Finally, choose when you want to send the email and click Continue. You can deliver it straight away or specify a date/time in the future.
Sequences
Under Send > Sequences, you can build email chains that are sent to subscribers based on triggers.

For example, you might use it to create a welcome sequence that gets sent out to new subscribers when they submit an opt-in form. Or you might use it to set up a thank you email that gets triggered when someone makes a purchase on your site.
To get started, click + New sequence. Then, choose a template.
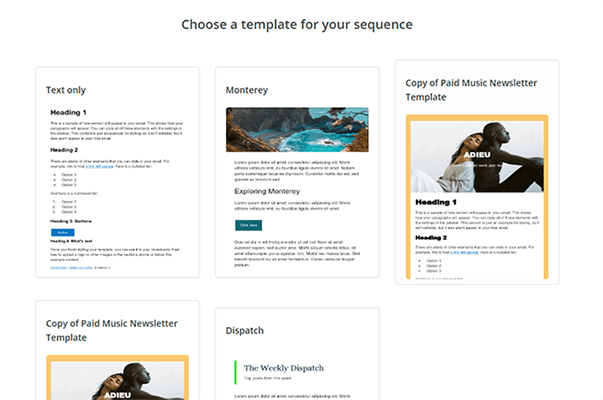
This will bring up the same email creator as the Broadcast tool, where you can build and edit your email content.
The only difference is that this time, you can also click Add Email on the right to create your automated series.
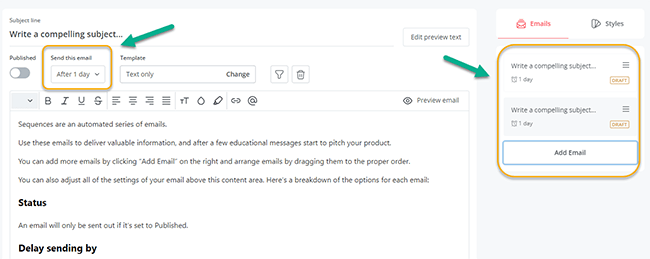
And you can choose how long to wait until sending each of them. For example, you might set it so that the second email in your sequence gets sent out 1 day after the first. And the third email gets sent out 3 days after that. You get the idea.
It’s super intuitive and makes the process of setting up automated sequences much simpler than is usually the case with other tools.
Of course, there’s a limit to what you can do with Sequences. It’s only useful for setting up very simple, straightforward triggered emails. For more advanced stuff, you’ll need to use…
Visual automations
Under Automations > Visual Automations, you can build more complex marketing workflows.
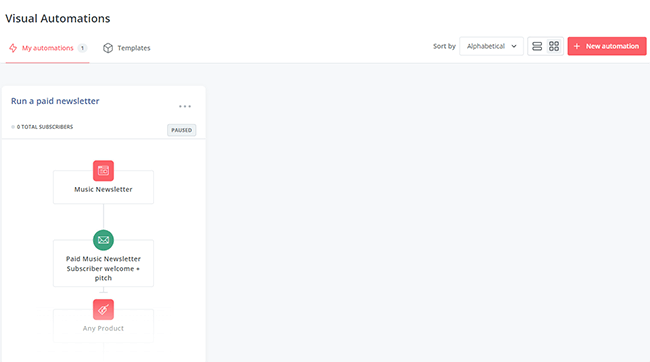
You set the entry point and create paths to send different subscribers down based on actions, events, and conditions.
To get started, click + New automation. Next, you can either click Empty Automation to start from scratch or choose a pre-built template.
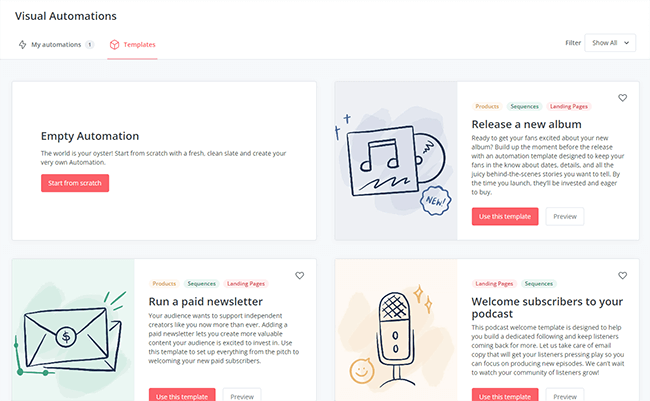
There are some really useful templates for creators. For example, if you’re a podcaster, you might use the ‘Welcome subscribers to your podcast’ template.
If you’re a blogger, you might use the ‘Run an evergreen newsletter’. Or even better, use ‘Run a paid newsletter’ to monetize your audience.
To better manage your list, you could use the ‘Let your subscribers self-segment based on their interests’ template. The point is, there’s a lot of great stuff.
Once you’ve chosen a template, you can open it up in the workflow builder, which looks like this:
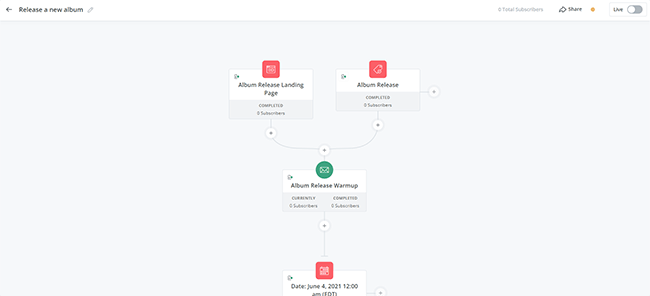
It’s basically a flow chart, where you chain together different events, actions, and conditions to create automation paths. It might seem complicated, but it’s easier than you think to work with. You’ll get the hang of it in no time, trust me.
Rules
Another way to build automations on ConvertKit is through Rules. Use Rules to create link triggers and connect to your other marketing tools.
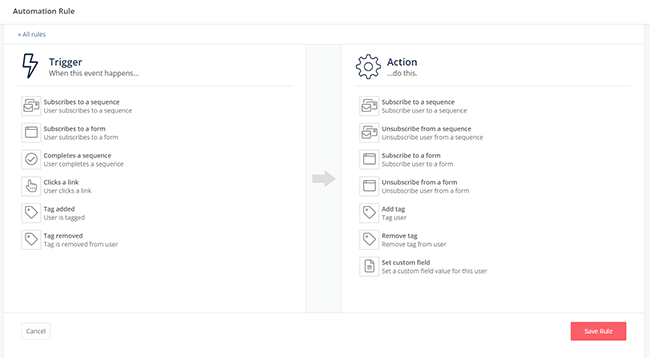
Rules work based on ‘if this, then that’ logic. You just specify the trigger (the ‘if’) and the action (the ‘that’).
For example, you could use rules to make it so that when one of your subscribers clicks a link, it adds a tag to their account. Then, you can target users with this tag in future email broadcasts/sequences.
RSS feeds
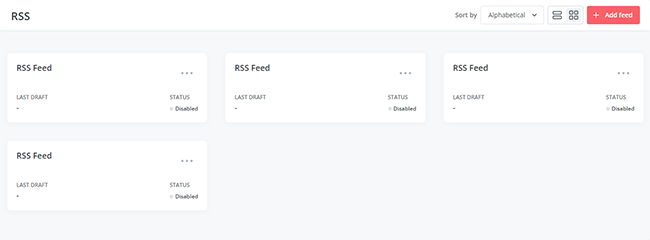
As you’d expect given that it’s built for bloggers and content creators, ConvertKit also has a solid RSS tool.
You can use it to automatically generate emails and digests with all your latest content.
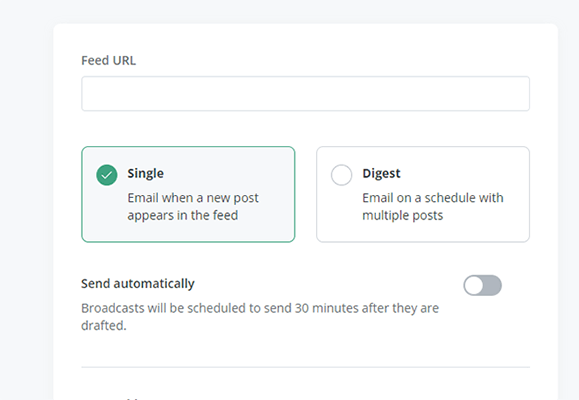
Just click Automate > RSS > Add feed.
Then, enter the Feed URL, and choose whether you want to email your subscribers whenever a new post appears in the feed, or send out a digest on a schedule that features multiple posts.
As with regular email broadcasts and sequences, you can use filters to segment your list and decide who you want to send your RSS emails to.
Other features
We’ve covered a lot already, but ConvertKit has even more to offer.
We don’t have time to cover everything in detail in this review, so here’s a quick overview of some of the other important features that we haven’t talked about so far:
- Products – Sell digital products and subscription memberships to your audience, with tools to help you fulfill orders, manage transactions, and more.
- Tip Jars – Collect donations from subscribers who want to support you.
- Creator University – Learn how to earn a living through ConvertKit with their extensive free courses for creators
- Sponsor Network – Join ConvertKit’s Sponsor Network to earn additional revenue through your newsletters. ConvertKit will help connect you to premium advertisers and place sponsorships in your emails in exchange for a 20% cut.
- Integrations – ConvertKit integrates with tons of third-party tools including Shopify, Teachable, Squarespace, Zapier, and dozens more.
How much does ConvertKit cost?
ConvertKit uses a subscriber-based pricing model.
That means the amount you pay for your plan will depend on how many email subscribers you have in your list.
There are three different ConvertKit pricing plans to choose from: Free, Creator, and Creator Pro. Each of them comes with different features. Here’s a quick overview of the differences.
The Free plan is good for up to 1,000 subscribers. Free users can build unlimited landing pages, forms, and email broadcasts. It comes with basic features like audience tagging and segmentation, digital products, ConvertKit’s training courses, etc.
The Creator plan starts from $15/month and comes with everything in the Free plan, plus a bunch of premium features. That includes access to the Creator Network, email migration, automated email sequences, the visual automation builder, third-party integrations, and live chat & email support. You’ll also be able to add one extra team member to your account.
The Creator Pro plan is the top-tier plan. It starts from $29/month and unlocks all features. On top of everything you get in the Creator plan, Creator Pro also comes with subscriber scoring, advanced reporting, access to the newsletter referral system, priority support, and unlimited team members.
With all plans, you can get 2 months for free if you choose to pay yearly. And if the Free plan isn’t enough for your needs, you can try out the Creator or Creator Pro plans with a free trial.
Note: The prices given above are based on 300 subscribers (the lowest pricing bracket). The more subscribers you have, the more you’ll pay.
ConvertKit’s pros and cons
Now that we’ve had a chance to try out ConvertKit and review all of its features, here’s an overview of what we think its biggest pros and cons are.
ConvertKit pros
- Creator-focused features. ConvertKit was founded by a blogger/creator who wanted a better way to reach his audience, and it shows. The platform is full of features creators will appreciate, like the creator profile and creator network.
- Best platform for sending out incentives. ConvertKit makes it easy to deliver lead magnets to new subscribers. Unlike many other tools, confirmation emails (that you deliver your incentives/lead magnets on) can be customized on the landing page/form level, rather than the list level, so it’s easy to offer a second lead magnet without having to create a second list.
- Impressive interface. ConvertKit’s UI is awesome. It’s super simple, straightforward, and easy to work. I also like how all the different tools are seamlessly integrated together. So for example, you can click on a sequence/form in the visual automation builder and edit without leaving the page.
- Good delivery rates. ConvertKit has a pretty good delivery rate of 99.8%+. This is no doubt thanks to its new account approval process. Unlike many other email providers, it doesn’t let anyone sign up and start blasting out emails—you have to get approved first. And that helps reduce spam and maintain a strong sender reputation.
- All-in-one solution. ConvertKit is a true AIO email marketing solution with everything you need to grow your email list, run campaigns, automate your processes, and earn money under one roof.
- Free plan. ConvertKit has one of the most generous free plans you’ll find anywhere. It’s good for up to 1,000 subscribers, so you don’t have to pay when you’re just starting out. And there’s also a free trial option for the paid plans.
ConvertKit cons
- Limited reporting data. ConvertKit provides basic analytics with essential metrics like opens, clicks, and unsubscribes, but it doesn’t offer much more than that.
- No spam testing. A lot of other email providers let you check how likely the emails you create are to be marked as spam by looking out for spam trigger words and the like. Unfortunately, ConvertKit doesn’t offer this kind of spam testing.
- Email editor could be improved. While the email editor is very easy to use, it could definitely be improved.
ConvertKit alternatives
ConvertKit is great for creators, but it might not be the best choice for every online business. Here are some alternatives that might be a better fit:
- MailerLite | Our review — Our top pick for the overall best email marketing software of the year. Affordable, feature-rich, and easy to use.
- Moosend | Our review — The easiest-to-use email marketing tool we’ve tried, and very affordable. A great choice for beginners who are just getting started with email marketing
- ActiveCampaign | Our review — Our top pick for the best email automation tool. Comes with a best-in-class workflow builder and automation templates, plus all the other tools you need to manage your email marketing campaigns.
Final thoughts on ConvertKit
That concludes our honest ConvertKit review.
Overall, we’d definitely recommend using ConvertKit if you’re a blogger or other online creator.
It has all the tools you need to run and manage effective email marketing campaigns. Plus, it’s incredibly easy to use with a really nice user interface. And it has a bunch of unique creator-focused features to boot, like the Creator Profile and Creator Network.
If you’re not sure if it’s the right choice for you, it might be worth trying it out for yourself. Click the button below to sign up for the free plan (or a free trial) and take it for a test drive.
Disclosure: Our content is reader-supported. If you click on certain links we may make a commission.
