How To Create An Opt-In Form In WordPress (Beginner’s Guide)

You probably know by now how important your email list is.
After all, we’ve gone over this a million times.
And the truth is, consumers haven’t changed a bit; they still choose email as their preferred marketing channel over everything else – including social media.
But the thing is, if you’re going to collect new leads, and encourage existing customers to come back time and again, you’re going to need to do more than create a cool looking opt-in form on your website.
Having the right tools when it comes to creating highly converting opt-in forms is a must for building a bigger email list with people that are actually interested in what you have to offer.
That’s why in this tutorial we’re going to use Thrive Leads (one of the best conversion-focused email list plugins in the market) to show you step-by-step how to build an opt-in form that’s not only fully optimized for your WordPress site, but a conversion machine too.
You’ll also learn some bonus tips to optimize your forms towards the end of the tutorial.
How to create a highly converting opt-in form for WordPress using Thrive Leads
The first thing you’ll need to do before you build an opt-in form is install and activate Thrive Leads on your WordPress site. You can get access to Thrive Leads here.
Want the low down on Thrive Leads? Check out our detailed review here.
Step 1: Create a lead group
Thrive Leads offers site owners three different ways to create an opt-in form on their site:
- Lead Groups: create multiple opt-in forms at the same time, all appearing automatically on the same post or page or in different places throughout your WordPress site.
- ThriveBoxes: create 2-step opt-in forms to ensure you have explicit consent from subscribers to send them future marketing materials.
- Thrive Shortcodes: create an opt-in form and easily display anywhere on your site using a shortcode.
There’s also a neat feature called Signup Segue.
Have you ever wanted to give subscribers a chance to sign up for a webinar?
Here’s how it usually works:
- You send an email campaign to subscribers with a registration link
- Subscribers click and come to a landing page with another form to fill out
- They then receive the webinar details in yet another email campaign
Seems like a lot right?
With Signup Segue, you can send people a link in one email that will allow them to sign up for whatever service you’re promoting with one single click. This will boost signups and everything that follows, including sales!
And, since Thrive Leads offers more API integrations than other tools, including connections to your favorite email service providers, running email campaigns using Signup Segue is a cinch.
For this tutorial, we’re going to use Lead Groups to create our opt-in form.
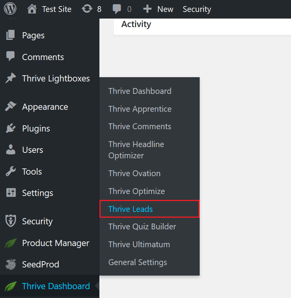
To create a Lead Group, go to Thrive Dashboard > Thrive Leads in your WordPress dashboard.
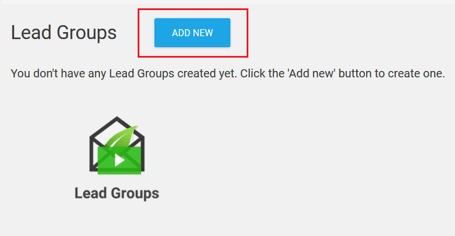
Next, click on Add New under Lead Groups.
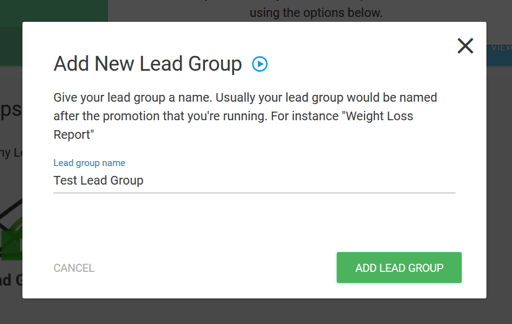
When the popup appears, give your Lead Group a name and click Add Lead Group.
Step 2: Create an opt-in form
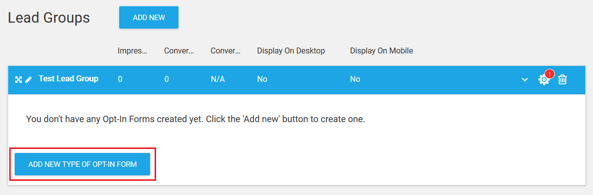
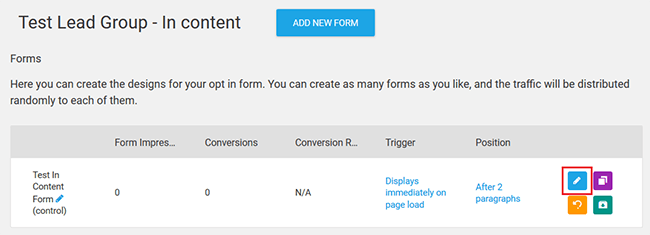
After your Lead Group is saved, you’ll see a new section in the Lead Groups section. This is where you’ll create and manage all of your WordPress opt-in forms.
To create an opt-in form, click Add New Type of Opt-In Form.
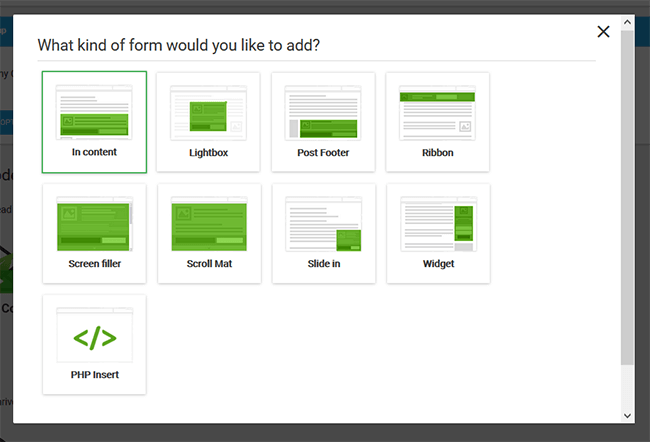
Thrive Leads will then ask you which type of form you’d like to add:
- In Content: insert an opt-in form within site content.
- Lightbox: trigger a popup that appears mid-screen.
- Post Footer: show an opt-in form at the bottom of your blog post.
- Ribbon: reveal a horizontal opt-in banner that sticks to the top or bottom of your screen.
- Screen Filler Lightbox: trigger a popup that fills the entire screen.
- Scroll Mat: create a screen filling opt-in form that appears on page load and scrolls from the top.
- Slide-In: trigger an opt-in form to slide in from the side or corner of the screen and overlap some site content.
- Widget: use this opt-in form in your site’s sidebar or other widget areas.
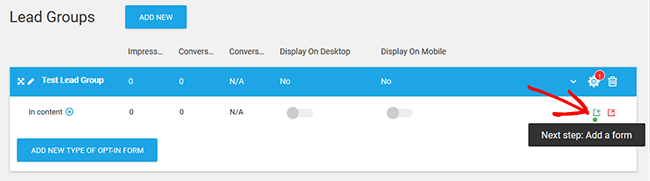
For my example, I will create an in content opt-in form that I can add anywhere in my site’s content.
After clicking In Content, this form type will be added to my Lead Group.
From there, I have to create the actual form by clicking the Add button. Luckily, Thrive Leads guides you through this process step-by-step making things much easier.
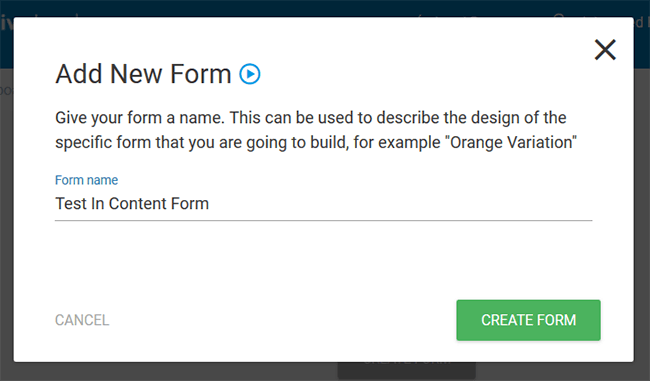
Next, click Create Form to get started.
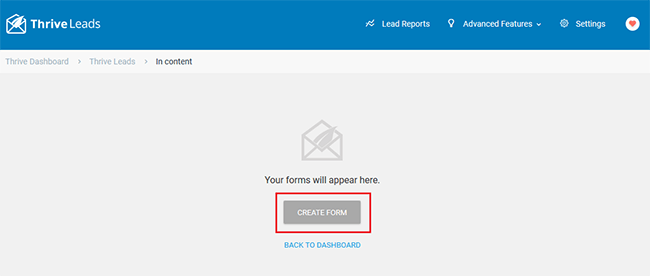
Name your new form and click Create Form.
Step 3: Configure your opt-in form settings
Now it’s time to customize your opt-in form’s settings. One of the best things about Thrive Leads is that it’s so flexible when it comes to creating unique opt-in forms. You have control over every single element and making changes is a cinch.
Let’s take a look at some of the individual form settings you can configure.
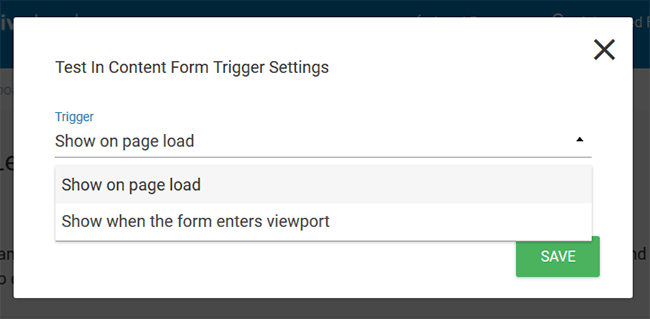
1. Define trigger actions
Thrive Leads comes with lots of trigger options that will prompt your opt-in forms to display for site visitors based on their behavior on your site. That said, it will depend on the type of opt-in form you create, because not all trigger actions are available for every opt-in form.
To change the trigger action, click on the Trigger column and select the action you want from the drop down menu.
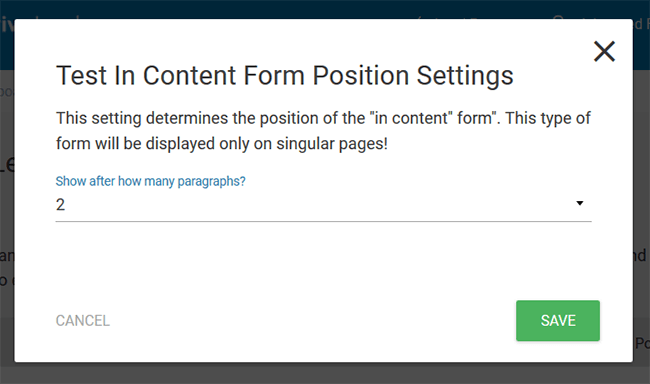
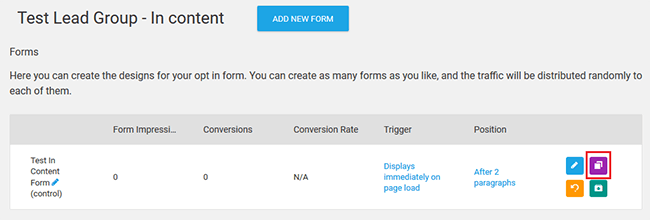
2. Position
My in content form has a Position column, which allows me to decide where in my content to display the opt-in form.
3. Other possible settings
Each opt-in form will have its own settings to configure. Here are some other settings you might have access to while creating your opt-in forms:
- Animation: customize the animation, or how your opt-in form will appear to site visitors. Display Frequency: define how long it will take for an opt-in form to reveal itself to site visitors.
- Form Position: configure where on the screen your opt-in form will appear from.
Step 4: Customize your opt-in form design
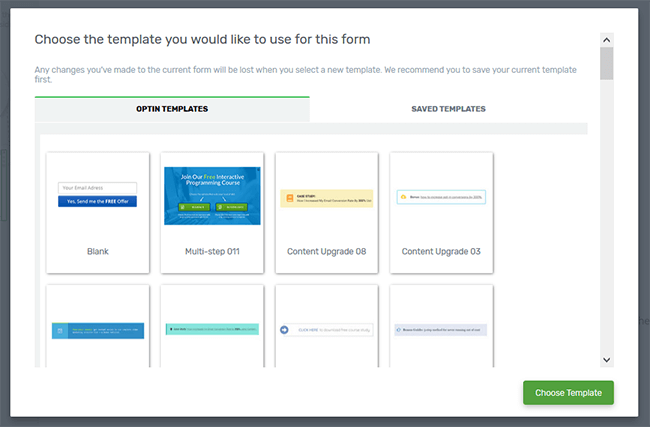
To change the look of your opt-in form, click on the blue Edit Design icon.
When you do this, you’ll be prompted to choose a template for your form.
Thrive Leads has a ton of templates to choose from, which is helpful for achieving your overall goal.
For instance, you might want to offer people a discount to your eCommerce shop in exchange for an email address. Or, you might want to add a content upgrade to your opt-in form to entice people to subscribe as part of your strategic content list building efforts.
When you choose the template you want to use, it will automatically load into the visual editor called Thrive Architect.
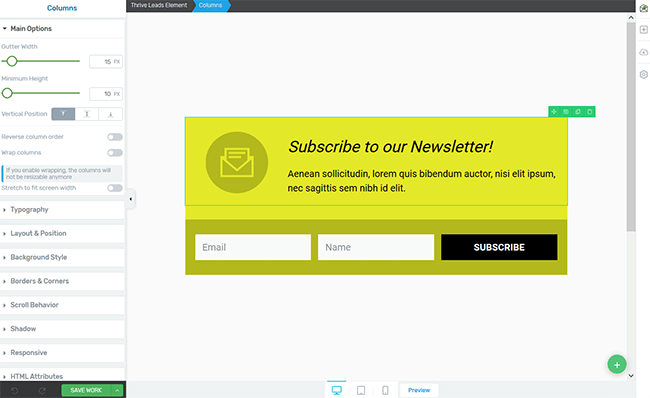
Now this is where the fun begins. You can literally customize the entire opt-in form using the WYSIWYG editor.
First, I’m going to change the background color because this yellow just isn’t working for me.
To do this, I’ll click on the background of my form, then the Background Style option, and then the color picker.
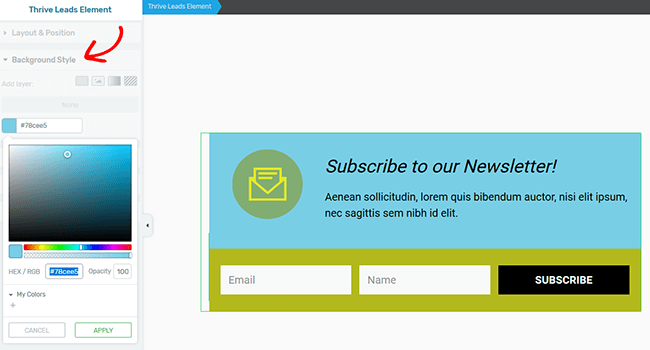
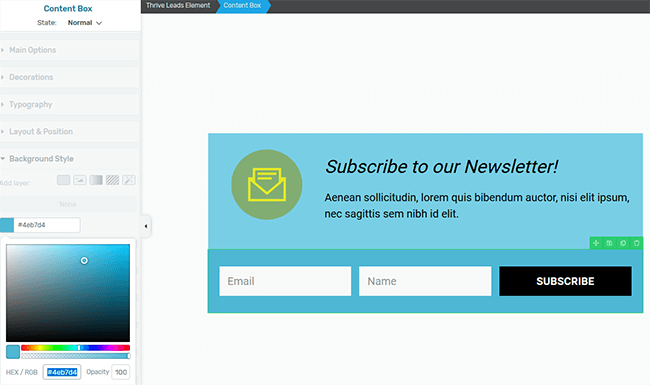
Next, I’ll do the same on the opt-in box color, so everything matches.
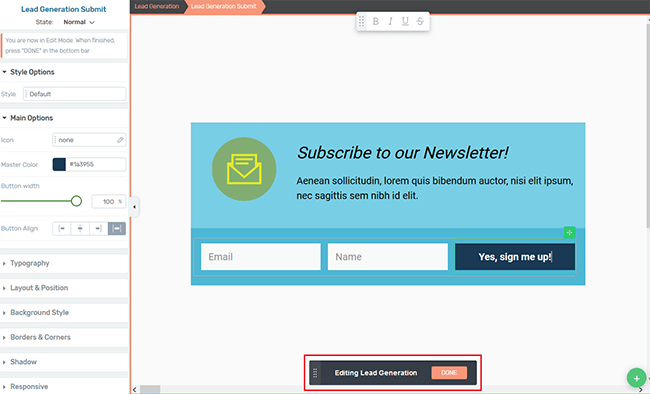
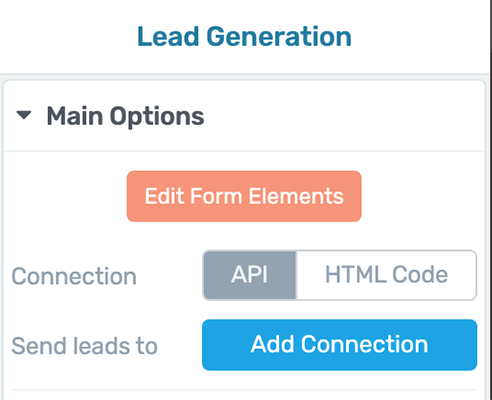
To change the CTA button, first click on it. Then, under Main Options, click on Edit Form Elements. This will give you editing access to the lead generation portion of your opt-in form.
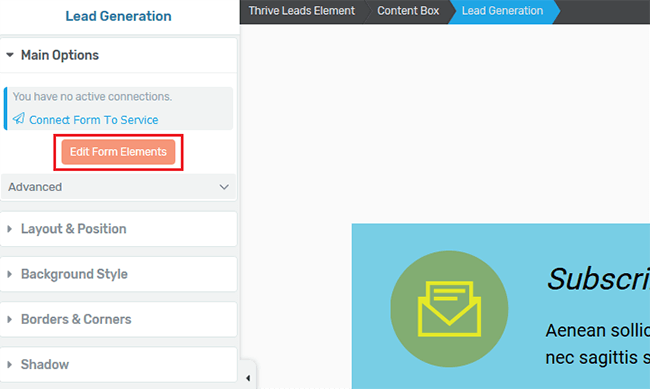
After that, simply click on the element you want to customize and make your changes. When you’re done, click Done near the bottom where it says “Editing Lead Generation” to come back to the default visual editing screen.
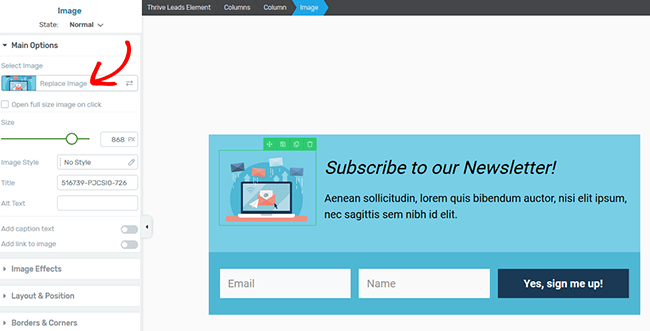
To change the icon, just keep doing what you’ve been doing…click to edit. Then, replace the image with one you like better.
Now, to really improve conversions for your form, you’ll need to offer some sort of incentive to build your email list. This could be a checklist, template, discount code, PDF, or something else.
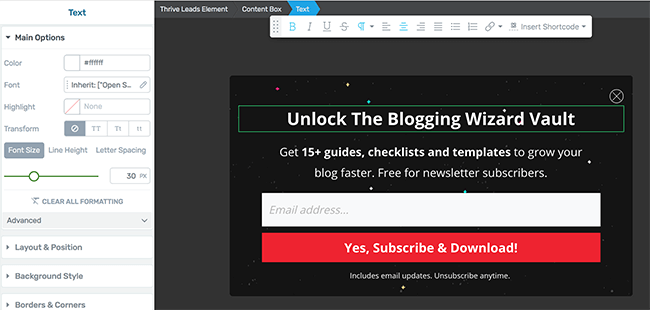
Or, like we do on Blogging Wizard, offer a collection of resources.
Here’s an example of what we created with Thrive Leads by adding a custom background image, and making some other tweaks:
Here are some other neat things you can do in the visual editor that you’ll be hard pressed to find in other list building solutions:
- Add new elements such as text, images, and buttons
- Change the styling to match that of your website (even things like button shape)
- Preview your form on desktop, tablet, and mobile phone views
- Turn off specific elements (such as large images) for smaller devices
- Create different versions of the same form based on whether people are subscribed already (called states)
When your opt-in form looks perfect, click Save Work.
Step 5: Connect to email service provider
Now that your opt-in form looks the way you want it to, it’s time to connect it to your email service provider.
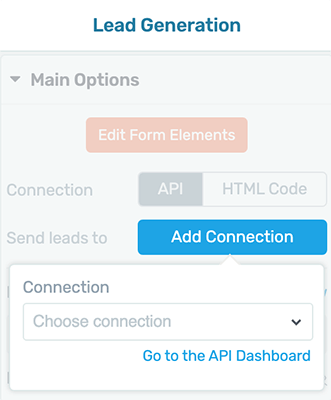
To do this, click on the CTA button. Then, in the visual editor, click on Main Options, API tab and lastly, Add Connection.
A dropdown menu will appear where you can select which the connection to add. However, if you have not set up an API connection yet, you’ll need to click on the Go to the API Dashboard.
A new tab will open showing your active connections:
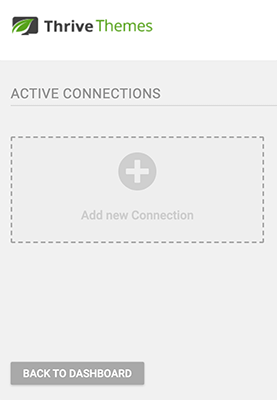
To add a new connection, click on Add New Connection. This will allow you to select your preferred email service provider from the dropdown menu.
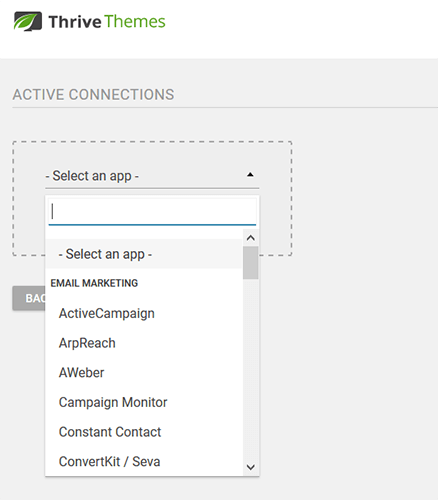
Once you pick your email provider, you’ll need to enter your credentials and click Connect. This tells your email service provider to begin collecting email addresses that are submitted through your newly created opt-in form.
Thrive Leads connects with most email service providers so chances are, you won’t have any issues. If you can’t find your email tool of choice, you’ll need to use the HTML Form Connection option instead. To use this, you’ll simply need to create an opt-in form in your email service provider and paste in the form code.
Step 6: Configure advanced targeting rules
One of the reasons Thrive Leads is so successful at boosting conversion rates is because it comes with a wealth of targeting rules. In other words, Thrive Leads gives you the power to show the right opt-in forms to the right people at the right time.
In the Lead Groups section of the Thrive Leads dashboard, you’ll see a red gear icon with an exclamation mark. Clicking on this will let you define the targeting rules you want to enable for your opt-in form.
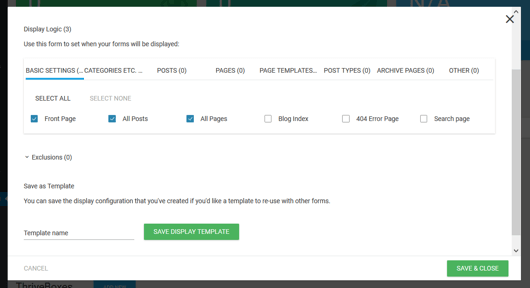
Here’s a look at what you can target:
- All posts and pages
- Some posts and pages
- Custom post types
- Archive pages
- Categories and tags
- Page templates
It’s worth configuring these targeting rules is so you can control which opt-in forms (and the messages each have) display to site visitors. The more relevant your opt-in forms are, the more likely people are to subscribe.
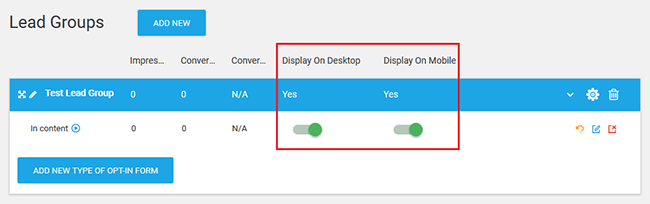
You can also enable/disable your opt-in forms on desktops and mobile devices.
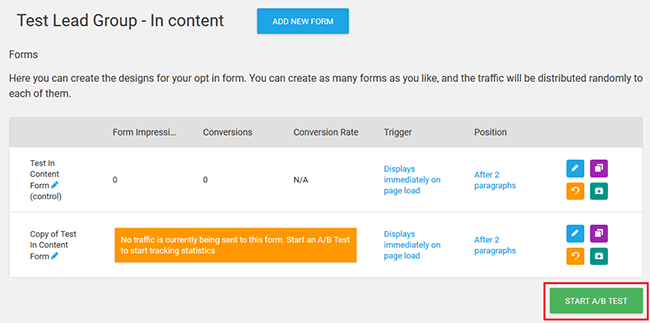
Step 6: Create an A/B test
If you want to split test two forms against one another to see which one converts the highest, start by either:
- Creating a New Form Altogether: helpful for those times you want to split test two totally different forms (g., lightbox versus slide-in) against one another.
- Clone Your Existing Form: if you want to make small changes to elements like copy, colors, font styles, images, or even trigger rules.
For this example, I’ll make a clone of my existing opt-in form by clicking the purple Clone icon.
I’ll then click the blue Edit icon and make my changes. Once the change(s) are made and saved to the cloned opt-in form, I’ll click Start A/B Test.
When the popup appears, give your A/B Test a name and enable the automatic winner setting if you want Thrive Leads to determine which form performs the best.
In addition, set the rules for becoming a winner: minimum conversions, minimum form display duration, and percentage to beat the original form.
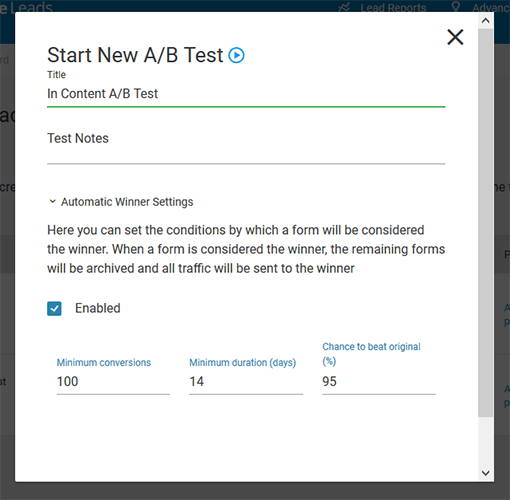
Click Start Test to tell Thrive Leads to start displaying both versions of your opt-in form to random site visitors.
Bonus tips to boost your opt-in form conversions
Now, you know how to build your form and run split tests – let’s look at how to boost your conversions.
You’ll find plenty of best practice advice to improve conversions on the web, but your mileage will vary depending on your niche & your audience.
This is why A/B testing is so important. Use best practice as your starting point, then test to improve conversions.
Here are a few quick best practice tips to get you started:
- Use a compelling and direct headline that speaks to your target audience.
- Use a button color that isn’t used in the rest of your design.
- Fewer form fields will usually improve conversions.
- Offer something exclusive like a PDF, checklist, or template to encourage email sign ups.
- An image with a person looking at the sign up form can sometimes improve conversions.
- Display trust indicators and social proof such as testimonials & impressive numbers, e.g. “Join over 40,000 of your peers.”
- Following modern design trends can help establish trust, particularly in fast paced vertical such as tech, etc.
Once you’ve got your form optimized, here are some things you can test:
- The design & structure of the opt-in form – the biggest changes can yield the biggest conversion increases.
- Your headline & tagline – experiment with different ways of presenting your offer
- Trust indicators & social proof – consider using different trust indicators or leave them off your form.
- Images – if you are offering a free download, you could include a screenshot of it on your sign up form. Images are powerful so it’s worth experimenting with them.
- Button color – there isn’t a universal “best button color” for your email sign up forms & calls to action (CTA’s) – generally this is a case of having a button color that is more eye-catching.
- Button text – just like your headline and tagline, your button text needs to be compelling. Experiment to find what works but definitely go beyond simply using the word “subscribe”.
- The headline question and button text answer combo – consider framing your headline as a question and your button text as the answer. For example, “Do you want to get more freelancing clients?” would be a headline, and the button text would be “Yes, gimme!” – the tagline or description in the middle would explain exactly what the offering is.
Wrapping it up
And there you have it! You now know how to build conversion focused opt-in forms for WordPress using the powerful and feature-packed Thrive Leads list building plugin.
The truth is, email marketing is always going to be a central strategy used by those that continue to grow their following and their online business.
If you want to succeed in building a bigger email list, you’re going to need to invest in a reliable list building solution like Thrive Leads because it delivers on design, functionality, and conversions.
Thrive Leads is $99/year (renews at $199/year thereafter), or can be purchased as part of the Thrive Suite which hosts a bunch of essential plugins that every marketer needs to grow their business online, this costs $299/year (renews at $599/year thereafter).
Disclosure: Our content is reader-supported. If you click on certain links we may make a commission.