How To Start A Photography Blog In 2024: The Definitive Guide

Are you ready to take the world by storm and start your photography blog?
There’s no better time than now.
In this post, you will learn how to start a photography blog – step-by-step.
You’ll also find tips to monetize and promote your blog. As well as additional resources to help you out.
TLDR
Here’s a quick snapshot of the main steps to getting your photography blog ready to go:
- Register a domain name with Namecheap – This is your blog’s permanent address on the web.
- Purchase web hosting with DreamHost – This is our recommended hosting for new bloggers. Once you sign up, you’ll need to connect your domain.
- Log-in to WordPress – This is the best platform for creating a photography blog (or any other kind of blog) and it’s pre-installed with DreamHost.
- Set up your blog and start creating content – The fun part begins!
Ready to get started? Let’s dive straight in:
Step 1 – Narrow down your photography blog niche
The niche you choose matters.
I know, I know, technically a photography blog is considered to be a niche by some. But it’s important to get even more specific – what type of photography blog will you create?
For example, will you be doing nature photography, wedding photography, product photography, or something else? Or will you focus on teaching others how to take better photos? Or edit photos?
What about writing about photography gear such as reviews? Or would you combine gear reviews with educational content such as tutorials?
It’s also worth thinking about this in terms of a revenue strategy. Even if you’re a hobby blogger, you should consider how you’ll be able to earn money from your photography blog in the future.
You never know when you may want to turn your photography hobby blog into a business.
For example, you may want to build a personal brand so you can promote your offline photography business or sell photos online (e.g. stock photos) or you may want to monetize an educational photography blog with ads, affiliate links, courses, etc.
Step 2 – Choose a blogging platform
If you want to start a professional photography blog that’s got the potential to earn money, I recommend using self-hosted WordPress to build your blog.
It’s the same blogging platform that I have used to build all of my websites and blogs, even those I have built for clients. And WordPress powers over 33% of the web.
There are a few more reasons too:
- Ownership – Unlike other hosted blog platforms, you have complete ownership of your blog and content.
- Freedom – You have the freedom to monetize how you wish. Some other platforms will restrict what you’re allowed to do.
- Community – The community behind WordPress.org is huge. In fact, the software is completely open source and developed by a large team of volunteers.
- Functionality – Thanks to wide availability of themes and plugins, you can do far more with self-hosted WordPress than any other platform.
But, we don’t recommend using WordPress.com….
Ok, so, here’s the confusing part. There are two versions of WordPress.
The self-hosted version (WordPress.org) – this software is completely open source and what we recommend using.
However, there is a commercial version (WordPress.com) – it’s a nice free platform for hobby bloggers but it’s extremely limiting.
The main reason is because you don’t technically own your blog. They have the right to shut down your blog without warning. And they restrict how you can monetize, etc.
The bottom line? Use self-hosted WordPress if you’re serious about building your photography blog.
Step 3 – Choose a blog name and register your domain name
The next step is to choose your blog name and register your domain.
Your domain name serves as your blog’s permanent address on the web and it’s a core part of your brand.
What makes a good domain name?
Usually, the best domain names will have some sort of relevance to the topic you’ll be covering. This may be photography, or something more specific.
You’ll need it to be brandable and easy to remember as well. The more catchy, the better.
However, be sure to:
- Avoid hyphens and numbers – These just cause confusion and make your domain name more difficult to remember.
- Get the .com if possible – Other domain extensions are more popular than ever but a .com is always the best one to get. If people forget the extension of your domain but remember your brand name, they’ll usually try this first.
- Make your domain name as broad as possible – If you’re focusing on a very specific niche such as wedding photography, or photoshop tutorials, try not to use these words in your domain name. You’re best of using a more broad phrase in your domain like “photography” or “visual” – this will give your brand more room to grow in case you decide to pivot the topical focus of your blog at any point in future.
- Avoid any trademarked brand names in your domain name – Chances are that this won’t happen to you. But it’s worth mentioning. Don’t use a trademarked brand name in your blog’s domain name. For example, if I used “WordPress” in a domain name, they could legally force me to transfer ownership to them.
- Avoid registering your domain with your hosting company – For security purposes, it’s best to keep your domain and hosting separate.
Coming up with a list of domain ideas
If you’re not sure what to call your blog, I recommend checking out this article on domain name ideas for inspiration.
Here are a few blog name formulas you can use:
- Niche + place – E.g. “Photography Island”
- Niche + authoritative word – E.g. “Visual Professor”
- Transformation + niche – E.g. “Learn Photography Today”
- Inspirational word + niche – E.g. The Happy Photographer”
- Portmanteau (combine parts of two words) – E.g. “PhotoGrappy” (Photography + Happy)
These are just examples and you can flip them round as you need.
My typical approach is to start with how I plan to help people, then I will write out two lists of words. One list of niche related words, then another list of other words I can combine with it – this might involve words that relate to the transformation people will get, etc.
Once you have the list, you can combine all of these words together and see how they look.
To get some more creative ideas, try using Word Mixer. It will combine words for you, so you can generate contractions (e.g. portmanteau) or anagrams.
Searching for available domains
Now, just headover to Namecheap.com and use their domain availability checker to search for domains.
You’ll be able to search for domain names individually or you can select Beast Mode and that will allow you to search for as many as you need to.
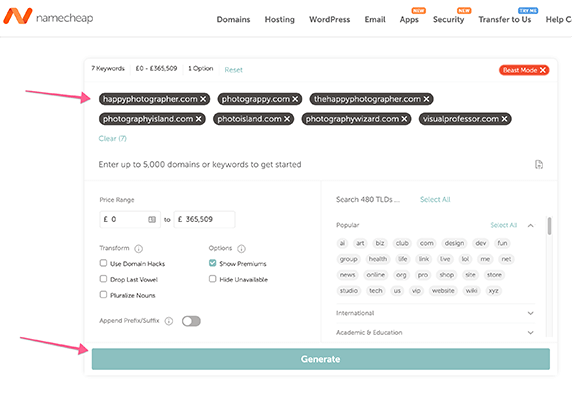
Next, make a list of all the domain names that are available to create a shortlist.
Registering your domain
Once you’ve decided on which domain to choose for your photography blog, you’ll need to register it.
This will mean you will have ownership and you can connect it with your hosting later.
Follow these steps to register your domain name:
- Go to Namecheap.com.
- Enter the domain name you want to buy:

- Click Add to cart to add the domain to your shopping cart:

- Click Checkout to access your shopping cart.
- Click Auto-Renew next to your domain (this will stop you from losing your domain. You can always disable this from your account later).
- Click Confirm Order to complete your purchase.

Step 4 – Sign up for WordPress hosting and connect your domain
While your domain is the permanent address of your website, your web host is what actually powers your website.
Why DreamHost is best for new photography blogs
DreamHost offers quality hosting that’s affordable. Solid performance and great support is included as well.
This means that if you decide blogging isn’t for you, it won’t have cost you much.
Not only that, but it’s the recommended hosting provider of big names like WordPress.org, CNET, and many more.

How to purchase hosting at DreamHost
First, click here to go to the DreamHost website.
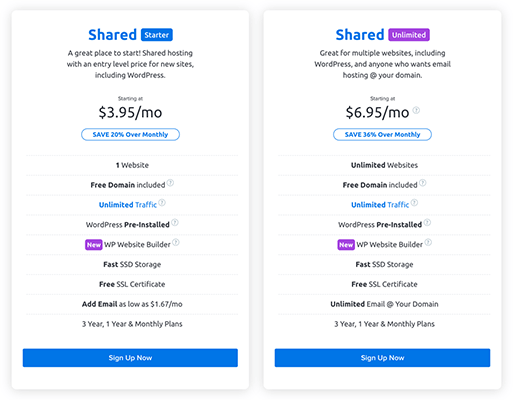
- Choose your DreamHost plan and click Sign Up Now. Starter is most affordable but Unlimited works out the best value.
- Select I already have a domain.
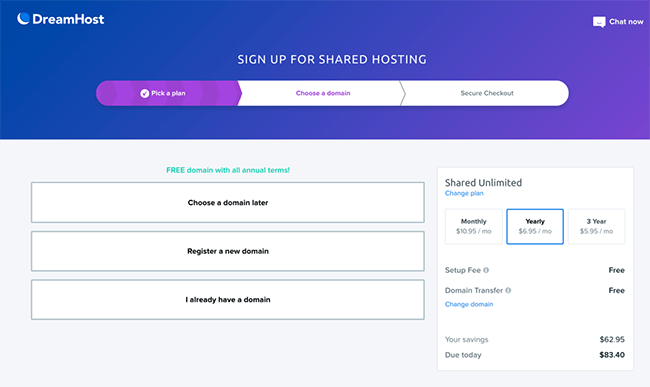
- Enter your domain name on the next screen. This is the domain name you purchased from Namecheap earlier. Click the button labelled Assign.
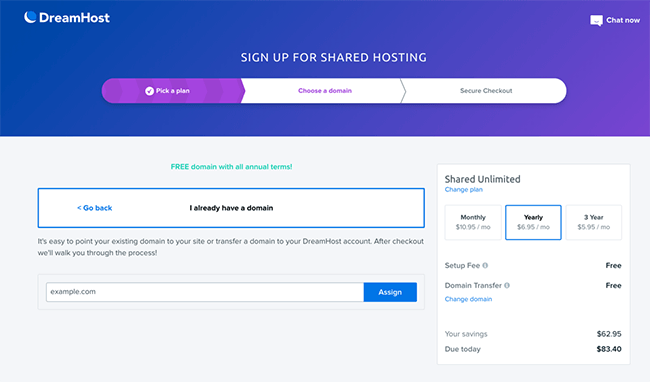
On the last screen, you’ll need to:
- Add your billing info
- Tick the Pre-Install WordPress box
- Select your payment method
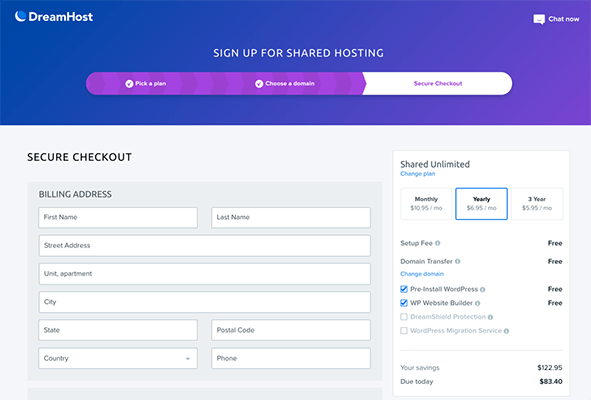
All done! You now have your very own hosting account for your photography blog.
Connect your domain and hosting
Before you can log-in to WordPress, we need to connect your domain name with your web host.
Here are the final steps:
- Read this quick guide to find your DreamHost nameservers.
- Go to your Namecheap.com account.
- Read this guide to use custom DNS at Namecheap.
Once these few steps are completed, the connection process will begin (known as DNS propagation). It sounds technical but its all very straightforward.
The process can sometimes take up to 24 hours to complete, but it’s usually done a lot sooner. Then, you’ll be able to log-in to WordPress.
Step 5 – Log-in to WordPress (pre-installed with DreamHost)
Now, it’s time to log-in to your WordPress dashboard. WordPress will be pre-installed if you selected that option while signing up.
By now, you will have received an email from DreamHost with your login credentials, etc.
You’ll need to sign into your account at DreamHost.com, then, on the homepage of your account, you’ll get the option to log in to WordPress:
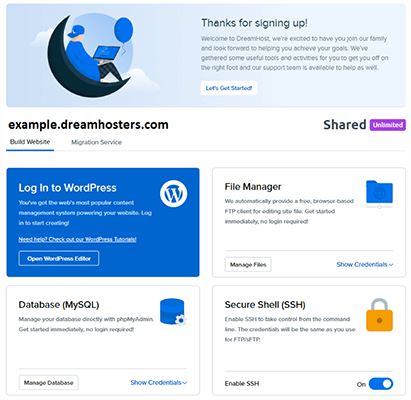
Just click Open WordPress Editor and it’ll open up your blog and log you in.
Finding your way around the WordPress dashboard
Your WordPress dashboard is the nerve centre of your blog – it’s your blog’s control panel.
You can access your dashboard by visiting yourdomainname.com/wp-admin. Just take your domain name and add /wp-admin to the end. Then use the credentials set up with DreamHost.
You can use it to:
- Change how your blog looks by installing a theme and customizing it.
- Installing plugins to expand functionality.
- Moderate & respond to blog comments.
- Write & publish blog posts, and pages.
And plenty more important things.
Once inside your WordPress dashboard, you will see a layout much like this:
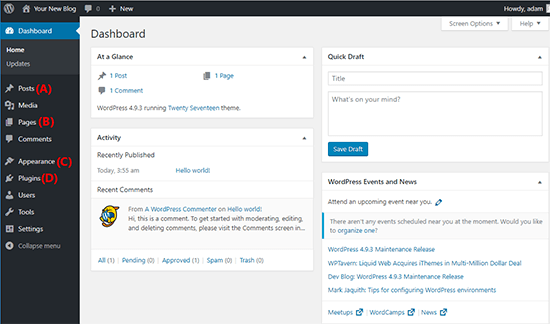
Let’s quickly go over the important areas:
- Posts (A) – Manage and write blog posts.
- Pages (B) – Create any necessary pages such as an about page, contact page, etc.
- Appearance (C) – Install a theme and customize your blog’s look from this area.
- Plugins (D) – Install plugins to expand functionality.
Next, we’ll go into a bit more depth with some of these areas.
Step 6 – Choose a WordPress theme
Every WordPress blog needs a theme. Each version of WordPress has an accompanying default theme that will be installed already.
The default theme changes every so often. You could stick with that but it wouldn’t look very unique.
You may want to pick a new theme from one of these articles:
A good free option is Kadence theme. It’s lightweight so it’ll load fast and it’s highly customizable.
Install your WordPress theme
The process is easy:
- Go to Appearance → Themes in your WordPress dashboard.
- Click the Add New button.
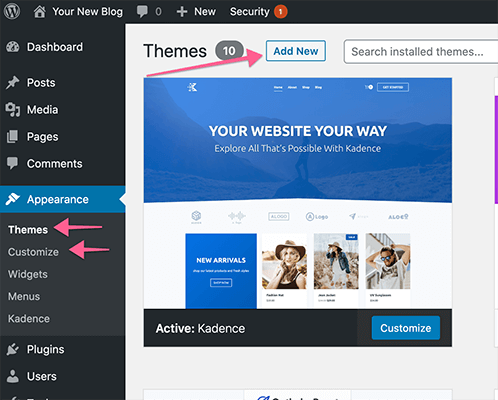
- You can search for free themes by using the search function. Then click Install.
- If you have a premium theme, you’ll need to click Upload Theme to upload a ZIP file of the theme,
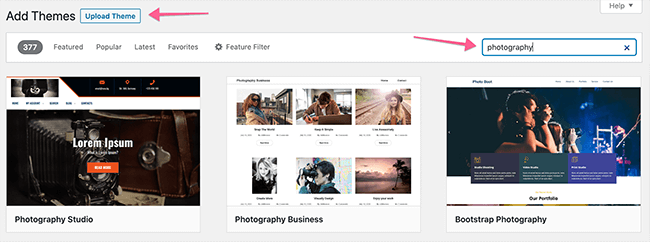
Regardless of whether you upload a theme, or search for a theme and install it from the themes menu, you’ll need to click the Activate button before the new theme is live on your site.
Customizing your theme
Now, it’s time to personalize your blog.
Most themes will support what’s known as the WordPress Customizer. This is what will allow you to make changes to how your theme looks.
You can access the Customizer by going to Appearance → Customize.
Just work your way through the menu options. You’ll see any changes you make appear in a live preview on the right hand side of your screen.
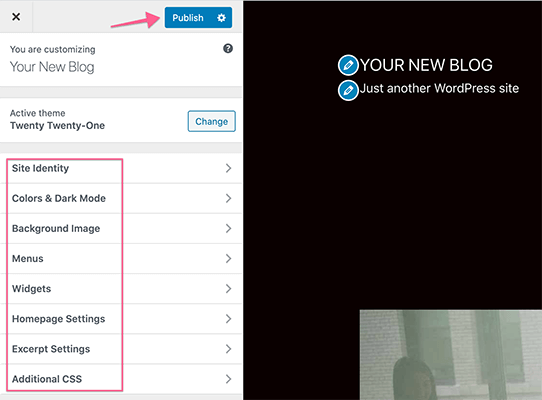
Once you’re done, you’ll need to click the Publish button for those changes to appear on your blog.
Now, there are two specific areas to pay especially close attention to:
- Widgets – Use these to add functionality to your sidebar and other widget areas. For example, you could add your latest blog posts or links to social profiles. Different themes may have slightly different widget areas such as footer widgets.
- Menus – This is how you’ll set up your site’s navigation menu. This is critical for ensuring people can find their way around your blog.
Step 7 – Install important plugins
Plugins control how your WordPress blog functions.
There are plenty of free plugins available at WordPress.org. Or you can search from within your WordPress dashboard.
First, let’s quickly look at how to install plugins. Then, we’ll take a look at some essential plugins and extra recommendations for your photography blog.
How to install WordPress plugins
First, you’ll need to head over to Plugins → Add New.
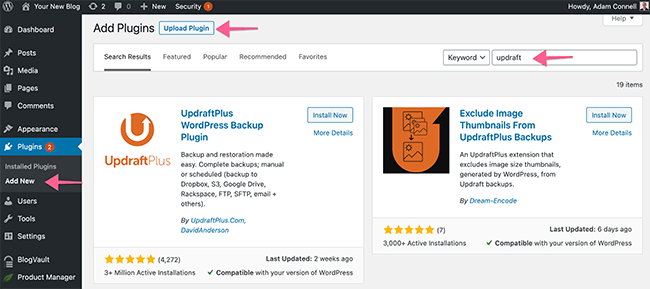
From here, you can use the search box to find free plugins to install. Once you’ve found one you want to install. Click the Install button. Click the button again to activate it.
You can also perform a manual plugin installation. This is ideal if you download plugins directly from WordPress.org or you have a premium plugin.
To install a plugin manually, you would click the Upload Plugin button towards the top of the screen. Then, install the .ZIP file of the plugin.
Essential WordPress plugins
Hosting resources are finite so it’s important to limit the number of plugins you install on your photography blog (or any other type of blog).
However, there are some types of plugins that you should consider installing. In fact, I’d consider all of these to be essential.
And just to be clear – while I make specific recommendations of plugins below, what’s essential is the task the plugin performs – not the specific plugin.
Consider installing:
- Caching plugin – This will help speed up your website. Some hosts have their own but DreamHost doesn’t. WP Fastest Cache is a good free plugin to try.
- Security plugin – Hackers are always trying to do their thing. Usually via brute force attacks. While WordPress security is a huge topic in it’s own right, there are some free plugins that are useful. Specifically, Sucuri’s Security Scanner and Login No Captcha reCAPTCHA.
- Backup plugin – Most web hosts take their own backups but it’s crucial that you take extra backups that you have control over. UpdraftPlus is a solid free option.
- SEO plugin – If you want to rank better in Google, you’ll need an SEO plugin. We use SEOPress. It’s got a nice balance of features and simplicity. While there is a premium version, the free version will do just fine.
Additional recommendations
At this stage, there are some additional plugins and tools you may want to consider.
- Analytics platforms – You’ll need to monitor where your traffic is coming from and what content they’re checking out. This is crucial if you want to grow your blog traffic. I recommend Clicky for new bloggers because it’s simple to use and has a solid free plan. They have a WordPress plugin you can use to add your analytics code easily.
- Social sharing plugins – Want to add social share buttons? There are plenty of options.
- Contact form plugins – If you want to make it easy for people to contact you without making your email address visible, you’ll need a contact form. Kali Forms have a great free plugin.
- Opt-in form plugins – If you want to build your email list, you’ll need a way to display opt-in forms on your content. However, some email providers such as ConvertKit have this functionality built-in (it’s just not as customizable).
- Landing page plugins – If you want to build conversion-focused pages such as sales pages or landing pages, you’ll need one of these plugins.
Step 8 – Set up an image gallery to display your photography work
Depending on the type of photography blog you will be creating, this may not be necessary so consider this step optional.
However, if you want to get clients, an image gallery is essential.
Out of the box, WordPress includes basic functionality that allows for the creation of a somewhat limited image gallery.
This can be a viable option but if you want to protect your photographs from unsavoury characters and get more granular control over how your photographs are displayed – an image gallery plugin is the way to go.
Now, there are a bunch of WordPress image gallery plugins on the market but my favorite is Modula.
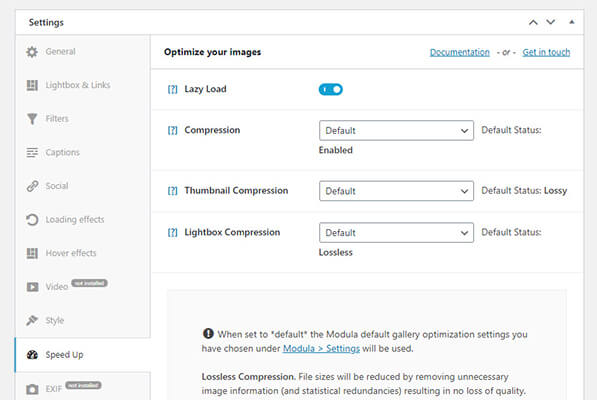
Here are a few reasons why:
- Automatically watermark your images upon upload to protect them from being stolen.
- Right-click protection stops people from saving your images.
- Password protection allows you to upload photos for a specific client.
- SpeedUp feature optimizes your images and serves them from a content delivery network for much faster load times.
If you simply want a more customizable image gallery solution for your photography blog, I recommend trying the free version of Modula available on WordPress.org.
If you want the advanced features I mentioned, you’ll need the premium version of the plugin which is quite affordable.
For a guide on how to install the plugin (and to learn more), check out our Modula review.
Step 9 – Publish your first blog post and relevant pages
Now, it’s time for the fun part of starting your photography blog – getting some content published.
In WordPress, you can publish content in two forms:
- Pages – This is where you’ll add your static content. Typically your about page, contact page, and legal pages.
- Posts – This is where you’ll add your blog posts, articles, or news.
Adding a new page in WordPress
First, we’ll go to Pages → Add New. Then, we’ll see the Gutenberg editor that comes with WordPress.
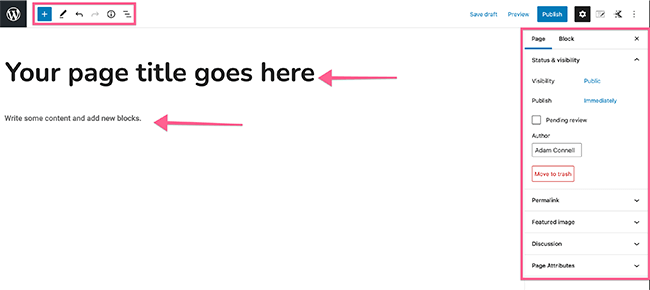
Gutenberg is a block editor. The idea is that you add blocks for each thing you want to add. So, for example, if you want to add an image, you would add an image block.
If you want to add text or a heading, you’d just add a relevant block. When you put your cursor over the block, a bar with some additional options will appear. You can also save blocks to be reused later.
You can add a new block by clicking the blue + button at the top. Or, when you press the return key to go onto a new line, a black + button will appear at the side of the editor.
There are Gutenberg blocks plugins that offer additional types of blocks but you should be fine with the blocks that come with WordPress for now.
On the right hand side of the editor, you’ll see your page options such as permalink, featured image, etc. When selecting a block, additional options will appear there.
And, if you have an SEO plugin or some sort of social sharing plugin, you will see additional options here or below the editor.
When you’re ready to add your content to the page, you just need to:
- Add a page title
- Add your content
- Save your page
- Customize your permalink (this is the URL for the page/post. For example, domain.com/about/)
Then you can view a preview of your page, or go ahead and hit the publish button on the top right hand side.
And that’s it!
Adding a new post in WordPress
This process is similar to adding a page but you would go to Posts → Add New instead.
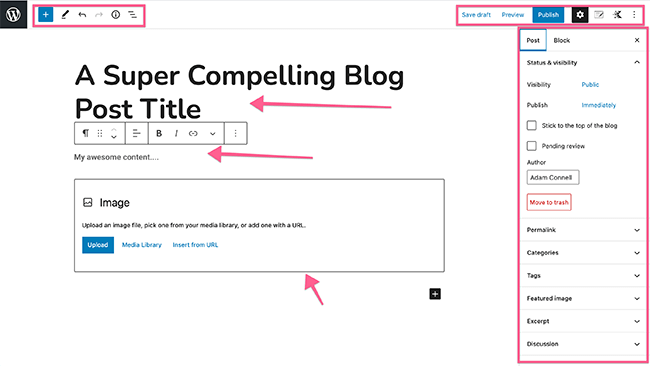
The editor for your posts works very similar to the page editor. Just with a few extra options on the right hand side.
So, just go through similar steps as before. Add your title, content, save your progress, customize your permalink, etc.
You may also want to add a featured image, add some categories, etc. Then, you can publish or schedule your post for publication at a later date.
If you’re struggling to come up with ideas for blog posts, we have a list of 60 blog post ideas to get you started.
Note: You can display your blog posts on your homepage or by creating a new page called Blog and setting that as your Posts Page. These settings can be find by going to Settings → Reading.
Step 10 – Monetize your blog
Now that you’ve started your photography blog, you may want to monetize it so you can earn some cash for your efforts.
This is a huge topic in its own right so I’ll give you a few quick suggestions to get you started.
There are a few common ways to monetize a blog:
- Services
- Physical products
- Digital products
- Ebooks
- Courses
- Display ads
- Affiliate programs
I can’t tell you the best ways to monetize your photography blog exactly. It ultimately depends on the type of blog you want to start.
However, if you’re going down the educational route, courses and ebooks are a great option. There are plenty of course platforms you can use for this.
Promoting affiliate programs would be well suited to this type of blog too. And they’d be the go-to monetization strategy if you were reviewing camera gear.
Check out our article on affiliate platforms and networks to find some programs to promote.
Once your traffic increases, display ads will be a viable option for you. In which case, check out these ad networks. For new blogs, I recommend Media.net as they don’t require you to have much traffic to sign up.
Running online training classes and webinars are another option. Alternatively, you could offer coaching/consulting to brands.
There are plenty of options out there. Hopefully this is enough to help you start monetizing your photography blog right away.
Step 11 – Promote your blog
Building an audience is one of the most challenging aspects of starting a blog.
The exact tactics you would use depend on the type of content you’re publishing, and your end goals.
Ultimately, the rule of thumb is to figure out exactly who your audience is, then find out ways to put your content in front of those people.
For certain types of photography blogs such as those covering gear or teaching photography techniques, SEO is going to be a big help. Check out our beginner’s guide to SEO to learn more.
Building an email list and developing your presence on social networks like Instagram will be important as well.
To get a complete rundown of how to promote your blog, we’ve got an entire guide devoted to the topic. Click here to check out our beginner’s guide to blog promotion.
Wrapping it up
Congratulations on starting your photography blog. It’s now ready to be unleashed on the world. The next step is to create your content.
Just remember that the content you create should be crafted, not only with your audience in mind, but your revenue strategy as well. Think of your content as the top of a funnel that leads people towards the product(s) you’ll sell, or the products you’ll promote.
And be sure to check out my article on photography blogging tips every photographer should know.

