If you’re searching for how to start a blog, you’re probably not doing it just for fun.
You want leverage.
A blog gives you a platform that works for you 24/7. It attracts the right people, builds trust before you ever talk to them, and turns attention into traffic, leads, and sales over time.
The problem is most beginner guides make this way harder than it needs to be.
In this beginner’s guide, I’ll show you exactly how to start a blog the right way. Step by step. From choosing a niche to publishing your first post. So you can stop overthinking and start building an asset that grows your audience and your income.
4 common questions about how to start a blog
As you prepare to embark on the process of building a blog, you probably have a few questions bouncing around your head.
Don’t worry – that’s normal!
In fact, there are some common questions that almost every beginning blogger asks, which is why I’m going to give you the answers upfront so that you know exactly what to expect from this process!
How long does it take to start a blog?
While it’s hard to put a timeframe on the creative process of choosing a blog topic, once you know what you want to write about, you can knock out the technical process of starting a blog in just 20-30 minutes. It really is easier than you might think!
Is it expensive to start a blog?
Nope! While the method that I recommend isn’t 100% free, you can start a blog for less than $50 for the entire first year, depending on the plan you choose.
Can’t I just use one of those free platforms to start a blog?
Free platforms are ok for hobby blogs. But the truth is you have little to no control with free platforms, and if they were to shut down, you’d lose your blog. The method I’m about to show you gives you the most control, protects your content and is ideal if you ever want to earn money from your blog.
Do I need to be one of those tech geniuses from TV to start a blog?
Nope! As long as you feel comfortable using a computer and browsing the Internet, you should have no trouble starting your own blog. No special knowledge needed.
Your 5-minute guide for how to start a blog today
You’re going to learn a lot more about all of these topics in this guide. But before I dig into the nitty-gritty details, I want to give you a bird’s eye view of the actual technical steps that you’ll need to take to launch a blog.
In addition to the creative aspect of choosing what to blog about, here are the steps you’ll need to take to get online in just about 20-30 minutes:
- Register a domain name from Namecheap – This is your blog’s permanent address on the Internet.
- Purchase website hosting from DreamHost – This is the engine that actually powers your blog.
- Install WordPress – This is the best platform for creating a blog.
- Set up your WordPress blog and start writing – This is the fun part!
I’m going to start at the beginning – choosing a blog topic. But if you’re already 100% sure what you want to write about, click here to jump straight to the technical part of how to start a blog.
Step 1: Choose a topic – is your WordPress blog for fun or money?
If you’re just planning to blog for fun, you don’t really need to read this section because choosing a topic is simple:
It’s whatever interests you!
But if you have monetary hopes for your blog, things can get a little more complicated.
See, sometimes what you like writing about the most isn’t necessarily something that’s going to make you money.
And because it’s hard to change your blog’s topic later on, if your end goal is monetization you need to put some effort into figuring out whether you have an audience and monetization options before you build your blog.
Try to answer these three questions:
1. Do I enjoy writing about this topic?
There’s just no way around this fact:
Building a blog takes time.
I don’t mean the technical part. That’s pretty easy.
But once you get your blog launched, building it into something that gets regular visitors is going to take some time.
For that reason, it’s important you pick a topic you can see yourself writing about over the long haul.
Sure – you might have a passing interest today. But are you going to still be happy writing posts on the topic two months from now even if your blog isn’t receiving thousands of visitors?
If you’re not passionate, it’s going to be an uphill battle trying to consistently publish new posts.
2. Are other people interested in this topic, too?
If you’ve found a topic that you know you’ll be passionate about for the foreseeable future, it’s on to the next question:
“Are other people as passionate about the topic as I am?”
This one is pretty simple.
If you want to be able to eventually build an audience, it helps if you already know people are interested in your topic.
Don’t worry – you don’t need to be able to read minds to do this.
There are actually some helpful free internet sleuthing tools that can help you figure out whether there’s an interested audience:
KWFinder – This free tool lets you input a “keyword” to see how popular it is. A keyword is essentially any phrase that people search for in Google. If lots of people are searching for the topic in Google, you can be pretty sure there’s a good-sized audience.
Try to think of the words that best describe your topic – then enter them in the box and click Find keywords.
You should see a bunch of results with a number that indicates how many people search for that term per month. Ideally, you’ll want to see numbers with thousands of monthly searches. For example, the topic of this post (a very popular topic) gets 10s of thousands of searches per month:

Your blog will probably cover multiple potential “keywords”, so it’s a good idea to repeat this process for different topics that your blog might cover.
And be sure to check out our in-depth guide to keyword research if you need more help.
Facebook Groups – Facebook provides a great way to gauge the interest in your chosen topic. Try to look for Facebook Groups that cover a similar topic and see how many active members they have.
If you find groups with thousands of members, that’s a good sign that your topic has an interested audience:

Google Trends – This tool is a bit simpler to use and lets you quickly see whether interest in your chosen topic is increasing or decreasing (increasing is better!).
3. Can I make money from this topic?
If you’re creative enough, it’s possible to make money from most topics. But some topics are definitely more suited to monetization than others.
This example is kind of commercial, but if you had a popular blog about strategies for using credit cards better, you can bet you’d have a boatload of credit card companies knocking on your door wanting to throw money at you.
If you are planning to make money from your blog, try to answer questions like:
- Are there companies that would be interested in paying for exposure to my audience?
- Do other blogs that cover this topic seem to be able to find monetization opportunities?
- Could I create my own product down the line, like an eBook, that people might be interested in purchasing?
Need more help choosing a blog niche?
Choosing a blog niche can definitely be difficult, so if you want an even more in-depth look at how to choose a blog topic, check out this post:
Step 2: Pick a blogging platform – I recommend WordPress
If you want to start a blog, there’s only one blogging platform I recommend nowadays:
Not only does WordPress power this very blog you’re reading, but it also powers 33% of all the websites on the Internet. Yup! More than one-fourth of every single website that you use is powered by WordPress.
So whether you’ve heard of WordPress or not, I can pretty much guarantee that you’ve used a website powered by WordPress at some point in your life.
Why is WordPress the best platform to start a blog?
If you weren’t dazzled by WordPress’ impressive market share, here are some actual concrete reasons why WordPress is the best platform to start your blog:
- It’s easy to use – WordPress is simple enough to use that even non-technical people can publish blog posts.
- It has a huge community – WordPress is so popular that it’s easy to find help if you ever run into issues.
- It’s easy to add functionality – Because of things called “themes” and “plugins”, it’s super easy to change how your blog looks and functions without needing any special technical knowledge (more on these later!)
You shouldn’t use WordPress.com, though
Here’s the confusing part about WordPress:
There are actually two different platforms named “WordPress”:
- WordPress.org – This is what I recommend. It’s a non-profit, open-source piece of software that’s developed by a huge community. This is best if you want a self hosted WordPress blog.
- WordPress.com – This is a for-profit service that’s built on the open-source WordPress.org software.
WordPress.com lets you create a basic blog for free. But:
- You don’t have full control of your website, which means you never really 100% own your blog.
- It’s difficult to customize your website because you can’t access WordPress plugins or themes unless you pay for an expensive business plan.
- com puts some restrictions on how you can monetize your site.
Self hosted WordPress with WordPress.org, means you install the free WordPress software on your own web host, which means you’re 100% in control of your website. It’s a little more involved to get started with, but the payoff is definitely worth the extra effort.
In addition to owning everything, you can also make whatever tweaks you want and monetize it however you’d like.
Here’s the bottom line: If you’re serious about your blog, having a self-hosted WordPress blog is a better option than using WordPress.com, even with WordPress.com’s offer of a “free” (but limited) blog.
Step 3: Register a domain name
Now that we’ve covered how to choose a topic and blogging platform, it’s time to start digging into the technical details of how to start a blog, starting with:
Your domain name.
Your domain name serves two core purposes:
- It’s your blog’s permanent address on the Internet. Once you get everything set up, anyone will be able to type your domain name into their browser’s address bar and access your site from anywhere in the world.
- It’s your blog’s brand. Usually, your domain name will be the same as your blog’s name, so choosing a domain name is a pretty important branding decision.
What makes for a good domain name?
A lot of this is personal choice and branding. For example, two of the most popular websites, Google and Facebook, have pretty unique names that would be hard to generate from some “formula”.
As those examples suggest, you’ll find plenty of successful sites breaking these rules. But in general, these are some good guidelines:
- Pick something that’s relevant – Choosing a name that has some tie to your topic helps people quickly understand what your website is about. For example, this blog is about blogging, hence – com
- Make it brandable, too – You want something that’s easy to brand so people will be able to remember your blog.
- Avoid hyphens and numbers – Avoid the desire to get creative with hyphens or numbers. It’s hard for people to remember!
- Use a .com if possible – While other domain extensions are becoming more popular, it’s still best to choose a .com domain name if possible. If you find a great domain name using something else, it’s ok to ignore this one, though.
Need more help with choosing a domain name? Be sure to check out our guide on choosing a blog name.
How to find domain names that are available
Here’s where most people get stuck:
A domain name can only belong to one person. Period. If anyone could just buy Facebook.com, the internet would be a mess.
So when you’re choosing a domain, it has to be available. That means no one else owns it already. Sounds simple, but it can feel frustrating fast.
But here’s the good news:
There are plenty of tools that make finding an available domain quick and painless, even if your first few ideas are taken.
First, to quickly check if a domain name is available, Instant Domain Search is about as easy as it gets. Just type in your desired domain name and the tool will tell you whether it’s available or not:

If you keep running into domain names that are no longer available, you can also turn to a blog name generator. A blog name generator basically spits back a list of relevant domain names that are guaranteed to be available. All you do is enter a word related to your topic and these tools will do the rest:
How to purchase your chosen domain name
Once you find a domain name that you like and is available, it’s time to buy it!
While it is possible to register a domain name directly through your web host, I don’t recommend this approach for a couple of reasons:
- It creates a single point of failure for your website because both your domain and web hosting are located at the same spot. This is bad for security.
- It makes it harder to move hosts, which you’ll likely want to do as your blog starts to grow in popularity.
Instead, I recommend a separate service called Namecheap because it’s:
- Secure – This is important because if someone ever gets access to your domain name, they have full control over your blog.
- Affordable – Namecheap only charges ~$10 per year to register a .com domain, whereas most hosts raise the price (even if they give you a “free” year at first).
- Convenient – Registering at Namecheap means that you can easily control your domain name if you ever need to change something in the future.
Here’s how to buy your domain name:
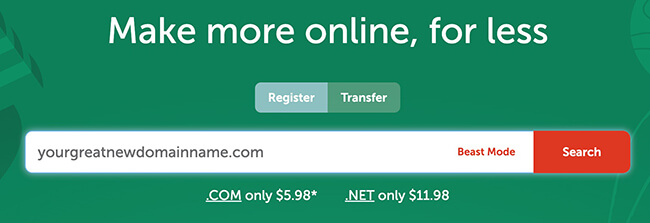
- Go to Namecheap.
- Enter your chosen domain name in the search box.
- Click the button to add it to your cart.
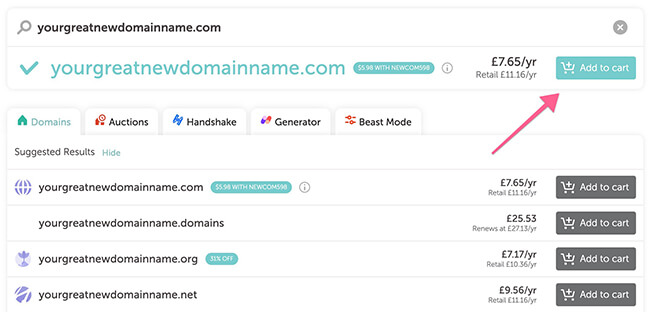
- Click Checkout to access your cart.
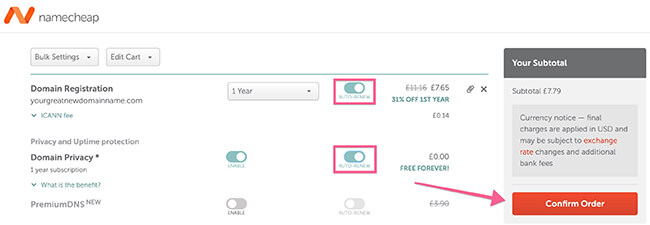
- Click the Auto-Renew to ensure your domain + privacy renews automatically each year.
- Click Confirm Order and complete the checkout process.
Once you pay, you now officially own your own domain name! Now, all you need to do is hook it up to some web hosting.
Step 4: Purchase web hosting at DreamHost
Whereas a domain name is a permanent address to your website, your web hosting is what actually powers your website so that, when someone goes to that address, there’s an actual website to greet them.
It’s like the engine that powers a car. Without an engine, a car isn’t gonna move! And without web hosting, your blog isn’t gonna work, either!
Why DreamHost is the best host for new bloggers
Thankfully, quality web hosting doesn’t have to break the bank. A service called DreamHost offers a great product starting at just $6.95 per month.
Don’t believe me? DreamHost is officially recommended by industry heavy-hitters, such as WordPress.org, ThemeForest, CNET, and PCMag. Plus, the company consistently garners excellent reviews from real users on TrustPilot.

So why do I, and so many others, recommend DreamHost for new bloggers? Here are the main reasons:
- Affordability
- Great support if you ever need help
- Solid performance to ensure your blog is always available and loads fast
- WordPress comes pre-installed on your account
How to purchase hosting at DreamHost
Click here to go to DreamHost.
Then, here’s how to get set up with your hosting:
1. Under the Web Hosting Launch column, click Sign Up Now.
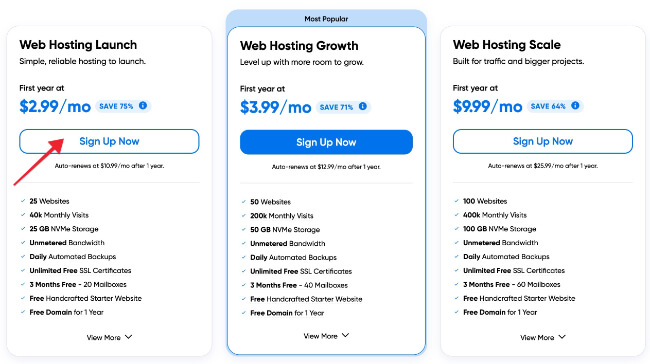
Note: The Launch plan is the cheapest and comes with unmetered bandwidth. That should be enough for any new blog.
2. Select I already have a domain.

3. On the next screen: Enter the domain name that you purchased at Namecheap in the box and click Assign.
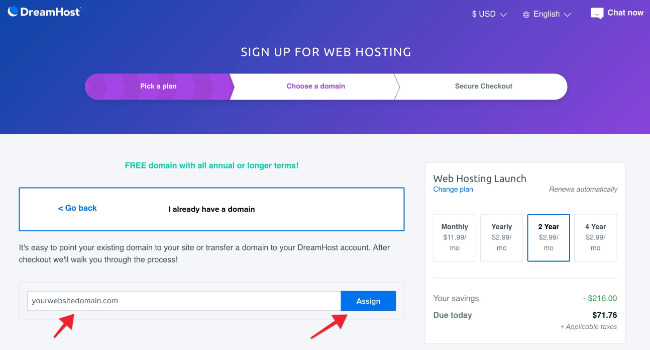
Then, you’ll see the final screen where you need to:
- Add your billing information
- Choose your payment method
The price you pay for hosting will depend on the plan you choose. Yearly, bi-yearly and 4-yearly plans offer far higher discounts over monthly, for example. And the longer the term, the longer you’ll secure your discount for.
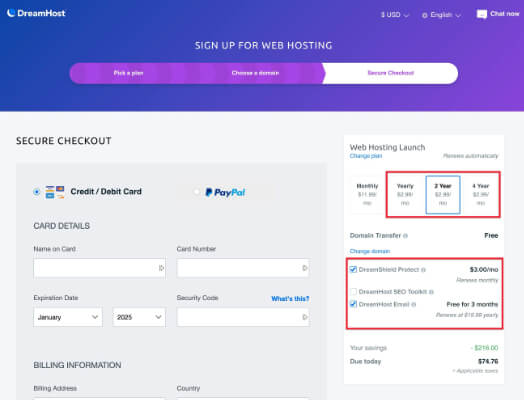
There are some add-ons to consider. Ignore the SEO add-on. That’s not worth it.
The Protect add-on is recommended for website security purposes and the email add-on should be considered if you want to create email inboxes on your account.
Whether that’s necessary will depend on your needs. I usually like to keep email and hosting seperate. Namecheap offers email inboxes so you could use that instead if you prefer.
And that’s it! You just purchased hosting.
How to connect your domain name with your web hosting
To connect your domain name with your web hosting, you just need to complete these steps:
- Follow this guide to find your DreamHost nameservers
- Go to Namecheap
- Follow this guide to use CustomDNS at Namecheap
The guide lays it out – but you’ll basically need to point your domain’s CustomDNS towards your DreamHost nameservers.
I know this process is a bit technical, but putting in a little time now will make things a lot easier further down the line.
If you ever run into any problems, you can talk to DreamHost’s support for more help. That’s one of the reasons I recommend DreamHost for beginners – their support is friendly, always available, and willing to go the extra mile!
Step 5: Log into WordPress (pre-installed with DreamHost)
As I mentioned earlier, the great thing about DreamHost is that you don’t need to install WordPress. It comes pre-installed on your account so you can start your blog faster.
Once you finish the signup process, you’ll receive an email from DreamHost to notify you that your account is set up and to provide you with your login credentials.
Sign into your DreamHost account. On the homepage, you’ll see a blue box that’ll help you log in to your WordPress Dashboard:
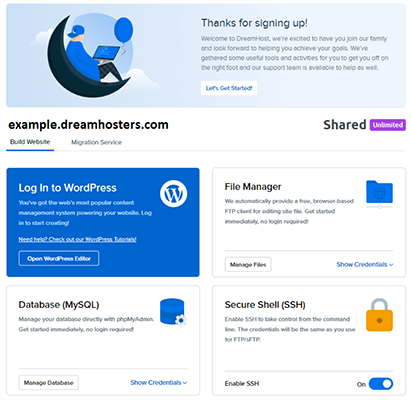
Click Open WordPress Editor.
Now you’re ready to start using your blog right away!
A quick tour of the WordPress dashboard
The WordPress dashboard is essentially the control panel for your entire blog. It’s where you’ll:
- Write your blog posts
- Choose how your WordPress blog looks
- Add functionality to your blog
- Moderate comments on your blog posts
As well as plenty of other important actions!
Accessing your dashboard is simple:
- Append /wp-admin to the end of your domain name (e.g. com/wp-admin)
- Log in using the credentials that you set up with DreamHost in the previous step.
Once you log in, you should see something like this:
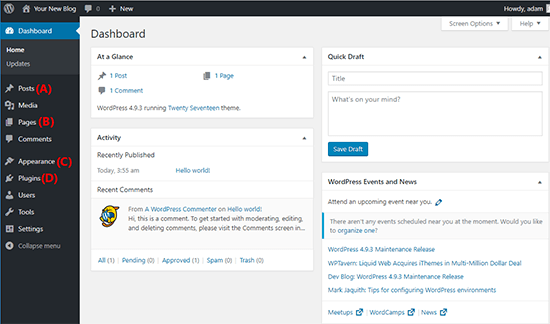
Here are some of the most important areas:
- A – This area is where you’ll actually write and manage your blog posts
- B – This area lets you create a different type of content called a “page”. This is good for stuff like about and contact pages
- C – This is where you can control how your blog looks using a “theme”
- D – This is where you control how your blog functions using “plugins”
Let’s go more in-depth with some of these important areas…
Step 6: Choose a WordPress theme (how your blog looks)
A WordPress theme dictates how your blog looks and, to a smaller extent, some parts of how your blog functions. It’s like your website’s clothing. And, just like you can’t go out in public naked, your WordPress blog needs a theme to function.
Your blog will come with a default theme, but most people want to choose their own theme to make their blog their own.
That said, the landscape of the WordPress eco-system has shifted dramatically in the past couple of years. Instead of choosing from a vast number of themes and getting wrapped up in analysis paralysis, most people tend to go for a select number of lightweight themes that offer maximum flexibility.
These themes include the likes of Astra, GeneratePress, and Kadence.
Each of these themes includes a large number of starter templates so you can make your blog look unique.
I use Kadence and have done for years now. I’ve been very happy with the functionality, and support.
What I particularly like is that the free version is a solid option for most people. You’d only need to upgrade to a paid plan if you need advanced functionality.
You can learn more about Kadence here. Alternatively, it’s available from WordPress.org.
Alternatively, you can check out our curated collection of blogging themes or free WordPress themes.
How to install your new theme
To install your theme:
- Go to Appearance → Themes in your WordPress dashboard
- Click Add New
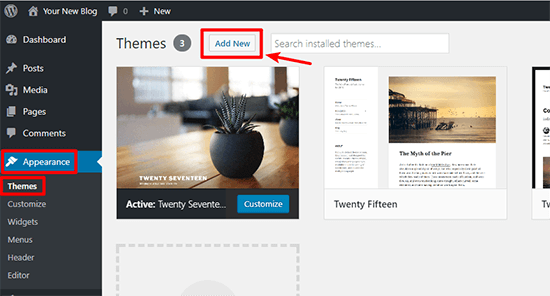
- For free themes you found at WordPress.org, search for the theme by name and click Install
- For premium themes, click Upload Theme and upload the ZIP file of your theme

Once you install your theme via either method, make sure to click the Activate button to make it live on your website!
How to customize your theme to make it your own
Once you activate your chosen theme, you can take things a step further and actually customize it to make it your own!
Most themes now support something called the Customizer. With the Customizer, you can modify your theme using simple options in a live sandbox. That is, you’ll be able to see the changes to your blog in real-time, but those changes won’t be made live until you Publish them.
To access this area, go to Appearance → Customize in your WordPress dashboard:
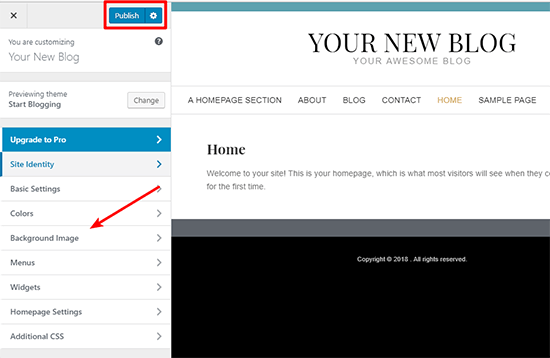
Feel free to play around and get creative with all the available settings because you can’t break anything!
Two areas that you’ll especially want to pay attention to are the Widgets and Menus:
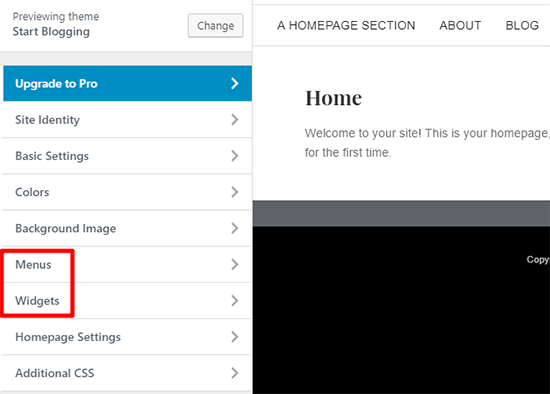
- Menus – Let you set up your site’s navigation menu so people can easily find their way around your blog.
- Widgets – Let you add cool functionality to your blog’s sidebar, like a list of your latest blog posts.
Step 7: Choose some WordPress plugins (how your blog functions)
Themes make your site look good. Plugins make it work.
Plugins are what turn a basic blog into something powerful. Want a contact form. A signup box. An online store. There’s a plugin for that.
And here’s the best part.
You’re not limited to just one. You can install as many plugins as you need, as long as they serve a purpose and don’t slow things down.
Some plugins are free. Others are premium. Both can be incredibly useful.
Choose the ones that help your site do more, not just look better. And don’t use too many.
When you’re just getting started, the WordPress plugin repository will be the place to go. You can install plugins directly from your dashboard or search WordPress.org directly. You’ll find a vast amount of free plugins there.
The plugins that every single blogger needs
While there are plenty of plugins that offer niche functionality, there are also certain types of plugins that pretty much every single blogger needs.
There are plenty of recommendations floating around the web, but it really boils down to specific types of plugins to install. We have some articles on some of these key plugin types worth checking out:
- Backup plugins
- Page builder plugins
- Mailing list & opt-in form plugins
- Social media sharing plugins
- SEO plugins
- Security plugins
- Speed optimization plugins
That should be enough to get you started!
How to install WordPress plugins
To install WordPress plugins:
- Go to Plugins → Add New in your WordPress dashboard
- For free plugins you found at WordPress.org, search for the plugin by name and click Install Now
- For premium plugins, click Upload Plugin and upload the ZIP file
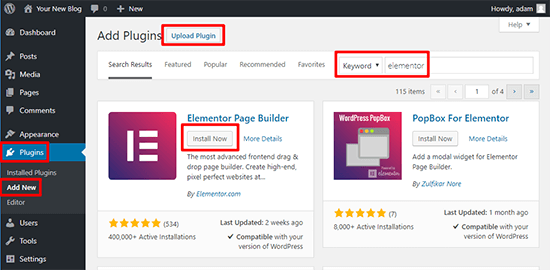
Once you install a plugin, make sure to Activate it. Then, you can read the plugin’s instructions for how to actually use the plugin on your site.
Step 8: Create some essential blog pages
Phew! That’s the tricky part over with. Now, you’re finally ready to start creating content for your blog.
But before you jump into writing your first blog post (that’s next!), it’s a good idea to create some core pages.
Unlike a post, a “page” has no publish date. It’s just something that’s always there.
At a minimum, most blogs have pages for:
- About – This tells visitors what your blog is about, as well as a little more about yourself. You can see my About page here.
- Contact – A surprisingly large number of readers will want to contact you. Your contact page makes that happen. You can see my Contact page here.
You might have more information that you want to share – but those two pages provide a good baseline to give readers the information they need.
How to create a new page in WordPress
To create a new page:
- Go to Pages → Add New in your WordPress dashboard.
- Enter the title of your page in the top box.
- Enter the content using Gutenberg blocks by clicking the plus sign, alternatively you can paste your content in and Gutenberg will automatically convert it into blocks.
- Click Publish when you finish.
Step 9: Write and publish your first blog post
And now for the super fun part of starting your WordPress blog. You’re finally ready to write your first blog post and share your thoughts with the world!
Creating a blog post in WordPress is almost identical to creating a page. There are just a few tweaks.
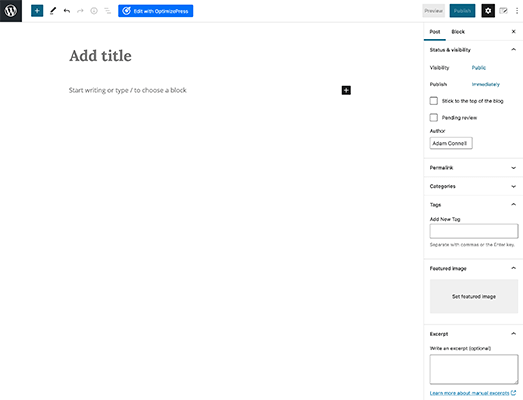
First, head to Posts → Add New. Then:
- Enter your blog post title at the top.
- Enter your blog post text using Gutenberg blocks. You can start typing immediately or paste in your content and it will automatically convert into Gutenberg blocks.
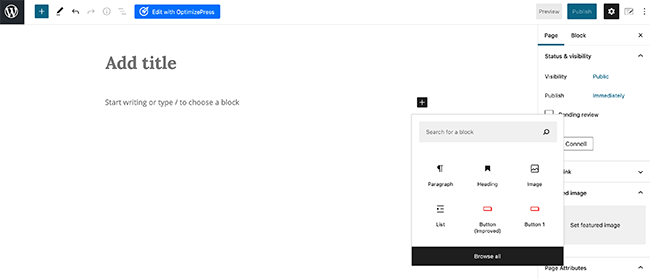
- If you need specific styled blocks such as button, bullet points or images, click on the plus sign which will bring up multiple options.
- Choose a category or add a new one on the right.
- Optional – add some tags that describe your blog post on the right.
- Click Publish when you’re finished.
Congrats! You just wrote your first blog post.
3 quick tips for writing awesome blog posts
There are a ton of blogs out there nowadays, so if you want to start a blog that stands out, you’ll need to create content that stands out.
Here are some quick-hit tips for writing content that people want to read:
- Think of your ideal reader…and write the post to speak to them. Don’t try to please everyone – just make your ideal reader really happy.
- Be helpful and add value. If you genuinely try to be helpful, it’s going to pay dividends in terms of popularity.
- Bring a unique perspective and voice. You’re a unique person, so don’t fall into the trap of writing the same thing as everyone else.
If you bring a unique perspective and try to create awesome content that actually helps your target readers do something better, you’re going to build a great foundation for a successful blog.
How to come up with blog post ideas if you’re stuck
When you first start blogging, you’ll probably be overflowing with ideas for blog posts.
But once you exhaust that initial outburst, it starts to get a little more difficult to consistently come up with new blog post ideas.
If you start struggling, check out our article on blog post ideas. Failing that, you could use an AI tool to generate ideas for you but I’d urge caution.
The best topic ideas are the ones that come from the heart. The ideas you come up with are the ones you’ll connect with the most.
Step 10: Start getting traffic to your WordPress blog
At this point, you should have the basics down pretty well. You’ve knocked out the technical details and started creating content.
Once you start putting that content out there, you’re likely going to shift into the next phase of blogging where you start thinking:
“Hey, I’m putting all this content out there. Wouldn’t it be great if people were reading it?”
Well, this isn’t Field of Dreams.
If you build it, some people might come. But it’s probably going to take a bit more than that to actually get traffic.
So when you’re just getting started, how can you get traffic to your blog?
Here are two proven strategies:
- Learn the basics of SEO and apply them to your site. While you don’t need to become an expert, knowing these basics will make it a lot easier for your site to get found in search engines like Google.
- Register social media accounts and start promoting your blog on social media. Some social networks, like Pinterest, can be especially valuable for blogs.
And for an even deeper look at getting more traffic to your blog, I wrote this huge post on traffic generation. There are plenty of actionable ideas inside.
Step 11: How to make money blogging
Finally, we come to the part of running a blog that many aspiring bloggers dream of:
Making money from your WordPress blog.
Now, I know that not everyone cares about making money blogging. But I think most people wouldn’t mind at least a little side income from their blog, right?
Thankfully, there are tons of different routes that you can use to monetize your blog.
Here are some of the most popular options:
Affiliate marketing
With affiliate marketing, you get paid a commission for referring potential customers to a product or service. Done right, you get to refer people to products that you believe in and get paid as thanks.
Advertising
You can either sell advertisements directly to companies in your niche or use a service like Google AdSense to serve the ads for you. While Google AdSense isn’t always super lucrative, it’s an easy, hands-off way that you can generate at least some revenue from your blog.
Offer a service
Plenty of successful bloggers make money by offering a service that’s tied to their niche. For example, plenty of other bloggers make a full-time living just by writing blog posts for other people. And I bet if you have a quality blog, you can do the same thing!
Beyond those three methods, there are also tons of other creative ways to make money from your blog. Give that post a read and get inspired.
But please remember: It takes time, effort and money to make a business work. And it may require some experimentation to get right. If you’re after a quick way to make some cash – blogging isn’t the answer.
Related Reading: Why Blog? 19 Benefits Of Blogging For Businesses.
Final thoughts
Starting a blog isn’t complicated. Most people just make it complicated.
When you know how to start a blog the right way, you’re not just publishing content. You’re building an asset. One that attracts the right audience, builds trust automatically, and creates opportunities long after you hit publish.
The key is simple.
Pick a clear topic. Create helpful content. Stay consistent. Then let time and momentum do the heavy lifting.
You don’t need to be an expert. You don’t need fancy tools. You just need to start.
Follow the steps in this guide, publish your first post, and keep going. That’s how blogs turn into traffic. That’s how traffic turns into income. And that’s how a simple blog becomes one of the most valuable marketing assets you’ll ever own.
Now the only question is this.
Are you going to keep reading about blogging. Or are you going to start one today?
Disclosure: Our content is reader-supported. If you click on certain links we may make a commission.