Shopify Review 2024: The Definitive Ecommerce Platform?

Welcome to our Shopify review.
Shopify is the most popular hosted ecommerce platform in the world—but is it the best?
That’s the question we’ll be exploring in this post.
We’ll start by explaining what Shopify is. Then, we’ll look at all of its key features, explain how pricing works, and reveal what we think the platform’s biggest pros and cons are.
What is Shopify?
Shopify is the fully hosted, all-in-one ecommerce solution.
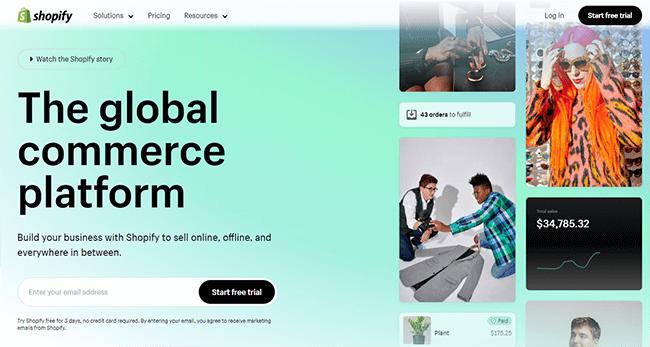
It powers over a quarter of all the online stores on the internet, making it the market leader by a wide margin.
The ‘fully hosted’ part of that description means that Shopify runs on its own servers. You don’t need to install software and purchase website hosting separately like you might if you were using something like WordPress and WooCommerce.
Instead, you just sign up, log in to the browser app, and create your online store—Shopify handles all the technical stuff to keep it on the internet.
The ‘all-in-one’ part means Shopify comes with everything you need to sell across multiple channels and manage your entire ecommerce business in one place.
That includes a no-code website builder and customizable store themes, integrated checkout, order and stock management features, a payment processor, marketing tools, CMS, POS system… pretty much everything.
And if Shopify doesn’t have a specific feature that you’re looking for out of the box, there’s a good chance you can find a third-party app that’ll do the job in Shopify’s enormous App Store.
That unparalleled flexibility is just one of the reasons why Shopify is the most popular hosted ecommerce platform in the world. But that’s not the only thing it has going for it.
We’ll get to all the other things we like about Shopify (and the things we don’t like) in due course. But first, let’s look at the features.
What features does Shopify offer?
As an all-in-one platform, Shopify comes loaded with tons of features.
We’ll reel off some of the main highlights below, but trust me when I say this is by no means an exhaustive list:
- Online store builder
- Website hosting
- Product management
- Inventory management
- Order management
- Shipping calculation
- Tax collection
- Customer management
- Segmentation
- Automation tools
- Cross-channel selling tools
- Shopify Payments
- Third-party payment processor integration
- Shopify POS
- Currency conversions & website localization
- Discount codes
- Free SSL
- Email marketing
- Abandoned cart recovery
- Reports and analytics
- App Store
And that’s just the tip of the iceberg. Shopify has plenty more features than those listed above, but we probably wouldn’t be able to fit them all on the page even if we wanted to.
Rather than try to cover everything in one review, what I’m going to do next is give you a high-level overview of some of the most important features, and walk you through how everything works inside the Shopify dashboard.
Here we go…
Getting started
When you log in to Shopify, you’ll be brought to your account dashboard.
If it’s your first time logging in, you should see a setup guide with a checklist of all the things you need to do to get your store up and running.
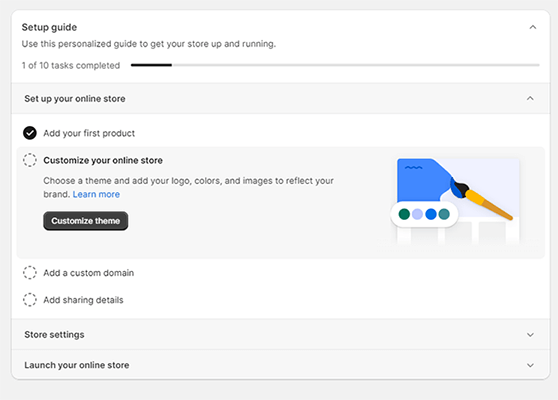
You can click the items in this checklist to work your way through the tasks one by one.
Or if you just want to go at it alone, you can ignore the checklist and access all of the tools and features you need to create and manage your store from the navigation bar on the left side of the screen.
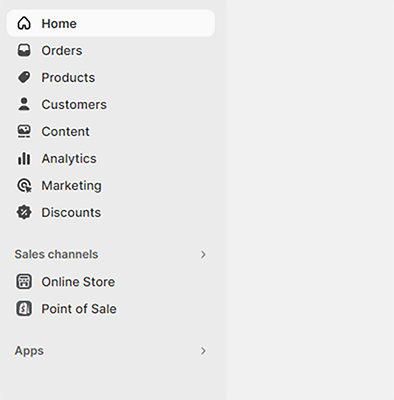
Probably the first thing you’re going to want to do is to add your products, so let’s start there.
Products
To create your product catalog, go to Products in the sidebar.
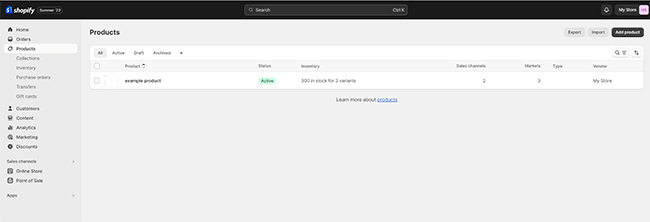
If you’re migrating your catalog over from another ecommerce platform, you can import your products in bulk from a CSV file. Just click Import products to get started.
Alternatively, click Add your products to create new listings one by one.
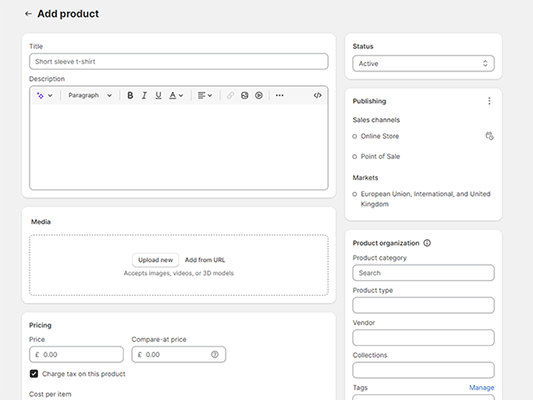
Regardless of whether you’re selling physical products, services, or digital products in Shopify, the first step is always to add them here first.
But for digital products or services, you’ll also need to connect an app to manage them later (we’ll explain more about this when we look at the App Store).
You’ll need to set a title for each new product you create, as well as a description. Recently, Shopify added a cool new AI writing feature that lets you automatically generate product descriptions from your prompts, which we found pretty neat.
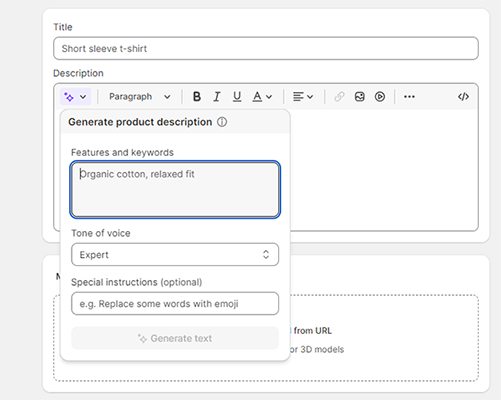
Just enter some features and keywords you want to cover, choose a tone, and add any other special instructions for the AI, and it’ll do all the copywriting for you.
Once you’ve done that, upload any media files you want to use as product pictures. These can be images, videos, or even 3D models.
Annoyingly, Shopify doesn’t crop your images to a uniform ratio automatically. But you can do this yourself using the built-in image editor as needed. After that, the next step is to set your pricing.
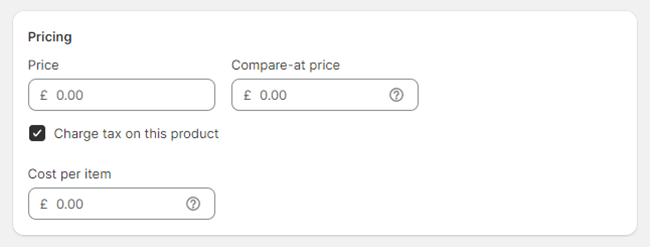
If you want to display a markdown for a product that’s on sale, you can also enter a compare-at price, which will be shown next to the actual price with a strikethrough (e.g. $35.00).
And optionally, you can also enter a cost per item. The customer won’t see this, but it’ll allow Shopify to calculate your profit margins and display them to you, which comes in useful.
Automatic tax collection
Underneath the Pricing section when creating a product, you’ll see a button that says Charge tax on this product. You can turn this on to have Shopify automatically calculate and add the relevant tax amount to the product price.
Just keep in mind that Shopify doesn’t file or remit taxes for you. It’s also still solely your responsibility to make sure you consult with a qualified tax professional and verify that you charge customers the correct tax rate for your area.
You can manage sales tax collection in all the regions you’re liable in through your store settings page. Just click Settings > Taxes and duties.
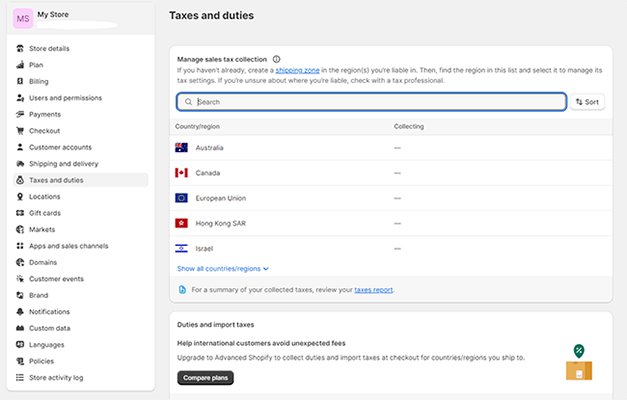
From here, you can decide how tax is charged. For example, you can have Shopify include tax in product prices, charge tax on shipping rates, charge VAT on digital goods, etc.
Additional purchase options
Aside from regular pay-now pricing, you can also offer additional purchase options to your customers with Shopify. There are three options to choose from:
- Subscriptions – Charge your customers a recurring subscription fee for your products.
- Try-before-you-buy – Give customers the option to order items without paying straight away. Instead, they’ll be able to try the product out and pay at a date in the future.
- Preorders – Give customers the option to purchase items that aren’t ready for fulfillment yet. They’ll be fulfilled at whatever date in the future you set.
Inventory tracking
When adding a product, you’ll have the option to create an inventory for that product.
Enter the number of each product that you have in stock, and then turn on Track quantity so that Shopify can keep track of your inventory and update it as you make sales.
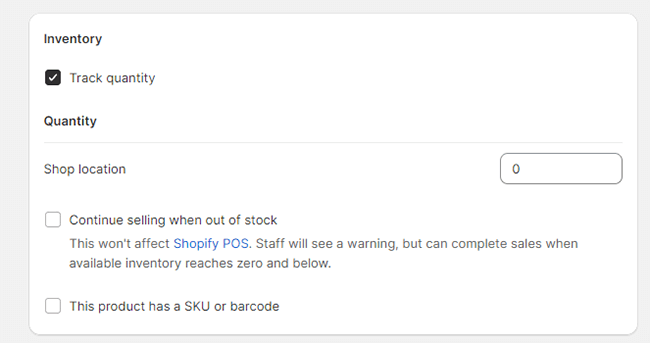
You can view the current inventory at any time from the Inventory tab.

You can also assign an SKU and a barcode to each product to help you internally manage inventory.
In addition to tracking your own stock, you can also manage, track, and receive inventory ordered from your suppliers under Purchase orders.
Product variants
When creating your products, you can also add Variants to provide additional customization options for the customer.
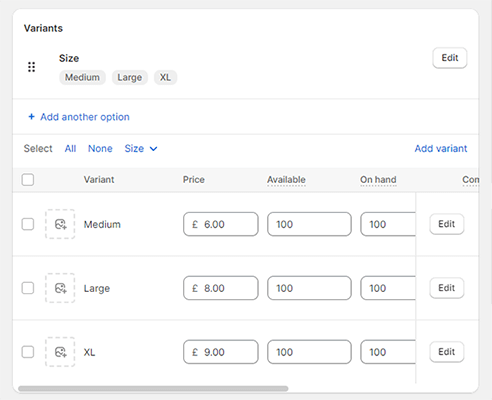
This is useful when you’re selling products that come in different versions, such as in different sizes or colors.
To do so, scroll down on the product creation page and click + Add options like size or color. Then, enter an Option name and as many Option values as needed.
For example, you might set the option name as Size, and then add 5 values: XS, small, medium, large, and XL.
You can set the price and inventory for each variant individually, and upload separate variant images for each of them too.
Collections
Once you’ve created your products, you can organize them into categories with the Collections feature. This will make it easier for customers to find them in your store.
For example, if you’re a clothing retailer, your Collections might include:
- Men’s t-shirts
- Women’s accessories
- Items on sale
- Products from a particular brand
- Seasonal products
You get the idea.
To get started, just navigate to Products > Collections > Create collection, and then fill out the details on the page to set it up.
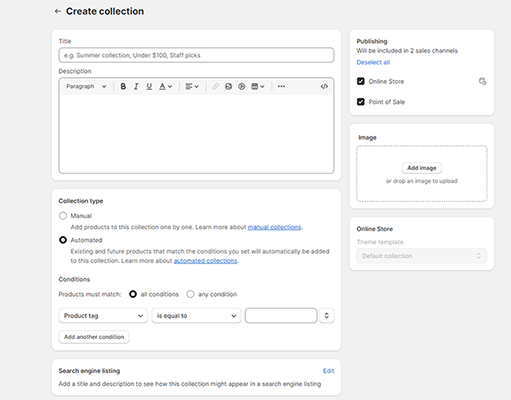
You have the choice of manually adding products to each collection one by one or setting up automation rules to automatically add existing and future products to your collections based on things like their price, title, tags, category, etc.
After you’ve created a collection, the products in it can be displayed on your store as a gallery on their own webpage. You can also add links to your collections in your navigation menu.
Shipping tools
Shopify also comes with tools to help you manage shipping.
You can set the weight of each product you create, and tick the This product requires shipping box to have Shopify collect shipping information from the customer at checkout.
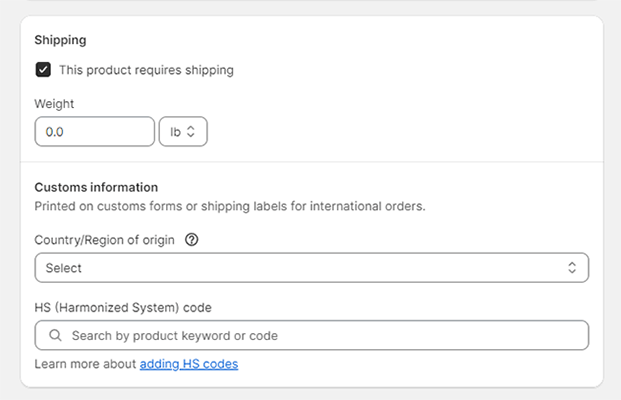
Optionally, you can also add customs information for different countries/regions, which will be printed on custom forms or shipping labels for international orders.
Once you’ve set up shipping in your account, you should be able to buy and print shipping labels directly from your Shopify admin (with discounted rates). Plus, display calculated shipping rates to your customers at checkout.
SEO tools
At the bottom of the page when adding a new product, you’ll see a box labeled Search engine listing.
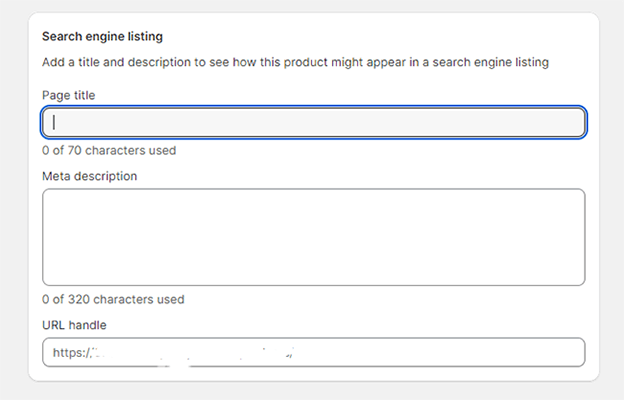
You can click this to change the page title, meta description, and URL slug for your product pages. This comes in handy if you’re hoping to drive traffic through SEO as you can optimize the above for your target keywords.
Aside from product pages, you can also edit the title tags, meta descriptions, URLs, and image alt text for all your Shopify web pages, blog posts, and collections.
Plus, edit your robots.txt file, find and submit your sitemap.xml file, and handle all the technical stuff involved in search engine optimization
Gift cards
There’s one last feature in the Products section of Shopify that we want to look at before we move on and that’s Gift cards.
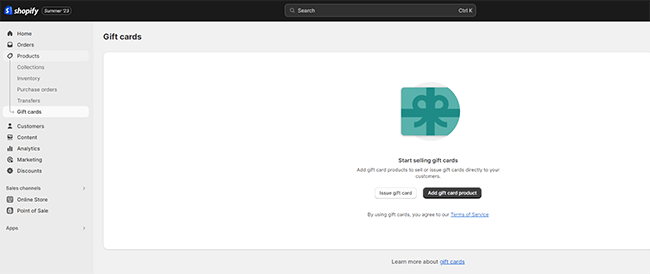
Shopify makes it easy to issue gift cards and sell them as products in your online store. Just go to Products > Gift cards > Add gift card product to get started.
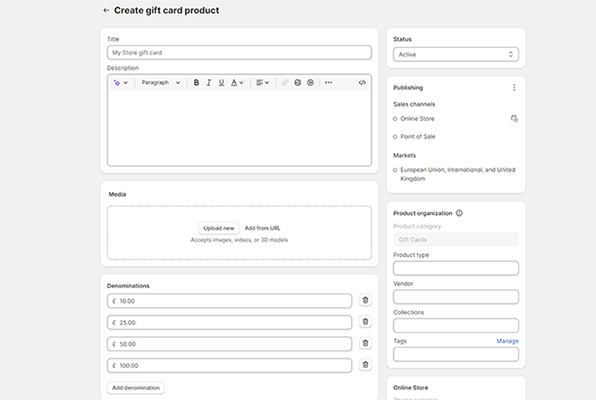
Next, enter a title, description, and media files just like you would for a regular product, choose your available gift card denominations, and save.
To issue a gift card to a customer, click Products > Gift cards > Issue gift card instead. Then, enter a gift card code (or use the one Shopify generates for you), the initial value, and the expiration date.
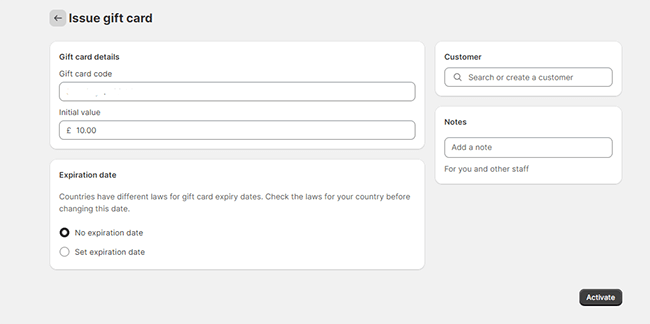
Finally, choose the customer you want to send it to (you can search your contacts list) and hit Activate and Send to deliver it.
Payments
Before you can actually start selling products on Shopify, you’ll need to connect your store to a payment processor/gateway. To do so, go to Settings > Payments.
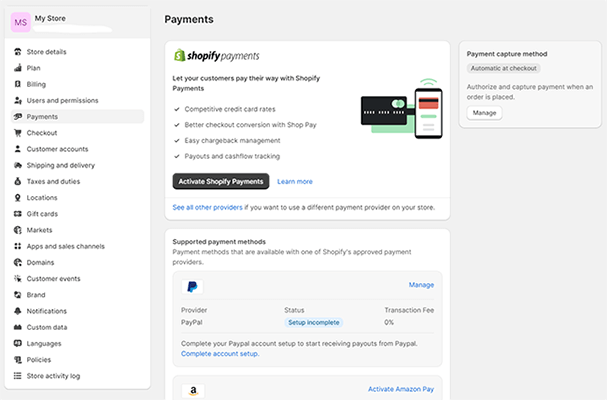
Shopify supports pretty much every payment provider, including PayPal, Amazon Pay, Klarna, AliPay, etc.
But annoyingly, it kind of pressures you into using the in-house payment processor, Shopify Payments.
If you use Shopify Payments, there are no transaction fees. But if you use a third-party payment provider instead, there are additional transaction fees of either 0.5%, 1%, or 2% depending on the plan you sign up for.
I get it. It makes sense why Shopify does this. After all, the platform makes a big chunk of its revenue from Shopify Pay, and there’s really no reason not to use it. But still, from the user’s perspective, it’s not a good look.
If you want to use Shopify Payments, all you have to do is click Active Shopify Payments and follow the on-screen instructions. For other providers, click Add payment methods, then search for and click on your preferred gateway to complete account setup.
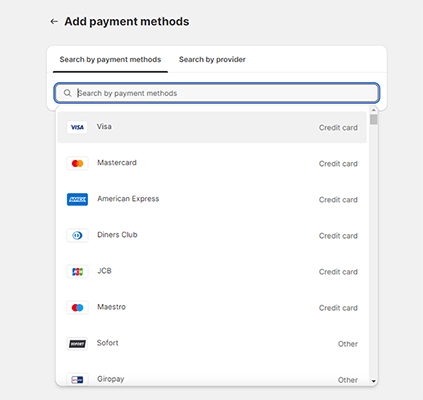
It’s also possible to accept manual payment methods on Shopify like cash on delivery and bank deposits. You’ll need to add these separately and approve orders made by manual payment methods before they can be fulfilled.
Online Store
Once you’ve created your product catalog and connected a payment gateway, the next step is to customize your Shopify store.
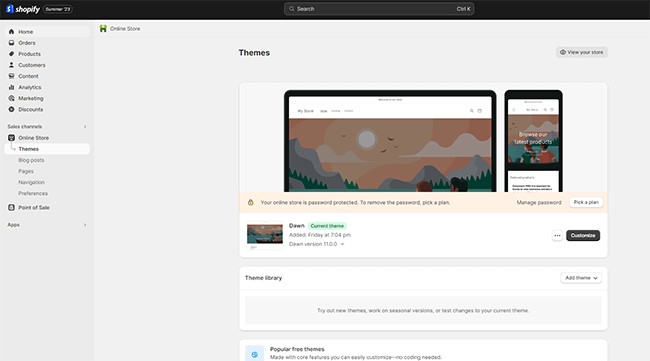
From here, the first thing to do is to choose a theme. The default theme is Dawn (which looks great, by the way), but there are plenty of other options that you can switch to instead.
There are currently 12 free themes available, plus 145 paid themes in the Shopify theme store. Each has its own unique aesthetic, but they’re all professionally designed.
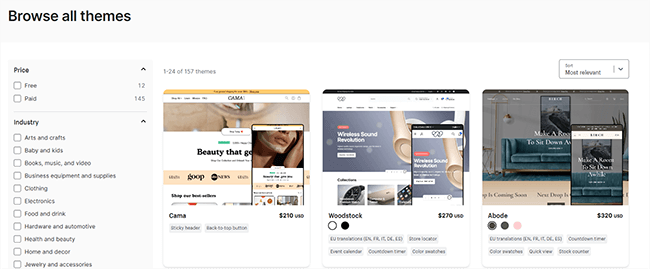
You can edit your theme and all your website pages in the store builder. Click Customize to open it up.
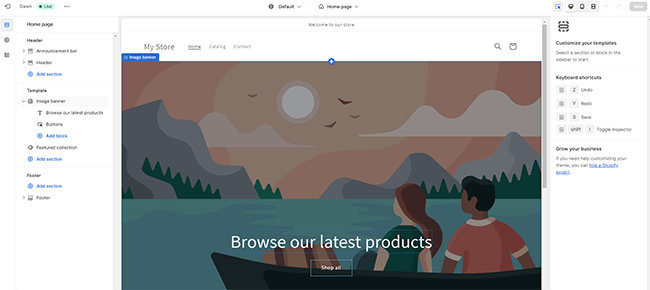
The store builder uses a no-code, drag-and-drop interface that makes it super beginner-friendly. You can add pre-made sections and blocks, then edit those sections and fill them out with your own content as needed.
You can also customize site-wide elements like your logo, colors, typography settings, buttons, header, footer, navigation bar, etc. And you can switch between desktop and mobile view to see what your site looks like on different devices.
If you need more control, you can also edit the code directly, as well as the default theme content.
Pages
Shopify automatically creates product pages for you, as well as some default pages like a home page, catalog page, and contact page.
To create a new page, go to Online Store > Pages > Add page. Then, add a title and some content, and publish it to your store.
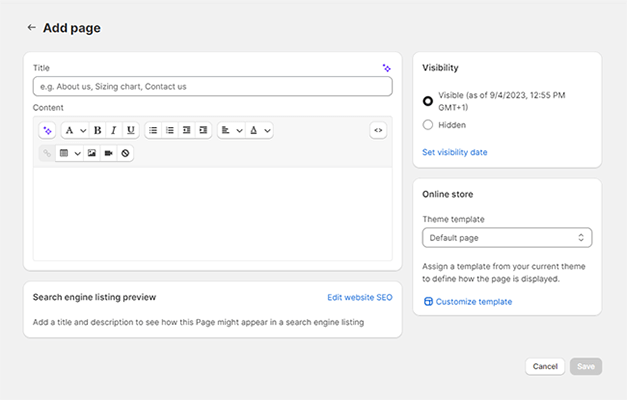
Once you’ve done that, you can open it up in the Store Customizer (page builder) again to add sections and blocks, change the content and design, etc.
Blog posts
Shopify is one of the few ecommerce platforms to come with blogging functionality.
This is a big plus as blogging can be a great way to drive traffic to your site, provide guidance and information to your shoppers, and build a community around your brand.
To create your first blog post, go to Online Store > Blog posts > Create blog post.
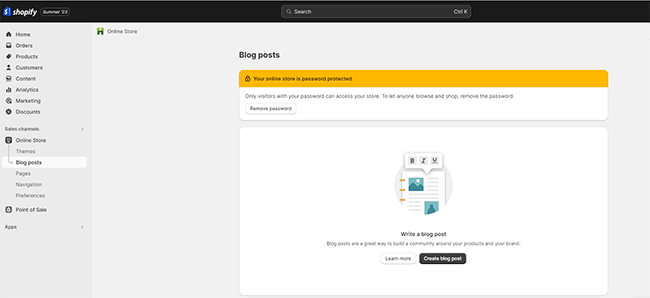
In the next window, you can enter a title for your blog post and start writing the content in the text box below.
The text space for your blog content is oddly small. And in general, the blogging interface just isn’t very well laid out. It’s certainly not as good as WordPress’s block editor, but it does the job.
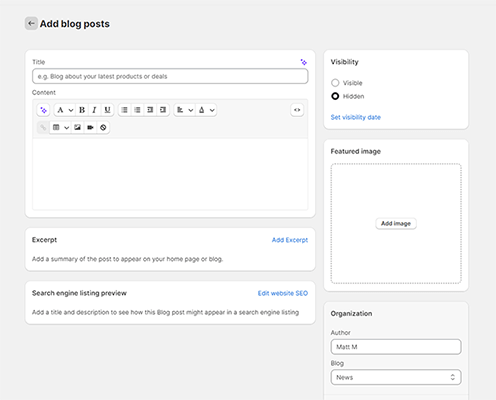
Before you publish the post, you also have the option of adding a featured image and excerpt/summary. Plus, you can edit the SEO settings, add tags, and change the blog category and/or author as needed.
Orders
Once your store is up and running and you’ve started to make sales, you can go to the Orders section of Shopify to view and manage all your customer orders.
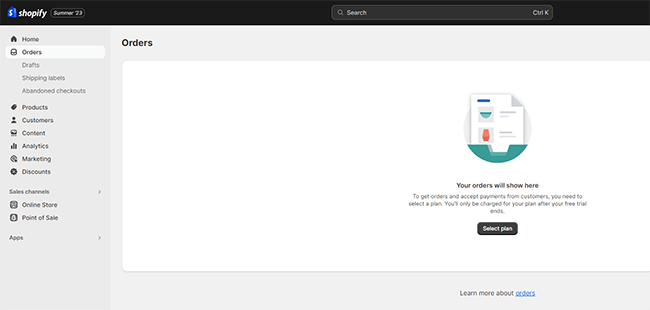
Aside from viewing previous orders, there are a few other things you can do in this section.
Under Shipping labels, you can purchase, print, reprint, and void shipping labels. And you can also track deliveries in bulk.
Under Abandoned checkouts, you’ll be able to see orders that your customers failed to complete. If somebody adds an item to their cart but fails to check out, it’ll show up here.
You can then email those customers a link to their cart to give them a nudge to go back and complete their purchase. However, it’s easier to automate this process by setting up an abandoned checkout reminder workflow (more on this later).
Customers
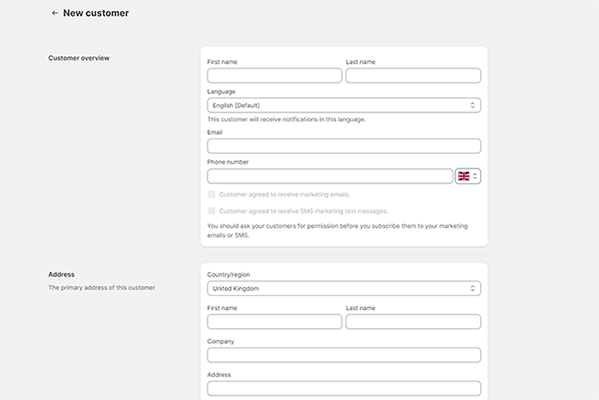
Whenever a new customer shops at your store, Shopify will grab their name and other details, and store them in your customer list.
You can then view and manage all of these contacts from the Customers section of your Shopify account.

Customers can create accounts with Shopify to add their address so that the next time they shop with you, their checkout details will be automatically populated with their details.
Once they’ve created an account they can also easily view things like their order history and order status.
You can click on any contact in your customers list to open up their information. From here, you can do things like send them links to update their payment information, etc.
If you want to add customers, either click Import to add them in bulk by uploading a CSV or alternatively, click Add customer to fill out their details and add them manually, one by one.
Segments
Shopify also comes with segmentation features to better organize your customers. You can group together customers who share certain characteristics into Segments.
This enables you to create targeted marketing campaigns, in which you personalize your messaging for different segments. It can also help you to better understand your customers and how different segments behave.
To get started, go to Customers > Segments > Create segment. Then, either choose a template or apply a filter.

There are templates for all the most useful segments like first-time customers, high-value VIP customers (i.e. who placed a lot of orders or spent a large amount per order), lapsed customers who have stopped engaging with your emails, etc.
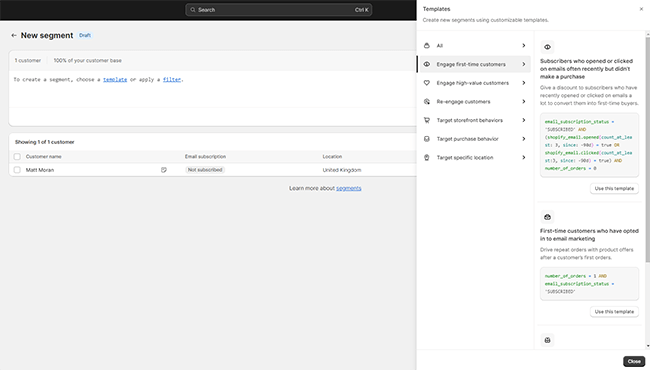
There are also dozens of templates to segment customers by storefront behaviors (i.e. pages viewed, collections viewed, etc.), purchase behavior, and location.
If you can’t find a suitable template, you can build your own segment from scratch by applying filters with your own segmentation criteria.
Marketing
You can use Shopify’s built-in marketing tools to acquire new customers and convert more of your store visitors and leads.
Go to the Marketing section of your account to get started.
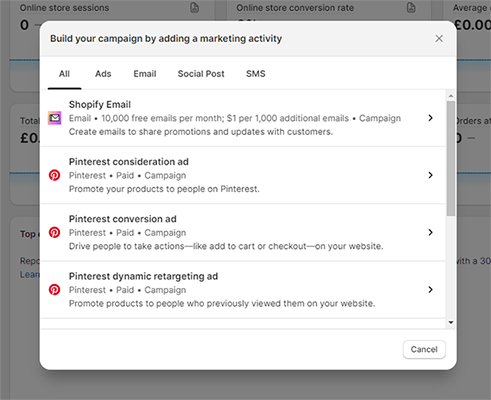
Here, you’ll see a bunch of useful marketing and sales statistics. Click Create campaign to build your first marketing campaign.
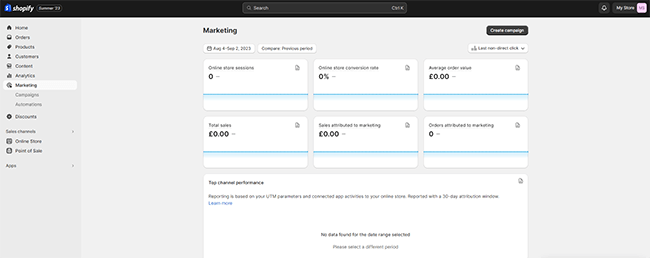
You can run all sorts of different campaigns with Shopify, including email campaigns, social media marketing campaigns, SMS campaigns, and paid ad campaigns.
Some of these will require you to download and install an app (more on this later), whereas others are available out of the box.
To run an email campaign, you’ll need to activate the Shopify Email app first. It’s free for up to 10,000 emails per month, but you’ll need to pay extra for any additional emails on top of that.
The first step in creating a campaign in Shopify Email is to choose a template from the template library.
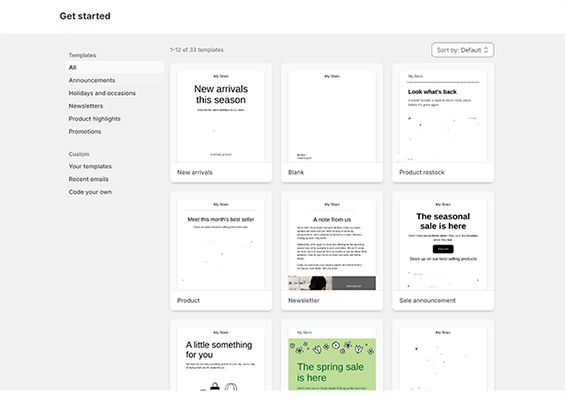
There are 33 templates in total, covering all the most common use cases. For example, there’s an email template for a sale announcement, new arrivals email, product restock message, etc.
Choose whichever one best matches what you’re trying to create to open it up in the email editor. From here, you can change the content, and add/remove/reorder sections in the drag-and-drop window.
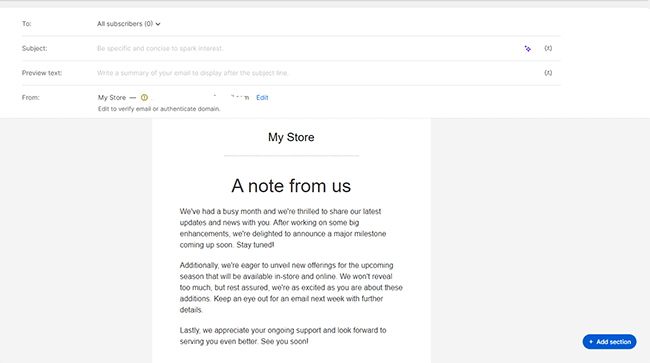
Once you’re done, just set your subject line and preview text, choose your recipients (i.e. all subscribers, or a particular segment), and send.
Automations
Under Marketing > Automations, you can set up automated campaigns to run as long as you want.
First, click Start automation to be brought to the Automation templates library.
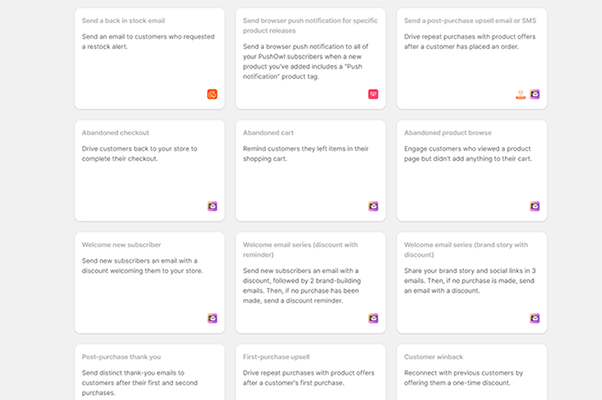
Here, you’ll find a bunch of pre-built workflows that you can roll out in a couple of clicks. All the most common ecommerce automations are covered.
For example, there’s a template for abandoned cart emails that’ll automatically send reminders to customers who have left items in their shopping cart and drive them back to the store to finish checking out.
There’s a template for a welcome email series in which you drip out a sequence of emails to share your brand story with new leads/contacts and follow up with a discount to get them to convert.
There are also templates for automated post-purchase thank-you emails, upsell emails, customer win-back emails, and more.
All templates can be customized in the workflow builder. And if you can’t find a template that does what you want, you can also start from scratch and create your own custom automations
Discounts
From the Discounts section, you can set up promotions and offers by creating discount codes, or offering automatic discounts that apply at checkout.
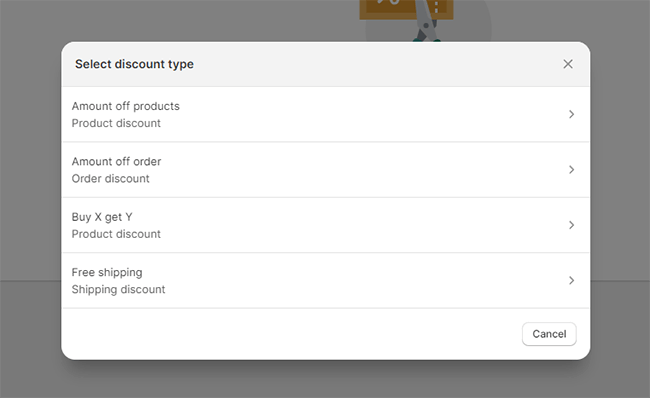
First, click Create discount. Then, select the type of discount you want to set up. Examples include ‘Get X amount off product’, ‘Get X amount off order’, ‘Buy X, get Y free’, and ‘free shipping’.
On the next window, you can generate a discount code, set the value of the discount (as either a percentage or a fixed amount), add terms and conditions like minimum purchase requirements and customer eligibility information, etc. You can also set a start time and end date for your discounts.
Analytics
Shopify offers a very robust analytics feature.
From the Analytics section, you can view all the most important statistics about your Shopify online store and track metrics like total sales, online store sessions, average conversion rates, average order values, returning customer rate, etc.
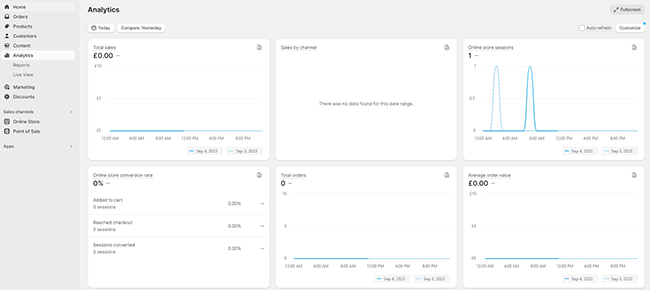
You can also gather insights about which marketing campaigns and sources are driving you the most traffic, which you can use to inform your strategy.
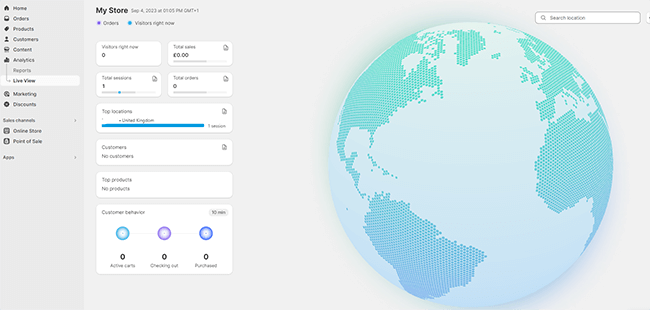
Under Live View, you can see all the visitors on your store right now, and what they’re doing. And it updates in real-time.
Under Reports, you can generate custom reports to surface whatever data you want to show. Then, save those reports or export them as CSVs.
Shopify POS
Shopify isn’t just for online stores.
It also offers a POS (Point of Sale) app for brick-and-mortar stores, which you can download on both iOS and Android.
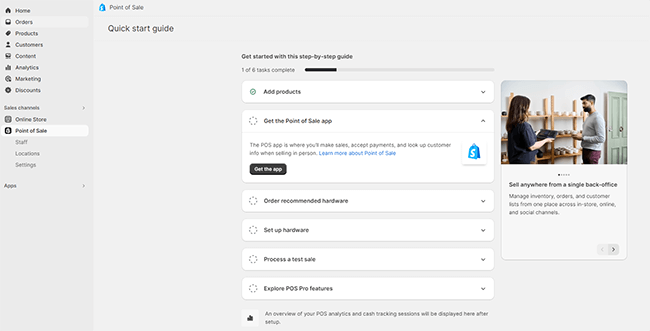
Once you’ve got the app, you can use it to accept payments in person, and your orders will sync up with your online account.
We won’t get into all the POS stuff in detail as it’s outside the scope of this article, but you may need to purchase some additional hardware and POS Pro features, depending on your needs.
Shopify App Store
So far, we’ve looked at most of the things you can do with Shopify out of the box. But really, that’s just the tip of the iceberg.
It’s possible to unlock hundreds of other useful tools and features that extend your store’s functionality by installing and activating third-party apps. There are over 8,000 apps to choose from in the Shopify App Store.
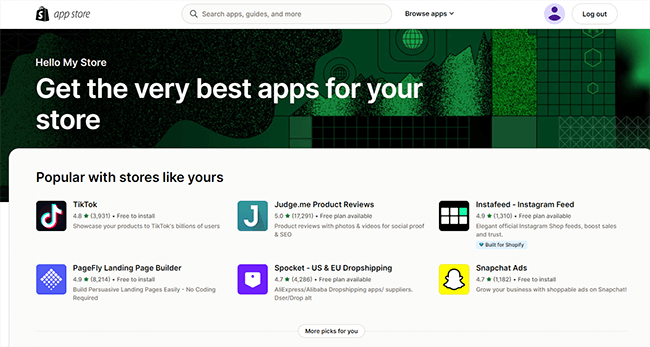
For example, let’s say you want to start a dropshipping store. In that case, you’d need to install a dropshipping app.
We’d recommend Spocket as it’s one of the top-rated dropshipping apps on Shopify with a 4.7-star rating.
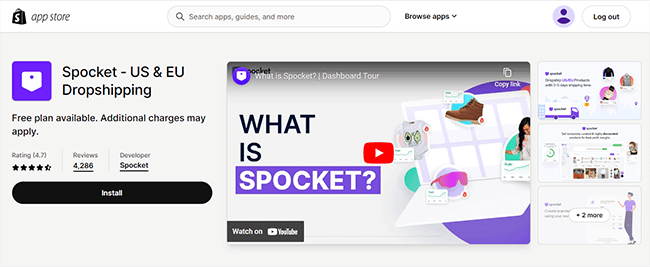
Once you’ve installed it, you’ll be able to browse products from hundreds of top suppliers across Europe and the US and import them to your store in a couple of clicks.
If you want to sell print-on-demand products, you’ll need to install a POD app first. For that, we’d recommend Gelato.
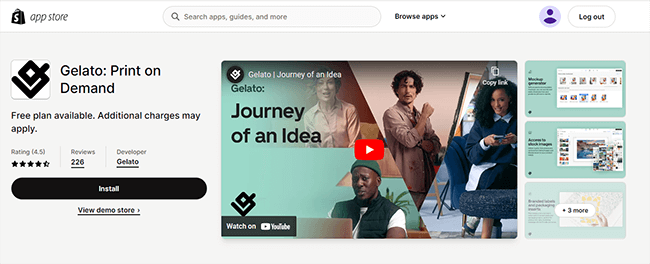
Once you’ve connected it to your store, you can import blank products from Gelato’s catalog, customize them with your own designs, and sell them with on-demand fulfillment. Gelato handles printing and shipping, and you only pay for what you sell.
How much does Shopify cost?
Shopify offers a few different pricing plans: Basic, Shopify, Advanced, Retail, Plus & Enterprise.
The biggest difference between plans is the transaction fees/credit card fees that apply to each of them. Generally, the more you pay in monthly subscription costs, the less you’ll pay per transaction in fees.
But there are also some differences in features, usage limits, etc. Here’s a very basic overview of each plan.
The Basic plan starts from $39/month, plus credit card rates of $2.9% online and 2.7% in person, and transaction fees of 2% when you use a third-party payment gateway. It also lets you sell unlimited products, but only includes basic reports.
The Shopify plan starts from $105/month, plus credit card rates of 2.6% online and 2.5% in person, and transaction fees of 1% when you use a third-party payment gateway.
It has all the same features as Basic plus better reports, and up to 5 staff accounts.
The Advanced plan starts from $399/month, plus credit card rates of 2.4% online and 2.4% in person, and transaction fees of 0.5% when you use a third-party payment gateway.
It comes with everything in the Shopify plan plus the custom report builder, duties & import taxes, and up to 15 staff accounts.
Shopify Plus is an enterprise-level solution for high-volume businesses. It starts from a whopping $2000/month but comes with top-of-the-line features and support.
Shopify Retail is a plan specifically designed for selling in person. It starts from $89/month and comes with more advanced staff, inventory, and loyalty features.
You can try Shopify free for 3 days, with no credit card required. You can try for 3 months at $1/month. Discounts of up to 25% are available on all of the above plans when you pay yearly.
Shopify’s pros and cons
Now we’ve had time to try out Shopify and explore its features and pricing, here’s what we think its main pros and cons are.
Shopify pros
- Fantastic checkout process. Shopify’s checkout is one of the best around. It’s super streamlined and converts like crazy, which helps to ensure you make the most of every sales opportunity.
- Huge app store (very extensible). Shopify has a lot going for it, but its the app store that makes it the number one ecommerce platform. With thousands of third-party apps for pretty much everything you can think of, the possibilities of what you can do with Shopify are nearly limitless.
- Performance. Shopify website pages load very fast, and uptime is excellent. It gets top marks for performance and reliability.
- Particularly good for POS and multi-currency selling. Shopify is a great choice for retailers that sell both in-person and online as it unifies those sales channels. It’s also good for selling internationally thanks to its multi-currency support, automated tax features, and shipping tools.
- Good for beginners and experienced developers alike. Shopify is whatever you need it to be. If you’re a complete beginner, you’ll have no problem building your own online store with Shopify’s drag-and-drop builder and free themes—no coding skills required. But if you need more control, it’s also very developer-friendly and gives you full access to CSS, HTML, and Liquid should you need it.
Shopify cons
- Transaction fees. My biggest issue with Shopify is its transaction fees. I don’t like that it kind of forces you to use its own internal payment processor by charging additional transaction fees for third-party gateways.
- Limited themes. Shopify doesn’t offer as many free themes as many of its competitors. Some other website builders and ecommerce platforms offer hundreds of themes, but Shopify only has a dozen.
- Reliant on third-party apps. While Shopify offers a lot out of the box, it’s still fairly reliant on apps. You’ll need to install apps to do things like email marketing, dropshipping, etc. And the more apps you add, the more bloated your store becomes. On the flip side, this does make Shopify more flexible.
Alternatives to Shopify
If you’re not sure Shopify is a good fit, you may want to explore some alternatives. Here are some other ecommerce platforms that might be a better fit for your online store:
- Sellfy | Our review – The best choice for artists, creators, and small businesses. It’s super easy to use and comes with zero transaction fees, plus built-in print-on-demand capabilities.
- Squarespace – A general-purpose website builder with ecommerce functionality. Easy to use, great design tools and website templates, and a good choice for beginners. Includes additional functionality such as email marketing, course builder, and more.
- BigCommerce – The closest thing to Shopify that isn’t Shopify. It’s another hosted, all-in-one ecommerce platform with all the features you need to start selling. But if I had to choose between the two, I’d still choose Shopify.
Final thoughts on Shopify
That concludes our in-depth Shopify review.
So, what’s the final verdict?
All in all, it’s clear why Shopify is the most popular ecommerce platform in the world.
It’s hands-down the best choice for serious merchants thanks to its high-converting checkout, extensive feature set, flexibility, performance and reliability, and enormous app store.
All that said, if you’re just hoping to start a very simple ecommerce store selling digital products, you probably don’t need Shopify.
Something like Sellfy might be a better choice as it’s a little more affordable and doesn’t charge extra transaction fees when you use third-party payment gateways
But if you’re planning to start a full-fledged ecommerce site in which you have to manage lots of inventory and ship products out to your customers, Shopify is without a doubt the way to go.
If you’re still on the fence about whether or not to sign up, it might be worth trying Shopify out for yourself. You can sign up for a free trial by clicking the link below – no credit card required.
Disclosure: Our content is reader-supported. If you click on certain links we may make a commission.
