How To Add Google Analytics To WordPress (3 Simple Methods)

Do you want to use Google Analytics but aren’t sure how to add it to your WordPress website?
Google Analytics is a free tool. It’s the net’s go-to analytics service for analyzing all of the traffic your site receives.
In this post, you will learn how to add Google Analytics to WordPress using several different methods.
Before we can add Google Analytics to your WordPress website, you’ll need to sign up for a Google account. Once you’ve got a Google account you can get started with this tutorial.
Note: It’s important that you only use one of the methods listed below. Using more than one method to integrate Google Analytics with your site can cause conflicting issues, which can lead to inaccurate reports or no reports at all.
How to add Google Analytics to WordPress – 3 easy ways
- Use a WordPress plugin – Simplest method. Plus, the best option for those already using particular SEO plugins.
- Insert code in your header – An easy way to add Google Analytics to your site without a plugin, though you can certainly use one to make things easier. Either way, you’ll have less features than the previous method, fair warning.
- Load Google Analytics locally – Best option if performance is a concern. Can be done in a few short minutes with a plugin.
Method #1: Use a WordPress plugin
If you use an SEO plugin, you may be able to use it to integrate your site with Google Analytics. This method negates the need for a third-party option.
Here are a few SEO WordPress plugins that allow you to add Google Analytics to your site through their settings:
- SEOPress – This method requires unique Google Analytics API credentials for your site, which you can create via Google Console. Once your API is set up, copy and paste the credentials in SEOPress’ settings. If you have SEOPress Pro, you can view stats from Google Analytics from the WordPress dashboard.
- The SEO Framework – You can integrate your site with Google Analytics using this plugin, but you’ll need the Pro-tier premium plan or higher.
- Rank Math – Integrate Google Analytics with your site by connecting your Google account through Rank Math’s setup wizard. Once you set things up, you can view stats and reports related to your site’s traffic from the Analytics page in Rank Math’s settings.
Browse your SEO plugin’s documentation for detailed instructions.
Using a dedicated Google Analytics WordPress plugin
If your SEO plugin doesn’t have this feature or you simply want to use another solution, consider installing a dedicated Google Analytics WordPress plugin.
GA Google Analytics is one of the simplest and most reliable plugins out there. It’s currently used by over 600,000 WordPress sites and has a 4.9 star rating.
Start by setting up a Google Analytics 4 account if you’re new to the service. Fortunately, GA Analytics also supports Google Analytics’ older tracking ID (starts with UA) if you already use it.
As you create a new analytics account, you’ll be given a Measurement ID, the new tracking ID in GA.
After you install and activate GA Analytics, head to Settings → Google Analytics, and open the Plugin Settings panel. Enter your Measurement ID in the GA Tracking ID field, then select Global Site Tag as a tracking method before saving your settings.
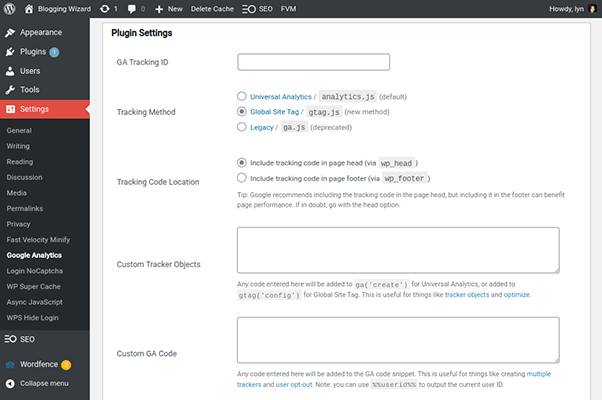
If you’re having trouble finding your measurement ID or tracking ID, open the admin settings for your property. If you’re using the new GA, click on Data Streams, and select the Web stream. Your measurement ID will be here.
If you’re using an older version of Google Analytics, open the admin settings, but select Property Settings this time. Your tracking ID is under the Tracking section.
The tracking code can take as long as 48 hours to fully integrate with your site. It’s best to wait this long before trying to view the stats you’ve collected.
While you have the plugin’s settings panel open, consider enabling the option that disables the tracking of admin-level users. This ensures your own activity on your site is not recorded in your reports so long as you’re logged into an admin account.
If you have the Pro version, you can display an opt-out box on your site and access numerous advanced settings.
Method #2: Insert a Google Analytics tracking code into your header
You can add the tracking code from Google Analytics in your site’s header or footer PHP file. However, it’s better to use your header as scripts inserted into the header receive priority over everything else as the page loads. This ensures your stats are more accurate.
Plus, Google Analytics’ tracking code is asynchronous, so it won’t slow your site down.
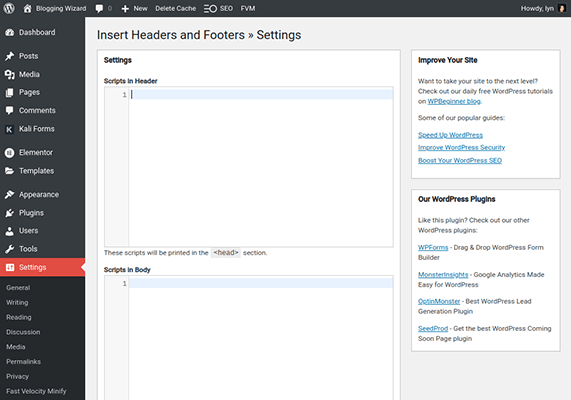
The easiest way to do this is to install the Insert Headers and Footers plugin.
When you go to the plugin’s settings page, you’ll see a code box labelled “Scripts in Header.” This is where you need to paste your Google Analytics tracking code. This is different from your tracking ID.
If you’re using the legacy version of Google Analytics (UA instead of GA4), log into your Google Analytics account and go to the admin settings for your property. Under Property, click Property Settings, then Tracking and Tracking Code.
This is where you’ll find the code snippet you need to paste into the Scripts in Header code box.
If you’re using the new Google Analytics, click Data Streams instead of Property Settings, and choose the Web stream. You’ll see a tab labelled Add New On-Page Tag under the Tagging Instructions section.
Open the Global Site Tag panel, and copy the code snippet here. This is the code you need to insert into the header code box.
Save your settings, and wait 48 hours for your reports to update.
Inserting code into your header without a plugin
If you don’t use an SEO plugin that integrates with Google Analytics or can’t/don’t want to use a dedicated Google Analytics plugin, adding the service’s tracking code to your site with a header and footer plugin is your best bet. It’s easy, and the code won’t get wiped when you update your theme.
Nevertheless, you can add this code to your site manually if need be.
WordPress, which is based on the PHP programming language, has a file called header.php. It’s a theme file and is, therefore, dictated by the developer of your theme. This means they’re in charge of what gets inserted into it in new updates.
Basically, any code you add to your header file will get deleted when you update your theme.
There are a couple different ways to evade this. First, check your theme’s documentation (or ask the developer directly) to see if it offers a way to add header scripts that won’t get deleted when you update.
For example, the premium version of the Astra theme has a feature called Custom Layouts you can activate to add scripts to your header file, footer file and 404 page.
If your theme doesn’t have an equivalent feature, you’ll need to use a child theme. A child theme is a secondary theme that inherits all of the styles and functionalities of your parent theme.
It allows you to make changes to your theme without altering its parent files. This means you can add tracking code directly to the child theme’s header file without running the risk of it being deleted when you update the parent theme.
Method #3: Load Google Analytics locally
This option uses Perfmatters, a performance WordPress plugin that allows you to apply small tweaks to your WordPress site to make it more lightweight.
These tweaks include loading Google Analytics tracking code locally from your server or CDN server rather than loading it from Google itself.
You’ll need to purchase a premium license for the plugin first as it doesn’t have a free version. This costs as little as $24.95 for one site for your first year. All licenses renew with a 15% discount applied.
Once it’s installed and set up, head to the plugin’s settings page, and open the Google Analytics tab.
All you need to do is configure a few settings here. First, enable the Enable Google Analytics setting. Next, enter your tracking ID in the Tracking ID box. Again, this is your measurement ID if you’re using the new Google Analytics, Google Analytics 4.
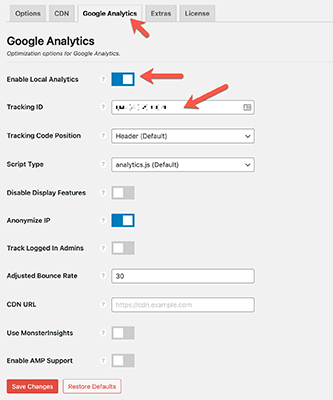
Set the Tracking Code Position option to Header. For the Script Type, set it to analytics.js if you’re using an older version of Google Analytics (tracking ID starts with UA). Set it to gtag.js v4 if you’re using Google Analytics 4.
You can enter the URL of your CDN server in the CDN URL field if you want to load Google Analytics from there instead.
Lastly, disable the Track Logged In Admins option to prevent your own activity from being recorded.
Be sure to save your changes, then wait 48 hours for your stats to start appearing in Google Analytics.
Why add Google Analytics in WordPress?
Adding Google Analytics in WordPress should always be one of the first things you do with a new WordPress blog. Google Analytics is a free yet invaluable tool that helps you analyze the traffic your site receives in many ways.
One of the most important features this tool has is the ability to have multiple “views.” These are different setups that showcase different types of results across the tool’s reports.
For instance, it’s recommended that you create a primary “Master” view with Google Analytics’ default settings unconfigured. This ensures you always have access to raw, unfiltered data.
You can also create different views for each type of traffic you want to track, including organic, paid, social media and search.
Google Analytics allows you to use up to 25 views, and you should definitely make use of all of them. It’s a good idea to set up different views for every marketing goal you want to track with Google Analytics.
For example, if you have a lead magnet that subscribes your readers to your email list from a specific landing page, you can create a goal for that page in Google Analytics. This will allow you to view traffic stats along with the page’s bounce rate, scroll depth, traffic, conversion rate and more.
Disclosure: Our content is reader-supported. If you click on certain links we may make a commission.