4 Best WordPress Translation Plugins For 2024 (Comparison)

Want to create a multilingual WordPress site so that you can connect with more people around the world?
Most people prefer to browse the web in their native languages, so this is a great way to make your site more user-friendly and help you boost your SEO by ranking in new languages.
But if you want to create a user-friendly and SEO-friendly multilingual WordPress site, you need the help of a WordPress translation plugin.
To that end, I’m going to compare the four best WordPress translation plugins. I have spent time hands-on with all four of these plugins, so my goal is to apply that knowledge to help you pick the plugin that best meets your feature needs, interface preference, and budget.
Let’s jump right in so that you can start translating…
1. TranslatePress

TranslatePress is the “youngest” WordPress translation plugin on this list, but it’s quickly grown in popularity – it’s now active on over 80,000 sites with an excellent 4.7-star rating on over 180 reviews.
If I had to pick the two most notable features for TranslatePress, I would say those features are:
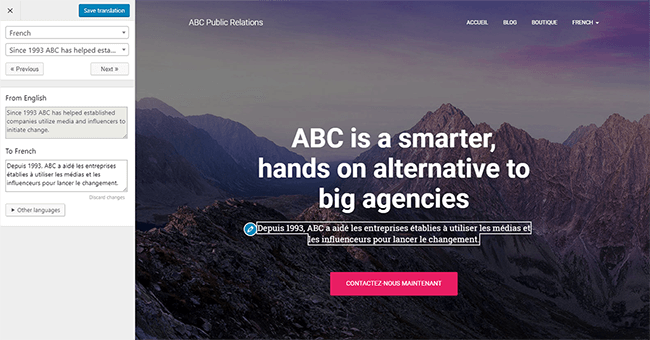
- A visual translation editor – You can manage translations by clicking on a live preview of your site. It works a lot like the familiar WordPress theme customizer.
- Out-of-the-box comprehensive translations – TranslatePress works with pretty much every theme and plugin right out of the box. You can click on plugin/theme content in the visual editor to translate it just like you can your blog posts.
To translate your content, TranslatePress lets you use both manual and automatic translation. If you want to use machine translation, you can choose between Google Translate or DeepL.
If you use machine translation, the nice thing is that TranslatePress will store those translations locally in your WordPress site’s database, so you don’t need to query external services to serve up your translated content. This also means that you can manually edit the machine-generated translations as needed.
Your translations are also SEO-friendly – each language gets its own, fully indexable subfolder on your site. You cannot use separate domains or subdomains, though.
With the premium version, you can also translate important SEO details, as well as access other useful features such as:
- Automatic user language detection and redirection.
- Separate navigation menus based on language (vs just translating the same menu into different languages).
- Dedicated translator WordPress accounts.
How you translate content with TranslatePress
No matter if you manually translate your entire site or use automatic machine translation, you’ll be able to manage everything from the visual translation editor.
The translation editor is super easy to use which, again, I think is one of the big advantages of TranslatePress. To translate content, you can:
- Hover over the element that you want to translate.
- Click the pencil icon.
- Add your translation in the sidebar.
If you have a site with restricted content (like a membership site), TranslatePress also includes a tool to let you browse your site as different user roles. This helps you view and translate restricted content.
TranslatePress pricing
TranslatePress offers a free version at WordPress.org that lets you translate unlimited words into one new language.
If you want access to the SEO features, support for unlimited translation languages, and other premium features, the paid plans start at €79 for use on a single site.
If you want to use automatic translation, you also might need to pay for the translation service. The Google Translate API offers a limited free quota, but DeepL is 100% paid.
2. WPML
WPML is one of the oldest and most established WordPress translation plugins – there’s a reason why so many other WordPress themes and plugins mark themselves as “WPML compatible”.
You can set up a separate, indexable version of your site for each language using one of the following URL structures:
- Subfolder -e.g. yoursite.com and yoursite.com/es
- Subdomain -e.g. yoursite.com and es.yoursite.com
- Separate domain -e.g. yoursite.com and yoursite.es
WPML gives you tons of options to translate your content. You can:
- Manually translate your content yourself.
- Use automatic translation powered by Microsoft on a post-by-post basis (not sitewide like some other tools, though).
- Outsource your translations to professional translation services. WPML integrates with 70 different services, which is way more than most plugins.
- Create special translator WordPress accounts and have them translate some/all of your site. For example, this could help you work directly with a freelancer.
WPML offers comprehensive translations, including theme and plugin content. However, this can sometimes require some manual effort on your part if a theme/plugin doesn’t follow best practices in its code.
You also get some nice features, like the ability to translate the emails that your WordPress site sends and RTL text support.
How you translate content with WPML
WPML offers two methods to translate your content – an old way and the new way. You can choose your preferred method in the plugin’s settings.
With the “old” version, you’ll essentially duplicate each piece of content in different languages. It gives you access to the full editor for each language version, but there’s no side-by-side tool.
The “new” version, dubbed the Advanced Translation Editor, fixes that with a more convenient side-by-side view:
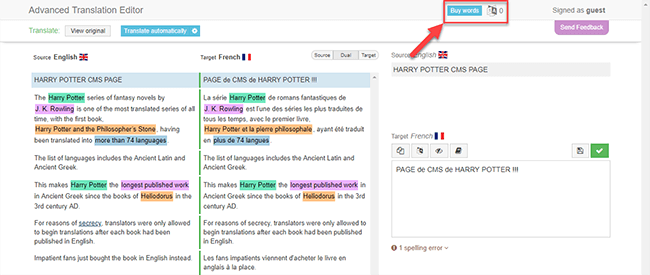
You’ll also be able to use automatic translation from the Advanced Translation Editor.
For other types of content, like content from your theme or other content “outside” the WordPress editor, you’ll need to use the separate String Translation editor.
Personally, I find having to use a separate interface for these non-editor-content strings to be a little cumbersome, especially because some of the other plugins on this list offer a more streamlined approach.
WPML pricing
WPML does not offer a free plan.
The cheapest plan starts at $29. However, I think almost all sites should go with the $79 Multilingual CMS package, as the cheaper plan doesn’t offer comprehensive translations.
That plan includes 2,000 free automatic translation words per month. If you want to exceed that, you’ll need to purchase additional words. This is because Microsoft, the automatic translation service that WPML uses, charges for machine translation – it’s not WPML trying to upcharge you.
3. Weglot

If you want the absolute simplest way to translate your WordPress site, I don’t think you’ll find anything easier than Weglot.
With Weglot, you can be up and running with a fully translated site in just a few minutes.
How?
Because as soon as you set it up, Weglot uses machine translation to translate all of your content.
One of the great things about Weglot is that it automatically detects all the content from your theme and plugins, as well. Basically, if the content appears anywhere on the front-end of your site, you’ll almost certainly be able to translate it – no special compatibility required.
You’ll also be able to translate important content that isn’t visible, like SEO titles/descriptions and image alt tags.
If you’re wondering, this is because Weglot’s approach to translation is to basically look at your site’s front-end HTML and use that to determine what content to translate. This makes it easier to ensure comprehensive translations vs some other plugins that look in your back-end theme/plugin files.
Each language gets its own SEO-friendly subfolder on your site and visitors can choose their preferred language with a user-friendly front-end language switcher. Weglot supports subdomains and separate domains for each language.
Once you have those automatic machine translations in place, you can always go back and manually refine them as needed. Or, Weglot has a built-in tool that lets you outsource translations directly to professional translators (you’ll need to pay those professionals, of course).
Weglot is technically a platform-independent SaaS, but it offers a dedicated WordPress plugin that makes it super easy to get started.
The two meaningful usage differences of this SaaS approach are that:
- You’ll manage your translations from the Weglot website, rather than your WordPress dashboard.
- Your translations “live” on Weglot’s servers and Weglot delivers them to your site when needed. That is, your translations are not locally stored in your WordPress site’s database, though Weglot will help you export them if you decide to stop using the Weglot service.
How you translate content with Weglot
Again, as soon as you activate Weglot, it automatically translates your entire site using machine translation.
To manually refine those translations, Weglot gives you two separate interfaces (both of which automatically sync with each other and your live WordPress site):
- List Editor – This is a side-by-side list of the original version of your content and the translated version. If you’ve ever worked with PO editor software, it’s a lot like that.
- Visual Editor – You’ll see a live preview of your website. To translate any element, all you need to do is click on it – it’s super easy to use. Pictured below.
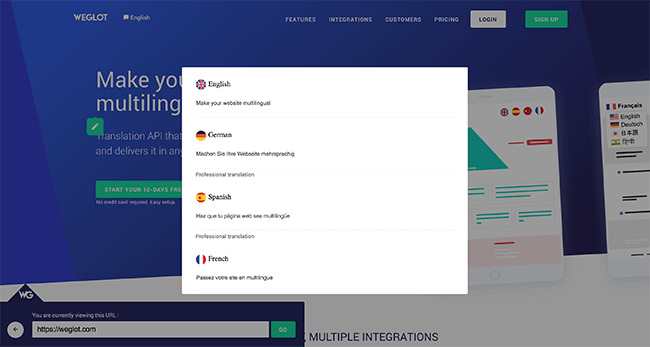
For some types of translations, like SEO metadata, you’ll need to use the back-end list editor.
Overall, being able to access both editors is quite convenient as each approach might be better in certain situations.
Weglot pricing
Weglot has a limited free plan that supports:
- One new language
- 2,000 words
- 2,000 translation page views
This free plan could work for a small static website/portfolio. However, if you have a blog, you’ll almost certainly need more words.
Paid plans start at €9.90 per month for up to 10,000 words and 10,000 translation page views.
* Translation page views only count for translated content. Additionally, if you use page caching, pages that are served from the cache won’t count against the limit, which means your translated content can receive a lot more visits without hitting your limit in Weglot as long as you cache pages.
4. Polylang

Active on over 500,000 sites, Polylang is the most popular free WordPress translation plugin at WordPress.org. It’s also maintained an excellent 4.7-star rating on over 1,400 reviews, which is impressive.
You can use Polylang to create separate, indexable versions of your site for each language using your choice of:
- Subfolders
- Subdomains
- Separate domains
The core Polylang plugin only supports manual translation. However, you can link it with the separate Lingotek Translation plugin from the same developer to use automatic machine translation or connect to professional translation services.
How you translate content with Polylang
Polylang works by essentially duplicating each piece of content for each language. When you go to translate a piece of content, it’s like writing a post from scratch…except the post is linked to its sibling in the other language by a meta box in the sidebar:
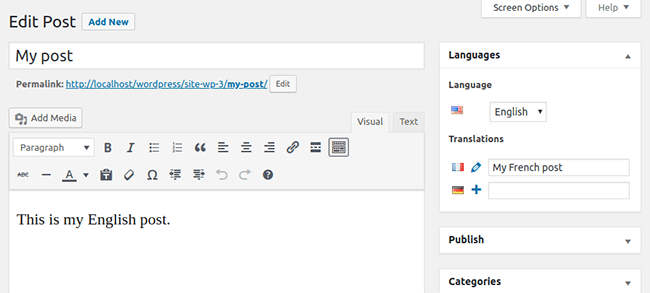
The nice thing about this approach is that you’re able to fully localize each post and it’s easy to control URL slugs and SEO details. However, this approach is a bit more labor-intensive as compared to TranslatePress, Weglot, or WPML’s Advanced Translation Editor.
Like WPML, you’ll also need to use a separate string translation manager for content that sits outside the WordPress editor, which also adds a little complexity.
Polylang pricing
The core Polylang plugin is free to translate unlimited content into unlimited new languages.
However, if you want 100% comprehensive translations and/or you want to use Polylang with WooCommerce, you’ll need one of the Pro versions.
Both Polylang Pro and Polylang for WooCommerce cost €99 each. Or, you can get a bundle of both for €139.
Which is the best WordPress translation plugin for you?
All of these WordPress translation plugins have something to offer, so I don’t know that there’s a single “best” plugin for all scenarios.
Instead, I’ll try to help you pick the best tool for your needs based on the features that you value.
First off, if you want the absolute simplest way to comprehensively translate a WordPress site, I think your two best options are:
- TranslatePress – This plugin has a free version with no word limits and is 100% self-hosted.
- Weglot – This SaaS tool has a limited free version.
Both offer user-friendly visual translation interfaces, support sitewide automatic machine translation, and offer comprehensive translations without needing to look for any special compatibility. That last feature – comprehensive translations out of the box – is what I find to be the most useful, especially if your site’s front-end content is largely based on plugins (e.g. WooCommerce, event plugins, etc.).
Weglot is a bit simpler to get started, while TranslatePress is more affordable and has a more generous free version.
With its new Advanced Translation Editor and support for piece-by-piece machine translation, WPML has also made itself a lot more user-friendly.
Overall, WPML is still not as simple as those two tools, but the trade-off is that you get superior translation management options (if working with freelancers or users) and integrations with 70+ professional translation services.
Finally, Polylang has the most generous free version, especially if you need to translate your site into multiple new languages. However, it lags behind a bit in the “ease of use” department and I find it to be the most complicated/labor-intensive plugin on this list.
Disclosure: Our content is reader-supported. If you click on certain links we may make a commission.
