Amelia Review & Tutorial 2024 – Create A WordPress Appointment Booking System

Looking for a way to start accepting appointment bookings at your WordPress site? Instead of trying to hack things together yourself, using a dedicated WordPress booking plugin can have you up and running with a working system in no time.
But even with a dedicated plugin, getting all the little details set up can still be a pain.
This is where Amelia comes in. A powerful WordPress booking plugin.
In this Amelia review & tutorial, I’m going to show you how to create a WordPress booking system using Amelia. Step-by-step.
The Amelia plugin has a free and premium version. For this post, I’ll show you how to setup a booking system with the free version. Which means you can follow a long without spending a penny.
Then, at the end of this post, I’ll share some of my thoughts on the plugin and the reasons why you still might want to consider the Pro version.
Let’s get booking…
What you’ll need to create a WordPress booking website
To get started, I’m going to assume that you already have a working WordPress site. If you don’t, you can follow the steps in our start a blog guide to get set up (don’t be fooled by the “blog” in the name – the same basic setup steps apply to a WordPress booking site, too).
Once you have your working WordPress site, all you’ll need to add is the Amelia plugin.
Unlike a lot of WordPress booking plugins that are targeted towards developers who want to be able to customize every little detail, Amelia is built to work right out of the box and look great with any theme.
So with very little tinkering (and no technical knowledge required), you’ll have a good-looking system where your site’s visitors can book appointments. And then you’ll also be able to manage those appointments from your WordPress dashboard.
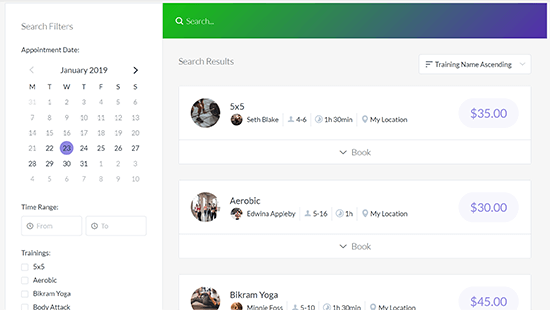
To give you an idea of what you’ll be building, here’s an example of what your booking form might look like:
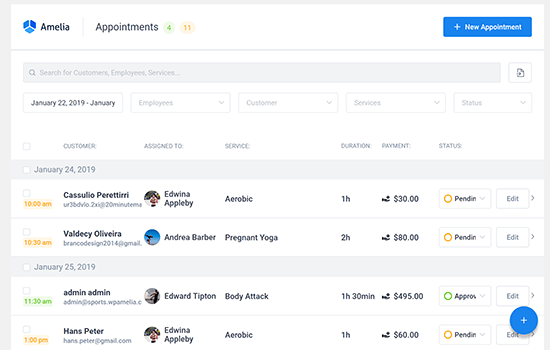
And here’s the backend area where you’ll be able to manage all of your appointments:
Again, Amelia will work with any WordPress theme, so you don’t need to make any special decision there, nor will you need to use custom CSS to make your booking functionality look good.
Instead, you can use your preferred WordPress theme and then just edit Amelia’s style options to match your theme’s looks.
How to create a WordPress booking system – Step-by-step
For this step-by-step tutorial, I will use the free version of the plugin that’s available at WordPress.org.
The free version of Amelia is a fine option if you:
- Are the only person who needs to accept bookings (Lite does not have an Employees feature)
- Are ok with not having access to a lot of the nice-to-have (but not must-have) features
If you need to exceed those limits, the paid version removes all those restrictions and adds a variety of other features, which I’ll discuss later on.
The same basic setup steps apply to both versions, though, so you’ll be able to follow this tutorial no matter what.
Ready to get started? Let’s dive in!
For this example, I’ll pretend that I’m creating a booking form for a personal trainer. But the same principles apply no matter what.
Step 1: Install your preferred version of Amelia
To get started, you’ll need to install and activate the Amelia plugin at your site.
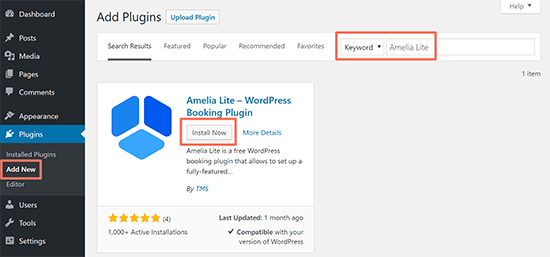
If you’re using the free version of Amelia (like I am), you can do that right from your WordPress dashboard by going to Plugins → Add New and searching for “Amelia Lite”:
Step 2: Configure basic details, like your opening hours
Once you’ve installed and activated the plugin, go to Amelia → Settings to configure the basic settings for your appointment booking functionality.
Here, you’ll see a list of categories:
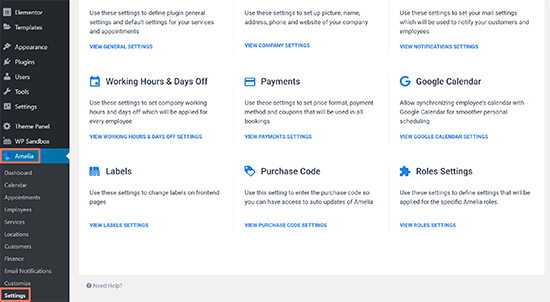
Many of these settings are reserved for the Pro version, but here’s what you’ll want to configure no matter what.
First, click on the Company details and enter information about your company:
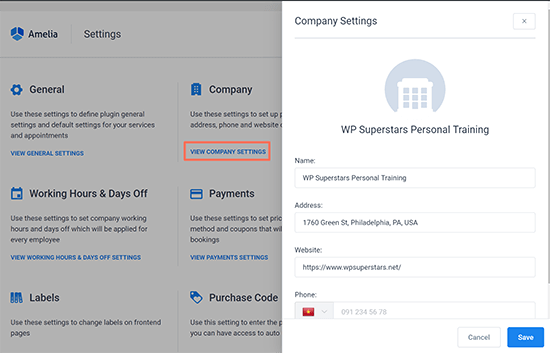
Next, go to the Working Hours & Days Off settings. These settings let you define when you’re available for appointment bookings.
You can use the Add Break button to set up different working time blocks. For example, you could be:
- Available for appointments in the morning
- Take one hour off for lunch
- Be available for appointments again in the afternoon
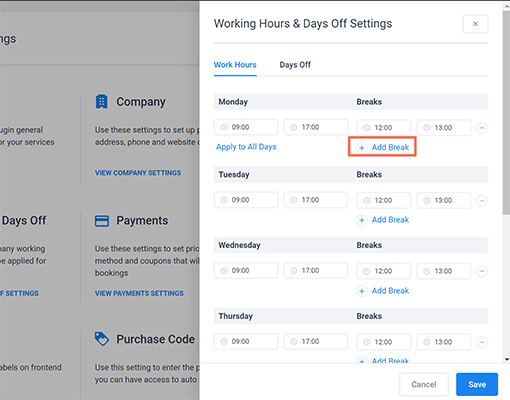
That’s all there is to set up in the free version.
Step 3: Create services that you want people to be able to book
Next, you’ll need to create the services that you want to make available for booking. The free version allows you to add unlimited services.
To create your first service, go to Amelia → Services.
First, you’ll need to create a category for your services. For my personal trainer example, categories could be:
- Workout
- Consultation
- Nutrition
- Etc.
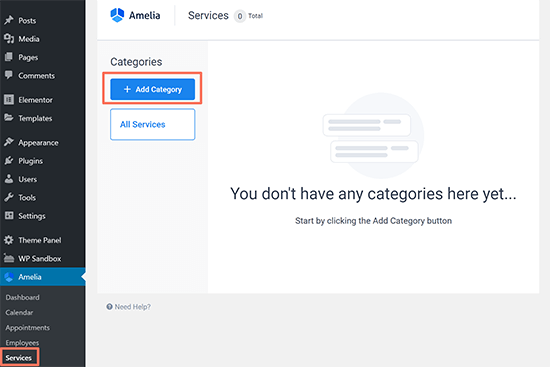
The free version also allows you to add unlimited categories to your services.
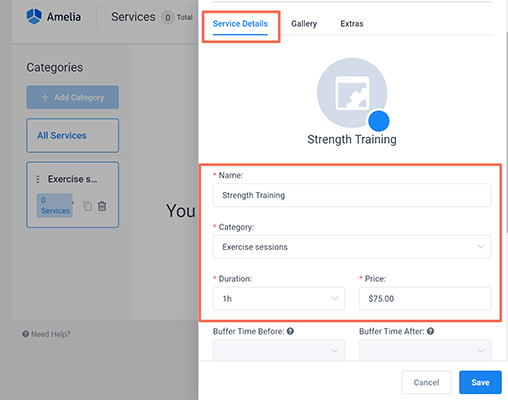
Once you’ve created a category, you can click the + Add Service button to open the new service interface:
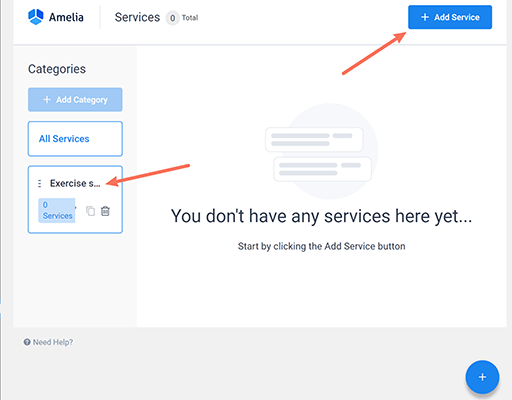
In this interface, configure the following information in the Service Details tab:
- Name – The public name of the service.
- Category – The category to which the service belongs.
- Duration – How long one session lasts.
- Price – The price for one session.
You can also optionally add an image for your service (at the top) and a text description (at the bottom):
Once you’re done, Save your service.
If needed, you can repeat the same steps to create up to three more additional services for people to book.
Step 4: Embed your appointment booking form
Once you’re finished adding your services, you’re ready to embed the front-end booking form that your website’s visitors will use to make appointments.
To do that, go to the post or page where you want to include your form (or create a new one).
Then, look for the Insert Amelia Booking Shortcode button on the editor toolbar:
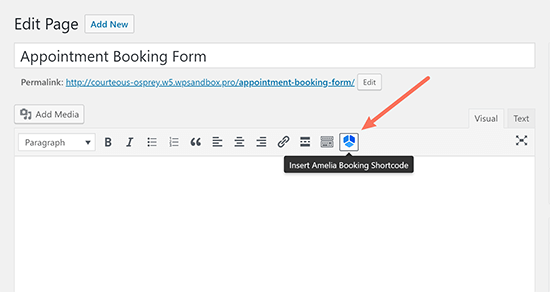
In the popup, click OK to insert the shortcode.
You can also add additional text around your booking form if desired. Here’s an example of what it might look like:
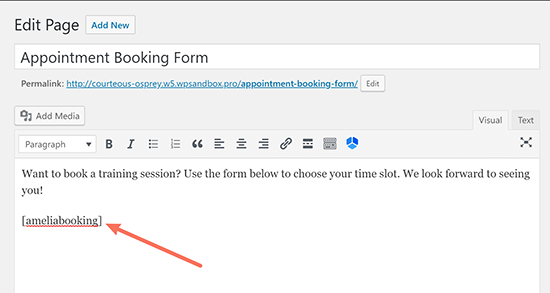
If you’re using the new WordPress block editor (AKA “Gutenberg”), you can embed your booking form by adding the [ameliabooking] shortcode to a Shortcode block:
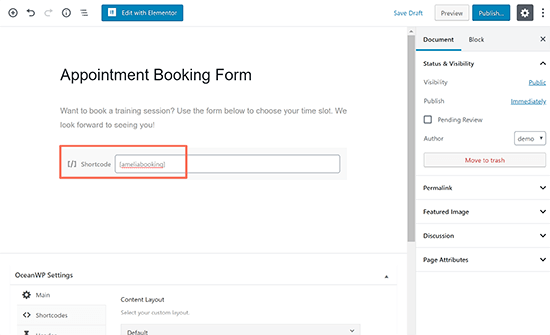
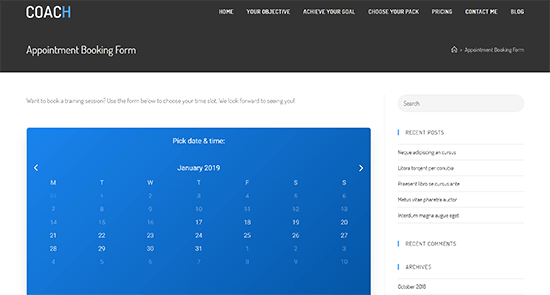
Here’s an example of what the live form will look like after you publish or update the page:
Appointment booking experience: Visitor perspective
At this point, your visitors are ready to start booking appointments. Here’s how the flow will work from their end.
First, they’ll choose their desired date for the appointment from the list of available days.
You can see that I’ve turned off the availability for Saturday and Sunday, so visitors cannot choose those days.
Once they choose a date, a list of available time slots for that date will appear:
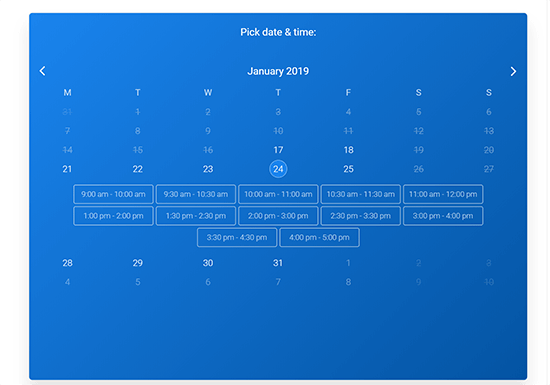
Once they select a time slot and click Continue, your visitor will be able to enter their details and confirm the appointment:
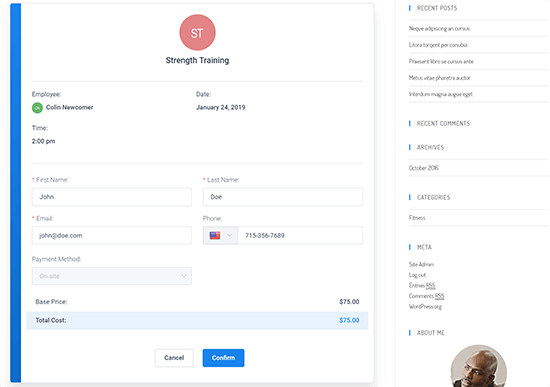
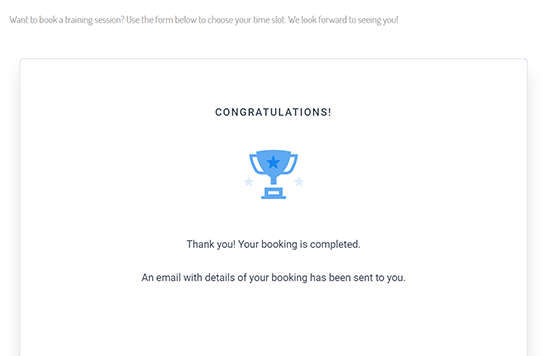
Once they click Confirm, they’ll see a confirmation screen. Additionally, both you and they will receive an email confirmation for the appointment:
In the Lite version you can also setup SMS appointment notifications for customers.
Appointment booking experience: Webmaster perspective
You saw how it works for visitors to book an appointment – but what about you? How can you manage appointments?
To make things easy, Amelia gives you two different ways to manage appointments.
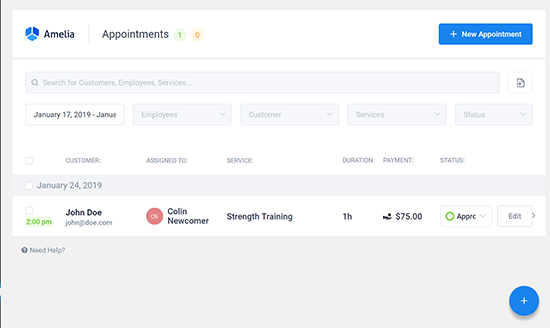
First, there’s a list view, which gives you a list of all appointments for a certain date range. You can access this view by going to Amelia → Appointments:
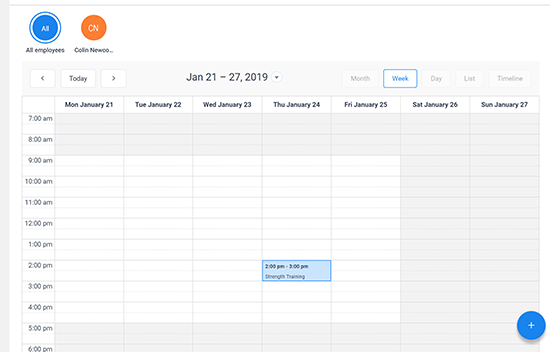
Then, there’s also the calendar view, which gives you a more visual look at which time slots are booked. You can access this view by going to Amelia → Calendar:
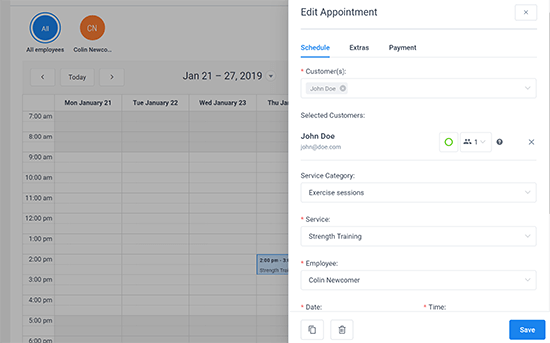
From both views, you can also Edit an appointment to open up a sidebar where you can adjust various details:
You can also manually create appointments from the back-end, which is helpful if you still want the ability to, say, accept bookings over the phone or in person and integrate those bookings into your overall system.
One big reason to consider Amelia Pro
As you saw above, the free version of Amelia is plenty capable of creating a functioning booking site…
However, there are some very real reasons to consider going Pro.
More functionality
Second, the Pro version just generally adds a lot more functionality.
Here are some of the new features that you gain access to:
- Online payments via PayPal, Stripe or WooCommerce to let people pay for their appointment online.
- Coupon codes to offer promotional discounts on bookings.
- Google Calendar and Outlook Calendar integration to sync appointment bookings with your Google Calendar (visitors also get an option to add appointments to their own calendars and employees can sync their own appointments as well).
- The ability to mark certain days as “off” (like holidays).
- An option to add different locations, which is helpful if people can book services at different physical locations.
- Style customization options to match your booking form with your website.
- Zoom integration for virtual sessions.
- An opportunity to give employees or customers front-end access to their panel, which lets them manage their appointments and events from the front-end.
- More detailed reporting, like the ability to view the conversion rate for your appointment forms.
- SMS appointment notifications for both customers and employees.
- Email notifications, like an option to send customers a message on their birthdays.
- Supports custom services schedules, and special days, allowing full flexibility for the schedule setup.
All those features help in two main ways…
First, they help you offer a better user experience, like letting customers pay for their appointments online and manage their appointments with their own account.
Second, they also make it more convenient to manage your site and appointments. For example, you’ll be able to use Google Calendar or Outlook Calendar, send an SMS notification before an appointment begins to cut down on your no-show rate.
The Basic plan is $79/yr for a single site license with all the essential features.
The Pro plan is $119/yr for a 3 site license with all the features, which is a small price to pay for the extra features.
If you need more than 3 sites, the Developer plan is $249/yr for unlimited sites, also with all features included.
Lifetime plans are also available for further discounts.
Final thoughts on the Amelia WordPress booking plugin
For a non-developer, Amelia is definitely one of the best appointment booking plugins to use because of how easy it is to get up and running.
No matter which version you use, it offers a well-designed interface that just works right away.
WordPress developers might not like it as much because it doesn’t offer as many “under the hood tweaks”. But if you weren’t planning on using your own custom code anyway, Amelia lets you control most important settings via its dashboard.
The free version is functional in a pinch, but you are missing out on many of the best features, and the limits might get in the way of your business needs.
For the best experience for both you and your customers, consider upgrading to the Pro version to access all the features and functionality.
Disclosure: Our content is reader-supported. If you click on certain links we may make a commission.
