

A while back, my partner and I launched a new YouTube channel called Trading Card Zen.
All for a bit of fun because we both love trading cards.
We split the tasks out. Nicola would handle the editing of full length videos and I’d handle the editing of short videos.
Things escalated rather quickly and I soon found myself with 100s of short videos to edit.
So, I had to get my process worked out and fast. Before the overwhelm hit me like a tonne of bricks.
And, I’m happy to report that after 100+ short videos and 100k+ views on this completely fresh channel, I had everything figured out.
In this post, I’m breaking down the entire process so you can implement it for yourself. And most importantly, save time.
Real footage vs faceless videos
Faceless videos are easy to crank out at scale. A few ChatGPT prompts and Canva’s bulk creation feature will have you on your merry way in minutes.
This process doesn’t work for those kinds of videos.
The videos on our new YouTube channel are videos that you can’t do with AI or any kind of shortcuts.
They involve real footage. That includes talking head videos and anything you’ve shot with a camera.
So, those are the types of videos this process works best for.
An overview of the tools & how to use them
I’ve already posted a video on the Blogging Wizard YouTube channel, where I cover an overview of the tools I use in this process and exactly how to use them.
So, I’d recommend giving that video a watch before moving onto the process that I’ve outlined below. It’ll help provide some context on how everything works.
Also, be sure to like, comment, and subscribe 😉
There are a few specific things that I go over in the video (especially towards the end) that are worth taking note of. Especially with regards to TikTok.
Step 1 – Organize your videos and group them into batches
First, we need to get our videos organized into batches. I usually like to get videos into batches of 5-10. Something like that.
Then, I know that in a single editing session, I’ll have enough videos to at least cover me for the next week or so.
Most of the short videos for this channel start off just as shorts. We’re not clipping longer videos into short videos or anything like that.
If you need to do that, there are some AI-powered tools that can help you. Kapwing can do this with its repurposing feature. And that’s the tool I use for editing so I’ll come back to that in a moment.
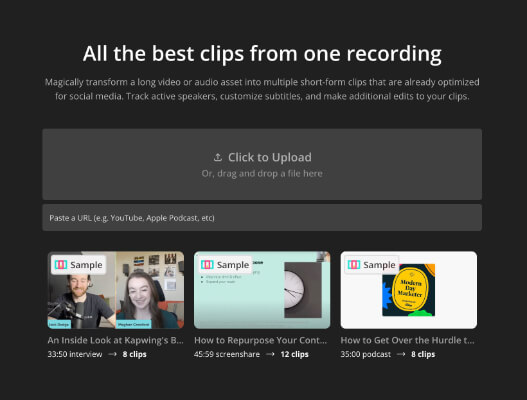
There are dedicated clipping tools like OpusClip and Minvo. They can be quite useful tool. But any tool that generates shorts from longer videos using AI is going to be a bit hit or miss. They don’t work well for all types of videos.
Step 2 – Fully edit your first video
I use Kapwing to edit these videos. For this process to work, you could use another tool but it helps for it to specifically be an online video editor. I’ll show you why in a moment.
I chose Kapwing for this process because it puts everything I need for editing at my finger tips. There’s no need for other editing tools or downloading external assets from stock sites like Envato Elements or whatever. Everything is there.
Stock footage, sound effects, music, images, templates, etc. It’s all there. Including the ability to generate subtitles automatically. I can also use AI to clip longer videos into shorts if needed too.
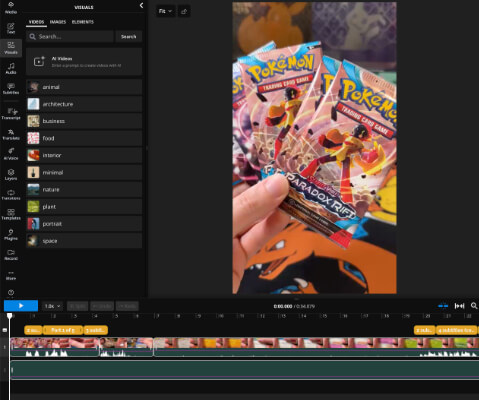
Anyway, for this step in the process we need to create a new project in Kapwing, upload our video and then get it fully edited.
So, I’ll typically:
- Set the start and end points of the video.
- Remove any parts of the video that need to be removed.
- Add any text overlays if video requires it.
- Add some stock music (keep it below 59 seconds for TikTok).
- Add a fade out to the music (to avoid popping).
- Add any other visuals or supplementary footage. For example, emoji’s, b-roll, images, etc.
- Generate subtitles + edit them (edit the text and the style).
Then we can export the first video and crack on with the next step.
Note: You may need to amend these steps depending on the edits you need to make to your videos.
Step 3 – Duplicate project + upload your other videos
The first video will set the tone for everything else.
So, I’ll go to my project folder in Kapwing and duplicate the first project a bunch of times. If there are 6 videos in the batch, I’ll duplicate the project 5 more times.
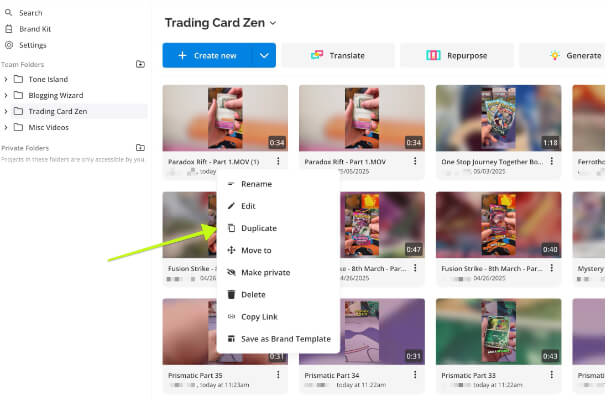
Then, I’ll open up each project in a new tab and rename each one.
I’ll also delete out the first video from all of these duplicate projects. That includes deleting it from the media tab on each video.
When we do this, we click on the Media tab on the left panel and ensure This Project is selected when we delete the first video. We do this to make sure we’re not cluttering up our account with duplicate footage whilst only keeping the footage we actually need.
Then, we upload the next videos to each one.
So, you’d just upload your video, move to the next tab and repeat.
By the end, you’ll have a bunch of projects, each with the correct names and the correct videos in them. Uploaded and ready to edit.
Earlier, I mentioned that it was useful doing this with an online video editor. This is why.
Kapwing is fairly stable when it comes to having multiple tabs open which is critical for keeping this process streamlined.
Step 4 – Complete your basic editing & generate subtitles
Next, we will go to the second project and get all of the basic edits completed.
The basic edits are fairly straightforward. Similar to what I mentioned in step 2.
So, like before, we’ll set the start/end points of the video, cut any parts of the video we need to, etc.
Any text we’ve added will still be there. We’ll edit that text based on whatever this next video needs.
The music will already be added. We can swap it out for different music if we need to. Replace any other visuals like b-roll, emojis, images, etc.
But the very last thing we do is to generate the subtitles.
Generating subtitles takes some time. And in the time it takes, we can do the basic edits for the next video.
So, we move onto editing the third video whilst the subtitles are generated for the 2nd video.
Then we repeat the same process for each other video in this batch.
Step 6 – Edit subtitles + export
Next, we go back to the second video and edit our subtitles.
Generally, Kapwing’s subtitle feature will work pretty well. But it’s always worth checking just in case it makes any mistakes.
Since we’re dealing with trading cards in our videos, I’ll always give subtitles a quick check.
I usually reduce the character count down so fewer words appear at a time. This helps to make subtitles a bit snappier.
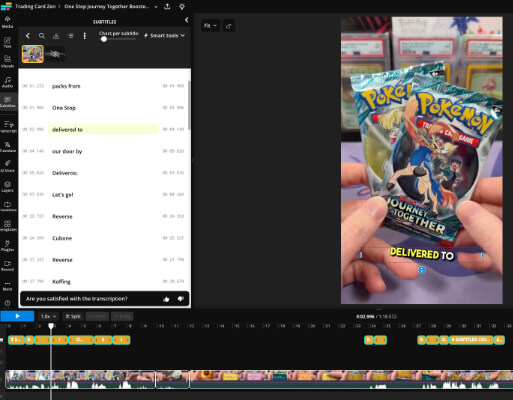
You can then change the length of time certain words appear for (if you feel the need) and make any other changes you need.
Once you’re done with the subtitles, you’ll export the video. I usually stick to the default export settings of MP4 files and 1080P resolution. Go with whatever makes the most sense for your videos.
Then, we repeat the process for the next video. Edit subtitles, and export.
We do this because exporting videos is the other part of the process that takes time. So, instead of waiting for the export to run, we just edit the subtitles for the next video.
And by the time we repeat this for all the videos in this batch, we’ll be done with the video editing part of this process.
Step 7 – Write out your social media captions & hashtags
Now, we need to prepare the social media captions and hashtags that will accompany our videos.
Generally, I’ll include:
- Caption
- Headline (for YouTube Shorts)
- Hashtags
If you’re targeting any specific keywords, be sure to include those in your captions & hashtags as well. It might help your videos rank on social media but the jury is still out on that. Remember –