How To Add A Post In WordPress: The Beginner’s Guide

Writing your first WordPress post can feel like a challenge especially when you’re not familiar with the WordPress editor and Gutenberg blocks.
In this post we will go through how to add WordPress posts on your website, along with how to edit, schedule and publish.
In no time you’ll be publishing your first post on your WordPress website.
Let’s get started…
What is the difference between WordPress posts and WordPress pages?
When you log into your WordPress website you’ll notice two options to add content – posts and pages:
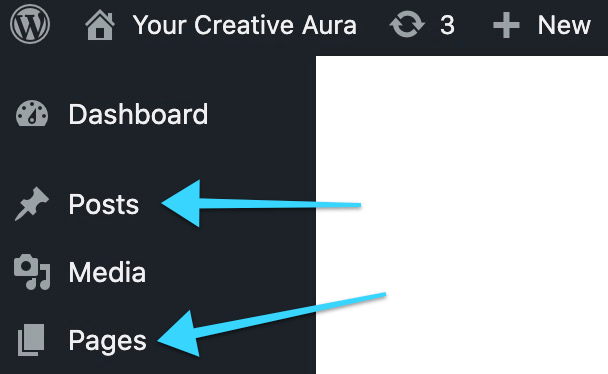
So, what exactly is the difference between them, and how do I know which to add my content as?
A WordPress page is a static and rarely updated piece of content, usually timeless in its purpose. Examples of WordPress pages are: about, contact, disclosure, terms & conditions.
A WordPress post is usually part of a blog like we have here on Blogging Wizard. It’s where we frequently publish and update content on an ongoing and continuous basis.
Understanding the WordPress block editor
Log into your WordPress site and you’ll see your WordPress dashboard. Then go to Posts → Add New on the admin panel to the left.
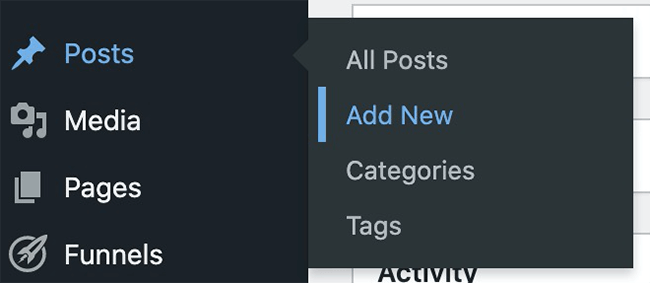
A new post will appear, this will be where you enter all your content for your post using the Gutenberg visual editor.
Let’s have a quick overview of the WordPress editor and post settings. For the post setting to appear you’ll need to click the gear icon top right:
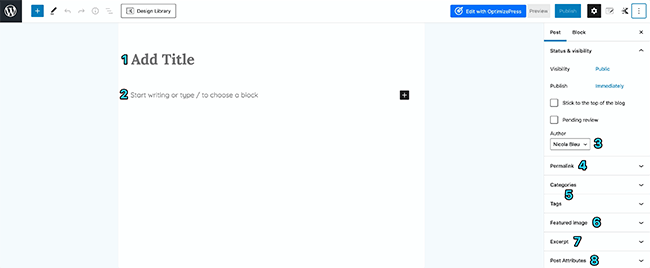
- Post title
- Post content
- Post author
- Permalink
- Categories and tags
- Featured image
- Excerpt
- Post attributes
The stack of 3 dots – top right corner shows you the Options mode. The main features here is the View mode of the post such as fullscreen to remove distractions, and Editor mode which converts to the post to either Visual or code editor (view in html code).
Let’s go through the post settings and what you should do.
1. Post title
Your title is your headline. It is a statement showing the reader what you’re going to deliver in the written content below.
Headlines can come in many forms such as questions, statements, and numbered lists. However, remember your headline is essentially a promise to the reader. You’re promising something of value and relevant to the reader.
If you need help writing captivating headlines, check out our guide to writing better headlines.
2. Post content
Before you even begin to write out your post content you would have done your research into your audience, their pain points and what they want to learn. The next step is to write a compelling blog post that your audience will love and share.
In this section, the sky’s the limit. You can add in text, images, embed audio and videos, add quotes and so much more using Gutenberg blocks.
The great thing about Gutenberg is the number of third-party plugins available to extend the standard list of blocks Gutenberg offers with more customizable options, most of which are free.
Check out our post on WordPress Gutenberg Blocks Plugins to learn more.
3. Post author
This is where you select the author of the post you’re publishing.
By default, your author account will be selected. But, if you have other writers, you can change the author to their account by selecting it from the list.
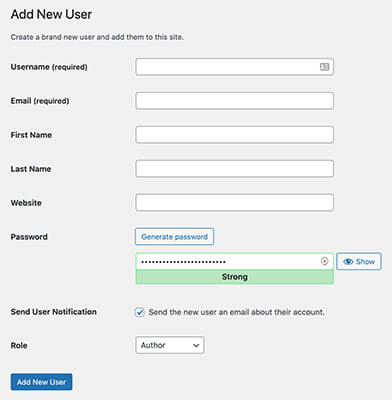
Note: You can add a new author in your WordPress dashboard. Just head to Users → Add New and add their details. You can select a role that will change the permissions they will have. In most cases, Contributor or Author permissions are best. Once the account is created, you can edit it and add their author bio which will appear below their blog posts. However, the display of author bios is controlled by your theme.
4. Permalink
The destination or home of your WordPress post is determined by the permalink (also known as the post URL) you choose. This is visible in the address bar of your browser:

The words in your URL will usually contain your keyword from your post. For example, your title could be “The Beginner’s Guide To Cleaning Your Home,” therefore, the keyword for your post URL would be “cleaning-your-home.”
5. Categories and tags
Categories and tags are part of WordPress’s taxonomy system.
Categories are used to organize your posts and are incredibly useful for your readers who want to learn more on a particular topic rather than browse aimlessly through each page of your blog.
Categories come in the form of parent and child categories. Parent categories are your top tier categories, they’re broader.
The example below is from Tone Island’s post editor in WordPress:
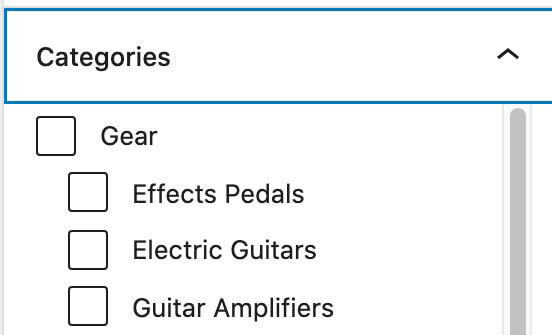
The parent category is the term ‘Gear,’ the child categories are then listed below: pedals, guitars and amps.
On the frontend of your website, if you click on the category, it’ll redirect you to the archive page of the category. Here’s an example from Your Creative Aura if you click on the topic ‘songwriting’:
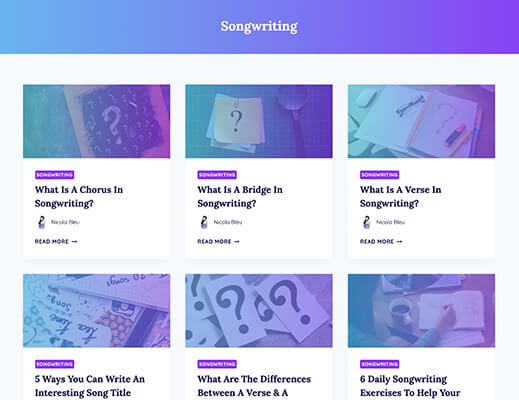
If you don’t assign a category to your post, it automatically goes to the ‘Uncategorized’ category.
Tags on the other hand are optional to use, and not all websites use them. We don’t use them here on Blogging Wizard.
Tags are a way to be incredibly specific about the issues you’re covering in your blog post. Categories, both parent and child are relatively broad. However, tags can cover multiple keywords, singular words and phrases relevant to the topic.
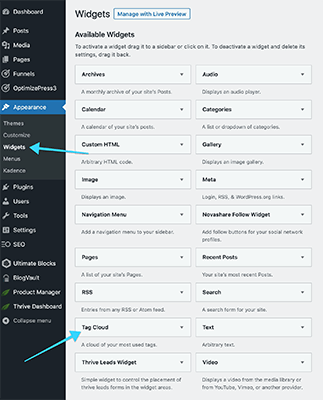
You can display a tag cloud by going to your WordPress admin dashboard, going to Appearance → Widgets and selecting the Tag Cloud.
6. Featured image
The majority of blogs use featured images as a visual advertisement of their post. This will be displayed on their blog homepage as well as the post itself, but also can be used to share on social media and via other networks.
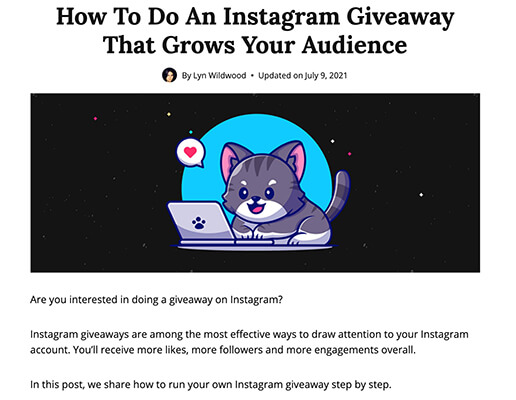
You don’t have to be a graphic designer to create images for your posts. Tools like Visme and Placeit make this especially easy.
Check out our list of online graphic design software tools.
7. Excerpt (optional)
An excerpt is a short extract from the post which is used as a summary for your blog posts.
WordPress will automatically generate an excerpt for you if you leave this blank. And that’s completely fine. That’s exactly what we do:
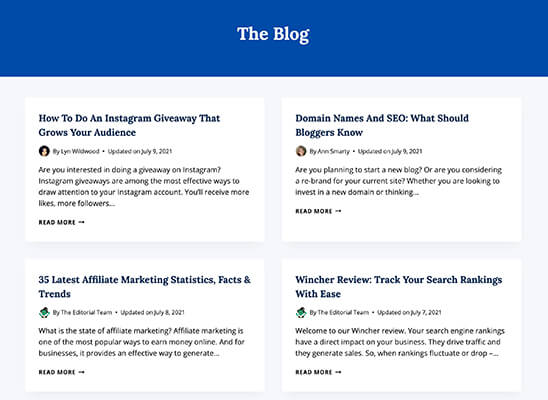
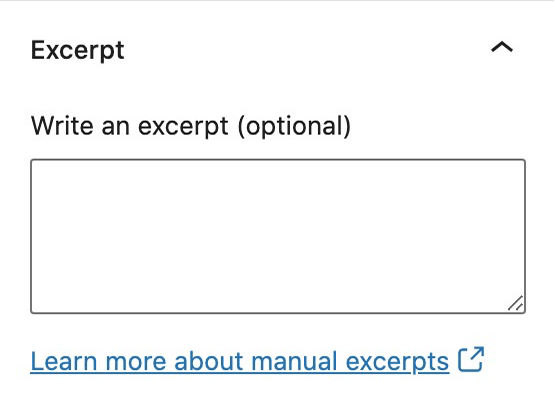
However, you can manually set the excerpt within the post editor. It is also worth noting that some themes (e.g. Kadence) will give you the option to control the length of automatically generated excerpts. By default, they are usually 55 characters.
8. Post attributes
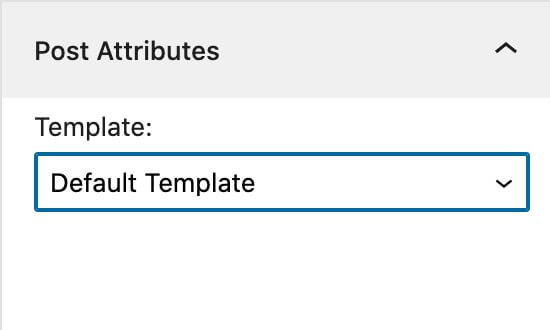
Post attributes give you the option to select different post templates.
You may not see this option at all and that’s ok if you don’t. You will likely only see this option if you have created a different post template with a page builder plugin or your WordPress theme offers extra attributes.
For now, either leave it as the default option or skip it entirely.
Now we’ve been through the main parts involved when adding a post to WordPress, let’s go through the physical part and add a post to WordPress.
How to add a post in WordPress
You can add a post to WordPress in two ways, by scratch or by pasting the content from a word processor. We’ll go through each one.
Writing a post in WordPress from scratch
Log into your WordPress site, head over to Posts → Add New, and you’ll be faced with a blank draft WordPress post.
When it comes to writing a new post from scratch it is best to have a process or checklist to follow to make sure you complete each task required to publish a successful blog post. The order I show here doesn’t have to be the order you choose for yourself.
Note: Prior to writing your post in WordPress do your research and preparation. It is also best to lay out a draft structure of your post including headings and an overview for each section.
1. Add a post title
The first step is to add in a title for your new post. If you don’t have the best optimized headline yet, just type in a draft one because you can edit this further down the line.
2. Start adding your content
Using the Gutenberg visual editor is different from your typical word processor; however, it is relatively simple to use. Content is added via blocks which you add by clicking on the plus button:
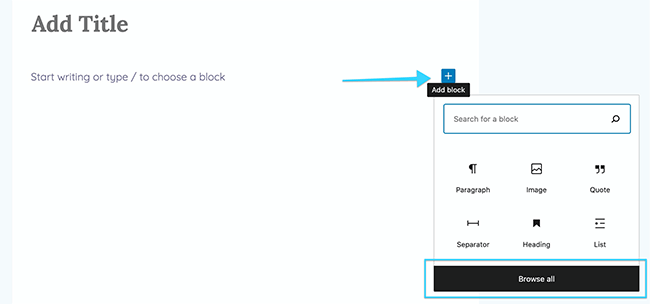
A popover appears giving you the most popular blocks used such as paragraph, image and headings. If you need a particular block not shown, click Browse all for a wider selection:

Blocks are broken down into categories: text, media, design, widgets, embeds and SEO.
There are many third-party Gutenberg block plugins available such as Kadence Blocks, however, throughout this tutorial I’ll be using the default WordPress Gutenberg blocks.
We’ll now go through the most common blocks you’ll likely use for your posts.
Note: Whilst writing your new post in WordPress don’t forget to click ‘Save draft’. WordPress does have an autosave feature, however, it is best not to rely on this incase you have browser or internet connection issues.
Text blocks – paragraphs, headings and lists
Here we have the introduction to a blog post, our title at the top followed by several paragraphs, a button (we’ll get to buttons later in the post), a heading and a bullet point list:
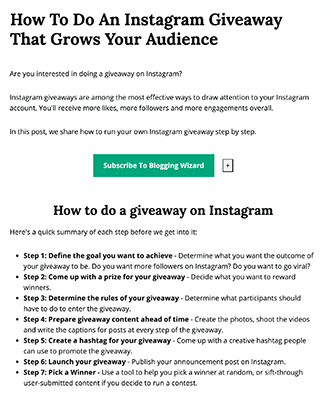
Let’s go through how we add and edit them.
Starting with the paragraph we add a paragraph block, or we can just start writing. If we click on the paragraph a floating text editor will appear:
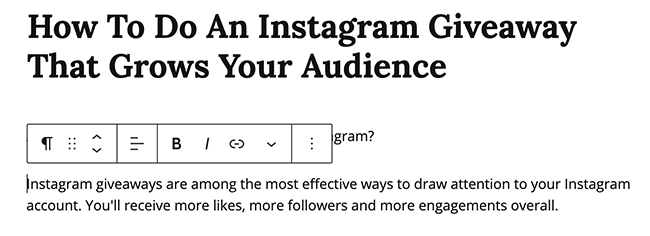
Here we can edit how the paragraph block looks.
- Starting from the left we can transform the block:
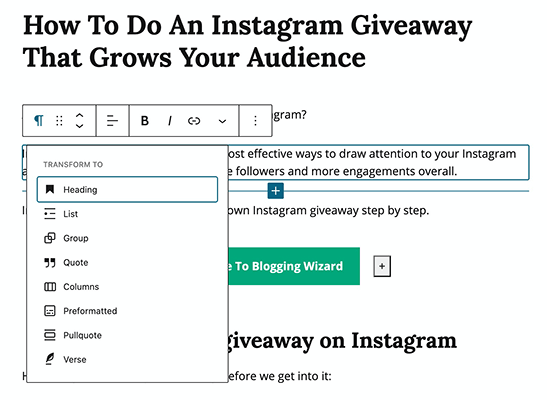
- If we click and hold on the dotted grid, we can move the block up or down the page to rearrange the order of the blocks.
- The up and down arrow means we can move the block up or down by one for every click.
- Alignment – left, right or center
- Bold or italic style
- Add a link (by highlighting specific words in the block first)
- Drop down arrow – highlight text, change text color and more features
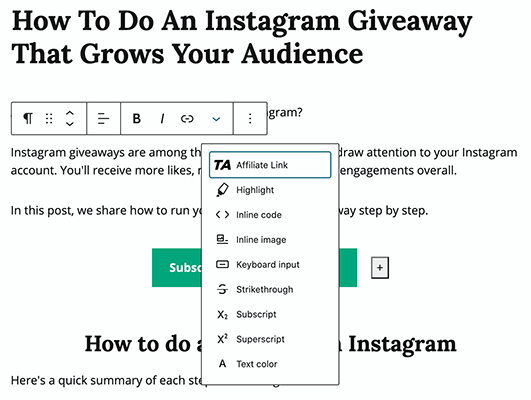
- Lastly, by clicking the 3 dotted button we have further settings such as copy, duplicate and edit as html. The edit as html feature is useful if you are familiar with html code:
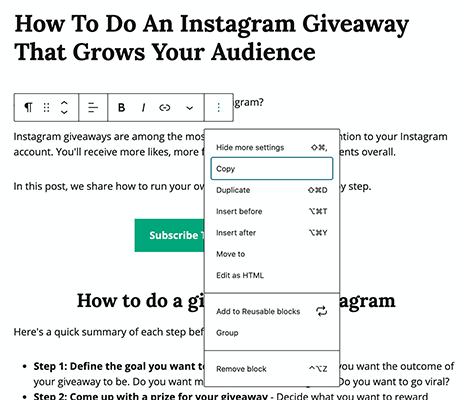
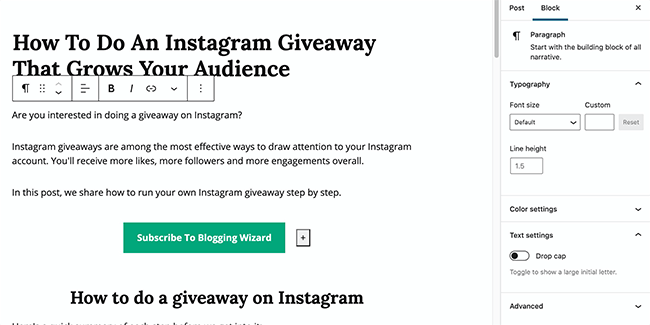
You will also see an option for more settings. When clicked a tab will appear on the right side of the editor which will give you options to change your font size, line height and color settings.
Let’s now look at headings. If we click on our heading from our example, we can see the floating text editor pops up again, however this time with an extra feature – an option to change heading levels.
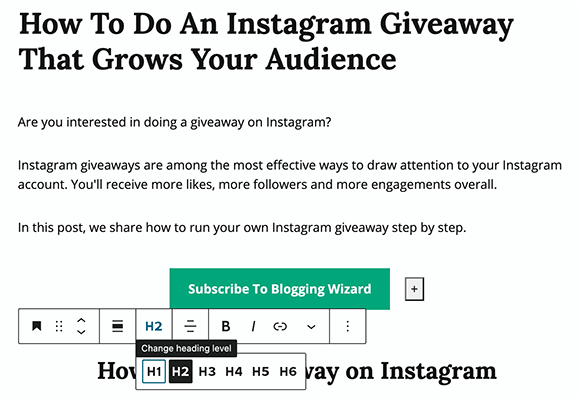
A heading is automatically added as a H2 which are the main headings in your content, H1 being your title. The hierarchy of heading can be summarized as:
- H1 – title
- H2 – main headings in a post
- H3 – subheadings to your H2’s
- H4 – subheadings to your H3’s
- H5 – subheadings to your H4’s
Note: When you structure your blog post you should keep the hierarchy of headings in mind.
Let’s now look at our bullet point list. If we click on our list from our example, the floating text editor will appear again with a few extra features specifically for lists – bullet point and numbered.
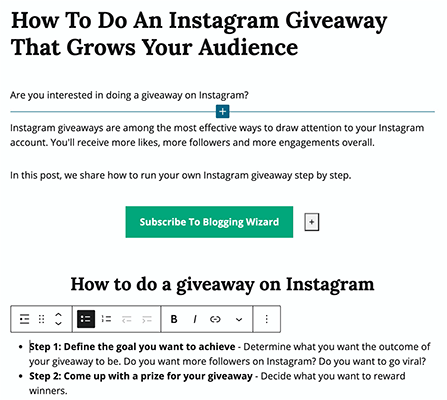
Note: At any point, if you’ve made an error with a block or need to change it you can click on the furthest left button on the floating text editor to transform it into a different block, such as a paragraph to a heading, or you can highlight a group of paragraphs and transform into a list.
Media blocks – image, video and audio
Images are a visual representation of the content of your post, they may demonstrate a point visually or provide direction and instruction in the context of a tutorial.
Let’s go through how to add an image and its settings.
To add images, select the image block and this will appear, a blank image block:
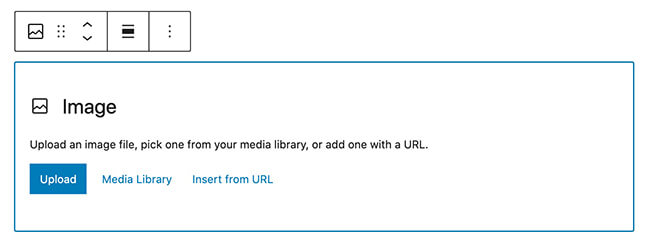
Just like all other blocks we’ve shown so far, a floating bar appears however with only a few settings. In the image block you have 3 options to add your image – Upload, Media Library and Insert from URL.
The most common options are Upload and Media Library.
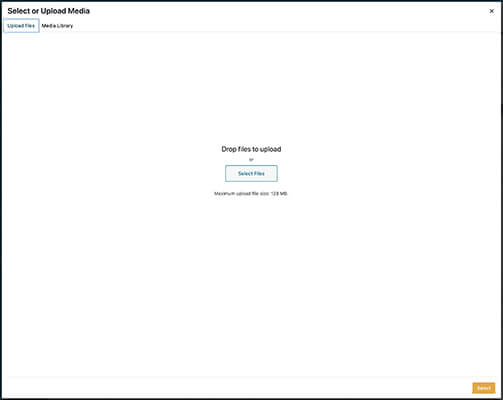
Selecting Upload will give you the option to drag and drop the image/s from your computer that you want to place into your post; the Media Library will enable you to select an image from your library:
Using the same example from Blogging Wizard, here is a section showing an image we’ve placed into a post:
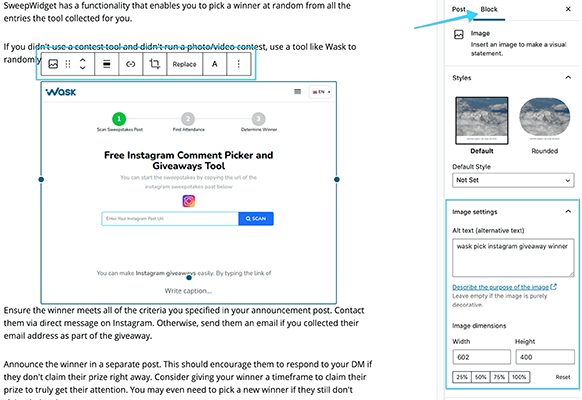
With an image now in place the floating bar now gives us a few more options: crop, replace and add text, and the tab on the right-hand side of the editor shows more image settings: alt text and dimensions. Alt text is the written element of your image which will show when the image cannot be rendered.
Although you can crop and resize images in WordPress, it is also best to optimize your images prior to uploading to your Media Library, this will save on hosting resources and improve page load times.
Let’s now look at adding audio and videos, both can be done in 3 ways: adding an audio/video block, embedding the audio/video depending on the platform it comes from or by adding a shortcode.
Adding the audio/video directly to your Media Library means it uses your web hosts resources, which for small businesses, solopreneurs or hobbyists’ may not be suitable if you’re on a small or limited plan. Videos in 4K can take up several GB of storage space if not properly optimized.
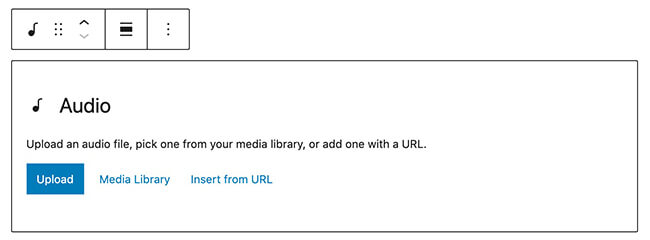
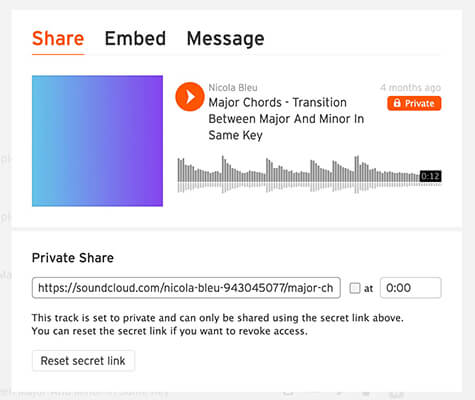
Our second option is to use a specific platform block such as YouTube, Spotify or SoundCloud (found in the Embeds section):

It’s as simple as finding the URL of the audio and pasting it into the audio block:
Lastly, we can embed our audio/video by finding the shortcode and pasting it into a shortcode block (found in the Widgets section):
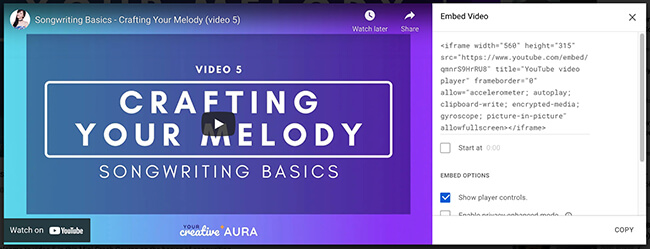
Once your audio/video has been uploaded or embedded, extra settings will appear when you click on the block. For audio these extra settings include autoplay and loop, and for video these include playback controls, autoplay and loop.
Design – buttons, columns, and spacers/separators
With Gutenberg blocks you have more control than you think over how each post looks, especially when you check out the design blocks.
The most useful blocks are buttons, columns and spacers/separators. Let’s look into how each of them works.
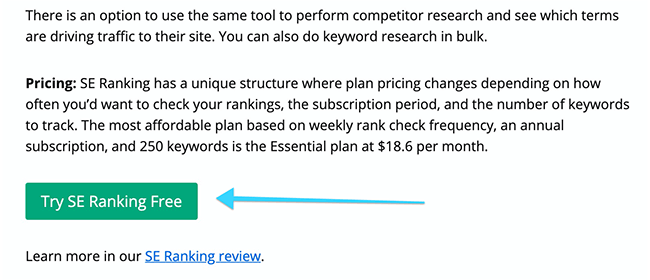
Buttons are handy for directing your readers attention to something important, rather than placing a link in the text, you’d create a button. Buttons are most commonly used for call to actions, such as subscribe or affiliate buttons.
Here’s an example of a button on Blogging Wizard using the Gutenberg button block:
To add a button, click the plus button in the WordPress visual editor and select Buttons. A blank button will appear:
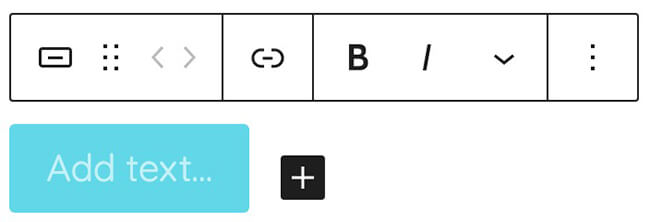
By clicking on the button, you can label it, for example “Try This Tool”, “Subscribe” etc. The floating bar gives you options to customize your button such as add a link, make it bold or italic. The main customization comes from the tab on the right which allows you to:
- Change the style of your button – fill or outline
- Edit the color of the button and text
- Edit the border radius and the width
- Link settings
- And custom css you might wish to add

If you need more than one button in the block, then simply click the plus button to add more. Also, you can change the alignment of the buttons:

Now let’s move onto columns.
If you want more diversity with how your post looks, try using the columns block.
The columns block has several layouts to choose from such as a 50/50 split and 25/75/25 split:
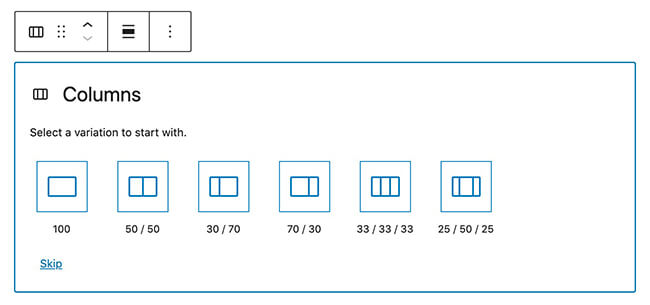
Once you select a split variation, your columns block will produce a single row split into the variation you’ve selected. Here’s an example when we select the 50/50 split:
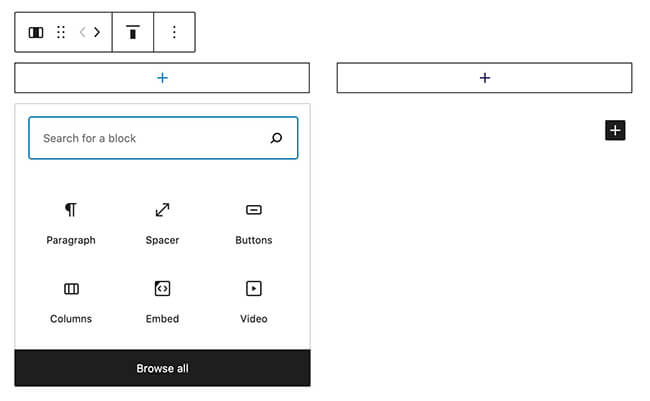
Our block has now been split into two even blocks, each which we can add a new block to.
This feature is incredibly useful if you run a review or news site as you can get creative with the layout without needing a third-party plugin.
Spacers and separators are, as the name suggests, a great way to add space and break up parts of your post.
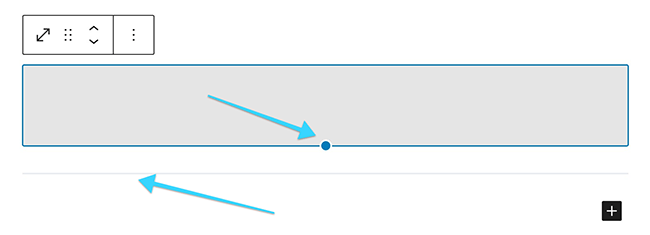
There is not much to customize with these two features as their purpose is sweet and simple. With the spacer you can drag the dot to increase its height (it will appear transparent on the frontend not grey), and if you click on the separator, you can change its style and color in the right panel.
So now we’ve been through the most common Gutenberg blocks and how to use them. What if you’ve already written your post elsewhere? How do you transfer your post into WordPress?
Adding a post in WordPress from a word processor
Not everyone wants to start writing a WordPress post from scratch. If you’re like me, we’re used to being in Microsoft Word or Google Docs merrily typing away writing content for our website.
So, in this scenario, how do we get our content into WordPress?
Simply copy and paste it.
Luckily, the WordPress visual editor is great at understanding the content that’s being put in it.
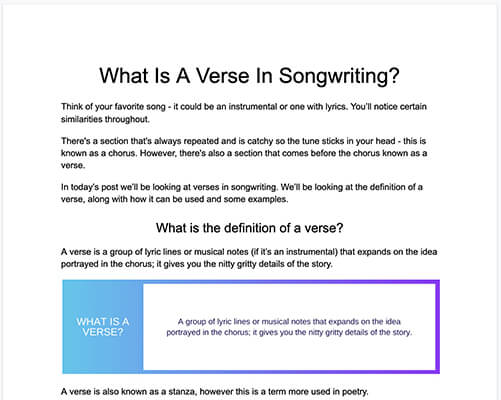
Here’s an example of a post from Google Docs and then it pasted into WordPress:
Google Docs:
WordPress:
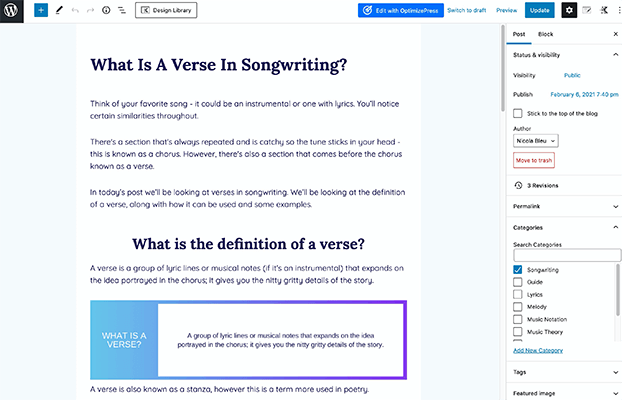
Headings, paragraphs, images and bullet points it will understand and be able to convert into blocks easily.
If you’ve put embed codes in for audio or video files, WordPress will automatically convert them into embed blocks, and embed the audio or video in your new post.
However, they are a few edits you’ll need to do.
- The heading level will be transferred but not the formatting, therefore, you’ll need to change alignment, however bold and italic formatting will stay.
- Second, depending on the image file type, the image may not be transferred, however a blank image block will be in its place instead and you’ll need to upload it. If the image is transferred, you’ll need to save it to your Media Library by clicking the save button:
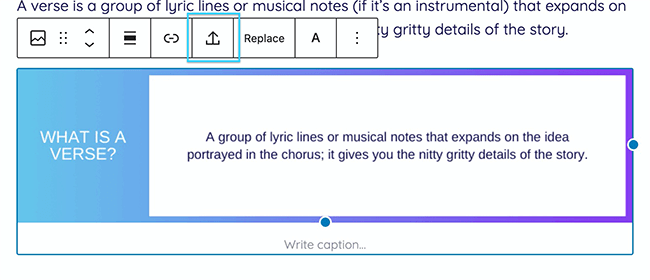
- Custom columns you create in a word processor won’t be recognized in WordPress and will be transferred as one row paragraph blocks.
Once you’ve pasted your content and formatted it as you wish, click Save draft.
9 steps to get your new post ready for publication
Using either methods to add your new post to WordPress, you’ll eventually reach the point where your post is complete.
What are the next steps before publication?
Here is an overview of the easiest way to get your post perfect before clicking the publish button.
- Set the author
- Set the permalink
- Select a category, and tags (if applicable)
- Select a featured image
- Write the excerpt (if applicable)
- Upload social media images
- SEO title and meta description
- Preview the post
- Publish or schedule the post
1. Set the author
Click on the tab below the author and select a name:
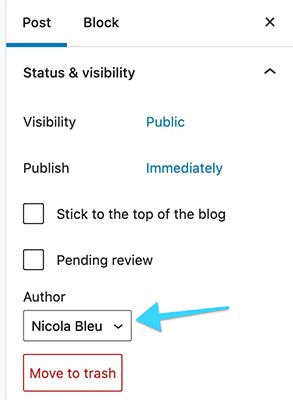
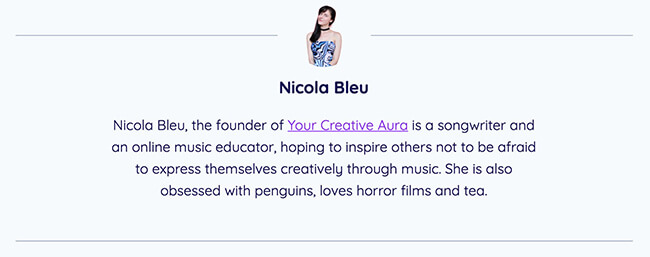
When you select a name that person’s author bio will appear on the published post. WordPress themes present the author bio in different ways, therefore, check your themes settings:
2. Set the permalink
The first time you click Save draft, WordPress will give the new post a post ID in the permalink tab. If you forget to add a title to the post, the post ID will be created with the default settings in WordPress, usually numerical:
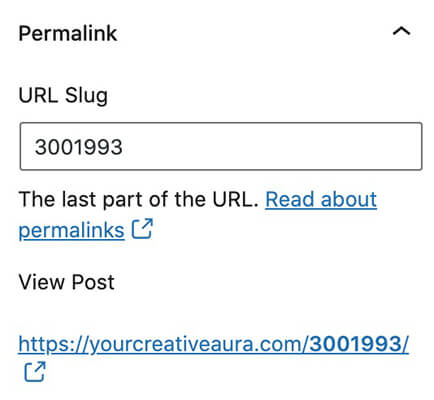
Edit the permalink with relevant keyword/s from the post.
3. Select the category, and tags (if applicable)
Categories organize your content and improve the reader’s experience when they want to learn more on a specific topic.
You can create parent and child categories: parent categories are broad in their meaning, however, child categories narrow down the topic:

Category pages are automatically created every time you add a new category to your website.
Category pages are useful to the reader as they can view all the content on a topic easily rather than browsing through the website.
If you have enabled the Tag Cloud widget on your website, you can add tags to your posts via the Tags tab.
4. Select a featured image
To display featured images on your new post go to the Featured image → Set featured image:
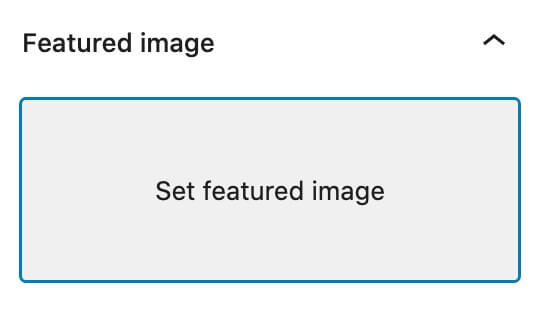
Upload your featured image, set the alt text and insert. You can edit how your featured image appears on your posts and blog page by checking your WordPress themes settings.
5. Write the excerpt (if applicable)
Not every blog shows excerpts on the blog page, however, in the post editor you can manually add an excerpt.

If you wish to use the first few sentences automatically then head over to your WordPress themes settings to select this option.
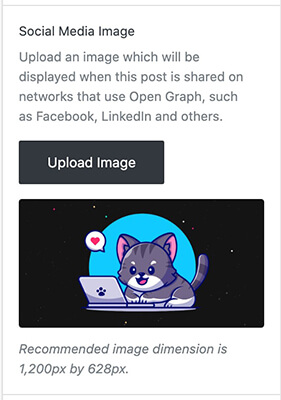
6. Upload social media images
Having social media images uploaded to your new post is useful for those readers who love your content and share it on the social media account. It’s also useful if you plan to use content promotion platforms.
7. SEO title and meta description
Understanding the purpose of SEO (search engine optimization) can be challenging to a new blogger. How to successfully implement SEO strategies into your content is an essay in itself – however, we have a fully fledged beginners guide to SEO for you to learn more.
There are several free and paid WordPress SEO plugins you can use, each with a variety of features. The most important are being able to have an SEO title and meta description:
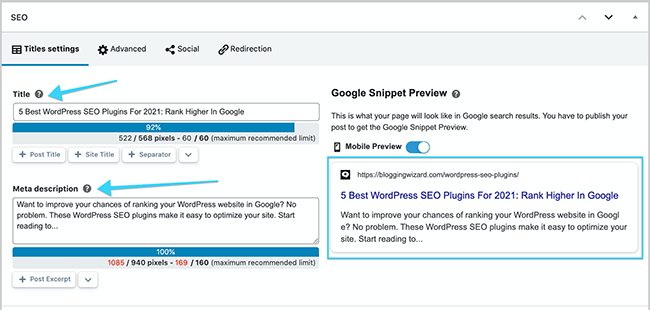
The preview feature means you can see how your post would look in search results.
8. Preview the post
Before you hit the publish button, you’ll need to preview the post and check how the post appears on the frontend of the website.
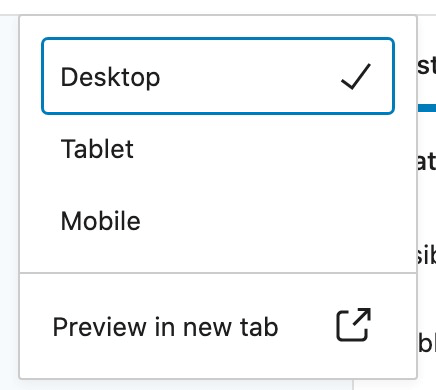
Click the preview button, and select how you’d like to review the post: desktop, tablet or mobile:
If the post appears exactly how you wish the last step is to publish.
If you have an editor who reviews the post before publication you can click pending review. If you tick pending review the post will now move from the drafts tab to a pending review tab in the posts dashboard:

9. Publish or schedule the post
Once the post is ready to be published you have two options: publish immediately or schedule a publish date.
To publish the post immediately simply click the blue publish button.
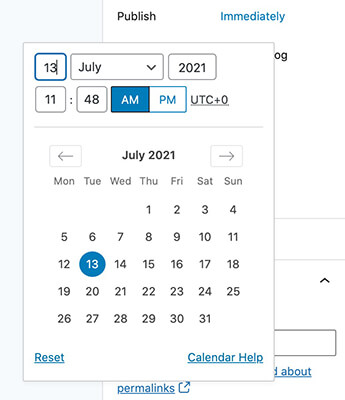
You can schedule a publish date by clicking on ‘immediately’ and a calendar will popup. Here you can select a date and time to publish your post:
Once you hit publish, your published post will now appear on your blog for your website visitors to check out. All the posts you create will be published to the front page of your blog unless you select a date from the past.
Here’s the front page of Blogging Wizard’s blog:

As default, a post will be published as public, however, you can have private posts and password protected posts.
Once you’ve published the post you can make edits and updates further down the line. Editing posts is easy, all you need to do is hover over the post on the posts dashboard and click edit:

Once you’ve made your edits to the post, click update.
Over to you
And there we have it! A fully fledged beginners guide to adding, editing and publishing a WordPress post.
Let’s summarize the process:
- Posts → Add New to add a new post
- Type in your headline
- Use the Gutenberg blocks to craft your content or paste your content in from a word processor – paragraph, headings, image, buttons and spacers are amongst the most common blocks to use
- Don’t forget to save draft throughout writing and formatting your content
- Once your content is complete get your post ready for publishing by:
- Naming the author
- Setting the permalink
- Selecting a category, and using tags if required
- Choosing a featured image, and uploading social media images
- Writing an excerpt if your theme shows this
- Complete the SEO title and the meta description
- Lastly, preview your post for last checks and then publish immediately or schedule a publication date
What’s next? You’ll need to promote your article to get the word out. Our guide to promoting your blog will help you get started.
Did you find this article helpful? We’d love for you to share it with anyone who may find it useful.
Disclosure: Our content is reader-supported. If you click on certain links we may make a commission.
