How To Add Custom Post Statuses In WordPress

Are your post drafts getting out of control?
If you have a complicated, multi-step workflow to your blog, or you manage multiple authors, saving all your posts as drafts until they publish just isn’t going to cut it.
In reality, posts drafts go through many phases before they’re published, including:
- Research
- Writing
- Editing
- Formatting
- Enhancing with multimedia
If you want to stay organized and make your workflow more efficient, especially if you’re working with a team, it would help to be able to change each post’s status depending on where it is in your process – and you can do that with custom post statuses.
In this post, we’ll go over how you can create your own custom post statuses, with a dedicated plugin.
Why create custom post statuses?
Default post statuses in WordPress include:
- Draft: Incomplete posts viewable by anyone with proper user level.
- Scheduled: Scheduled posts to be published on a future date.
- Pending: Awaiting approval from another user (editor or higher) to publish.
- Published: Live posts on your blog that are viewable by everyone.
- Private: Posts that are viewable only to WordPress users at Administrator level.
- Trash: Deleted posts sitting in the trash (you can empty the trash to delete them permanently).
- Auto-Draft: Revisions that WordPress saves automatically while you are editing.
When you’re creating a post, you can only make it a Draft, Pending, Scheduled, or Post.
For many bloggers, these statuses will be enough… but if you have a more specific or complicated workflow for your blog, you may need to customize these.
By creating custom statuses, you can more easily keep track of the state of each blog post, and what needs to be done before it’s ready to publish. Instead of keeping notes and to-do lists scattered across your email and other applications, you can see understand the status of your blog at a glance right from your WordPress dashboard.
For example, you might want to add custom statuses for:
- Pitch: Ideas for posts pitched to you by a writer, that need to be approved or edited before the post is drafted
- Needs Work: Posts that are sent back to the writer to incorporate requested edits
- Waiting for Images: Posts that are finished being written, but need images created or added to them
- Waiting for Edit: Posts that need a final review by an editor before publication
Add custom post status with the PublishPress plugin
PublishPress Planner is a free plugin that works as both an editorial calendar and a way to add custom statuses to your post drafts.
It has a lot of features that help you to organize your blog’s workflow which I’ll go into greater detail on later. But in brief, you can use it to:
- Organise and plan content publication dates
- Assign notifications to your team
- Create a standard checklist for every post
- Have editorial comments on posts
- View and organised overview of your content
- Create and assign additional user roles
And, of course, you can set and assign your own custom post statuses, including setting a colour for each status.
To set up your custom post statuses, install the plugin as usual, and navigate to the new menu option PublishPress > Settings > Statuses. Here you can create your own custom statuses.
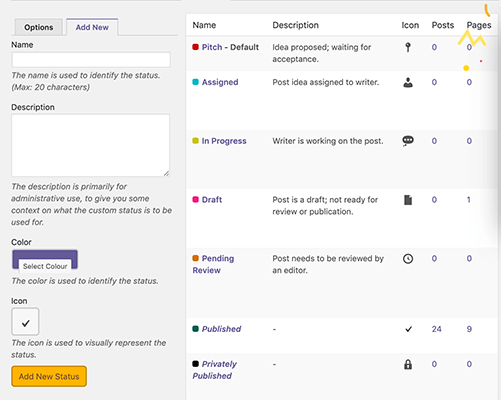
Custom statuses can be used on posts, pages and any other custom post types.
To create a status, first, give it a name. Then add a description for context. To stay more organised, choose a custom colour and icon. Then click Add New Status.
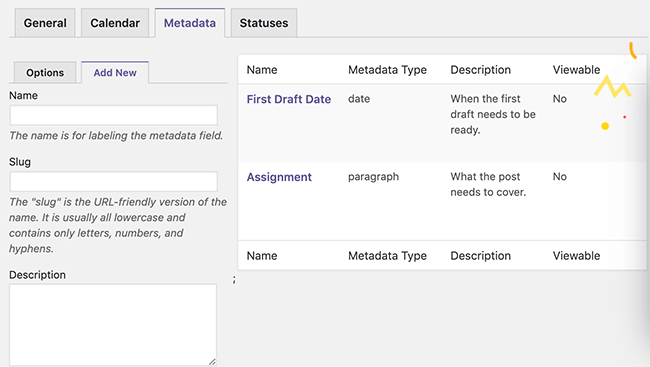
Alongside custom post statuses, PublishPress allows you to include a Metadata type. This helps you to keep track of important requirements for your content.
The default Metadata types are:
- First Draft Date: A field that shows when the first draft should be ready
- Assignment: A field to store a short explanation of the topic
- Needs Photo: A checkbox to make it clear if a photo is required
- Word Count: A number field to show the post length requirement
To add metadata types to certain post and page types, select the options tab and click the desired checkboxes.
Adding a new metadata type is a similar process to the custom statuses. Under the Add New tab, enter a name for the metadata label field. Then choose a URL-friendly slug version of the name.
Enter a clear description to communicate with your team on what this field is for. Then select from a dropdown list, the metadata type. You have a choice of:
- Checkbox
- Date
- Location
- Number
- Paragraph
- Text
- User
Finally, choose if you would like the metadata labels to be viewable on other views besides the post editor. Then click Add New Metadata Term.
Additional PublishPress features
As I mentioned earlier, PublishPress comes with far more features than simply adding custom statuses in WordPress.
PublishPress editorial calendar
The most powerful by far is the editorial calendar which allows you to easily see when your content is planned and published.
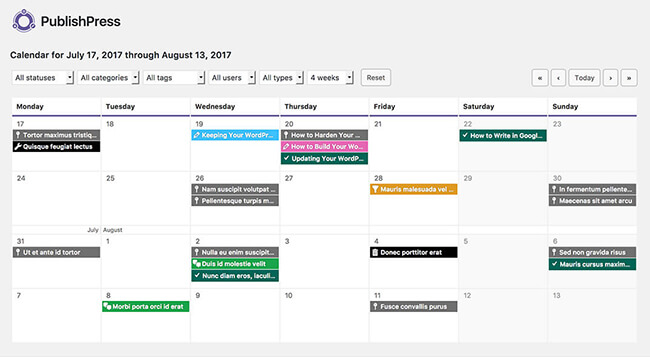
The default settings provide an overview of the content that is planned for the next six weeks. This view can be filtered by status, category, tag, user, type and time-frame. And if the content hasn’t yet been published, you’re able to drag and drop it to a new publication date on the calendar.
To create new content directly from the calendar, click any date and the following pop-up will appear.
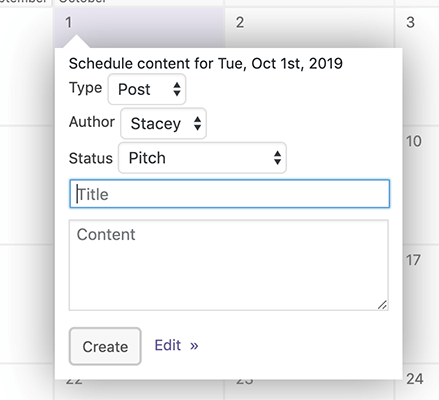
Clicking Edit will take you to the WordPress editor where you can make further editorial and styling changes.
Content notifications
The content notifications within PublishPress allow you and your team to stay up-to-date on any changes that happen to your content. Notifications can be controlled by:
- When they are sent
- Who receives them
- The details they contain
Multiple notifications can run at the same time. Plus, they can even be sent via email and Slack.
By default, there are two notifications already setup when you install PublishPress.

You can easily add many more notifications depending on the needs of your team and workflow. Click Add New to begin. You will see the following screen.
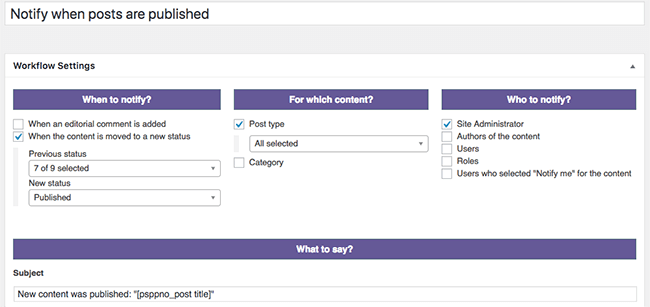
There are four options to customise your notifications including:
- When to notify
- For which content
- Who to notify
- What to say
Click Publish when you have chosen your options and your notification will be created.
Editorial comments
Providing feedback to your writers is an important part of any content workflow. PublishPress facilitates this with the Editorial Comments feature. With this feature editors and writers can have a private conversation about the work.
To add a comment, navigate to the desired article and scroll down to under the editor box.
Here you will see a button labelled “Add an Editorial Comment”. Click this button to reveal the following comment field.
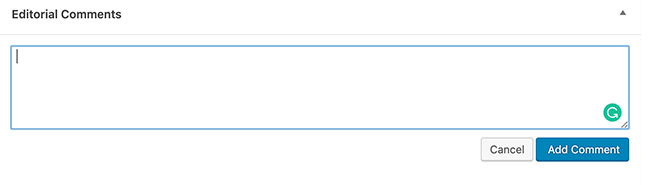
When you’ve finished writing your comments, click Add Comment.
Authors can easily reply to your comment by clicking the reply link on your comment. Replies are displayed in a nested style like the default WordPress comment system.

Premium Addons for PublishPress
PublishPress has an additional six addons to complement an already feature-packed plugin. They not only enhance the already existing features but also add further functionality for improving your workflow.
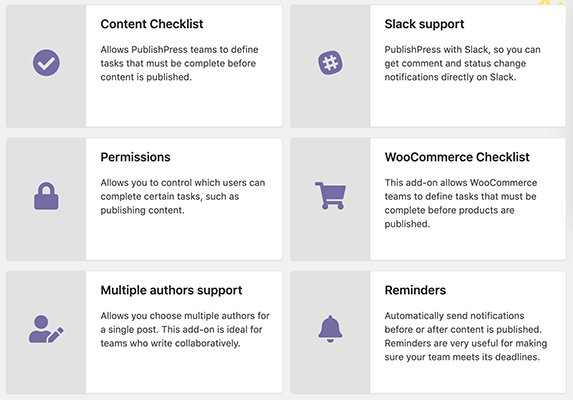
Premium add-ons include:
- Content Checklist: Allows teams to define tasks that must be completed before content publication. This is a great feature to ensure a smooth workflow.
- Slack Support: Provides comment and status change notifications directly within Slack. This is hugely important for teams working in a remote environment.
- Permissions: Lets you control which users can complete certain tasks like publishing content. This avoids accidental publication of content.
- Multiple Authors Support: Choose multiple authors for a single post which is great for collaborative teams.
- WooCommerce Checklist: Define tasks that must be completed before products are published which helps with quality control.
- Reminders: Send notifications automatically before and after content is published. These are extremely useful for ensuring your team meets their deadlines.
PublishPress Pro pricing
The price of the pro version of PublishPress starts at $75 per year for one website.
Conclusion
WordPress out of the box has good post statuses that are sufficient for most users, but the most organized bloggers need more flexibility in order to be at their most efficient. If you need custom post statuses, take a look at PublishPress.
The free version available on the WordPress.org repository has a variety of solid features that make creating custom post statuses effortless. With custom status colour coding and metadata types, every status should be easy for your team to understand.
The enhanced functionality of pro features like Slack integration and multiple authors support, goes the extra mile in ensuring your content management process runs like a well-oiled machine.
Related reading:
Disclosure: Our content is reader-supported. If you click on certain links we may make a commission.